alsatian apple tart

alsatian apple tart 5

I recently congratulated myself on having become more practical now that I’m older and then almost immediately had to call my own BS. I tried to think of one example of having taken the more practical route lately and came up blank. My tendency to go overboard nearly always wins.

alsatian apple tart 1

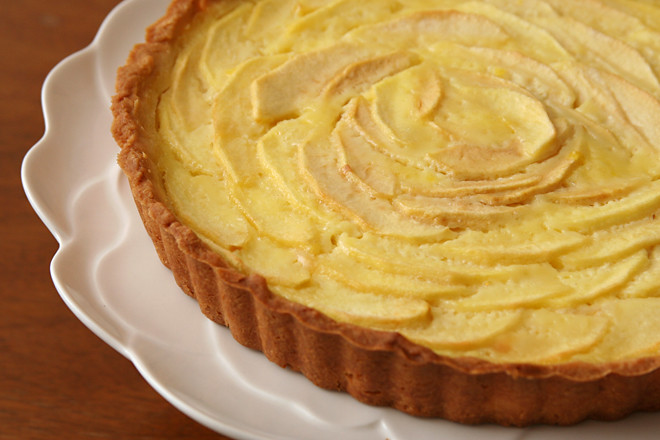
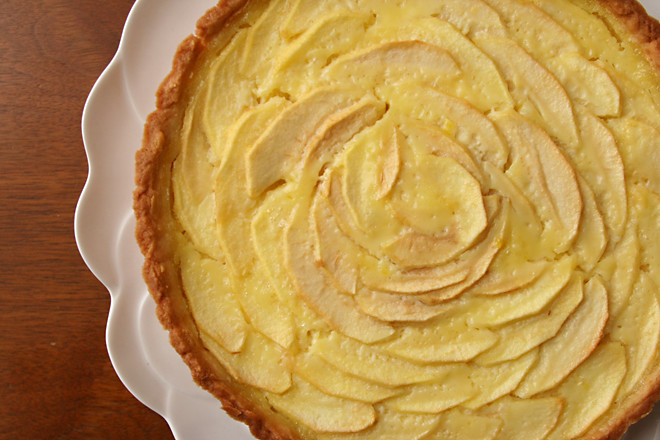
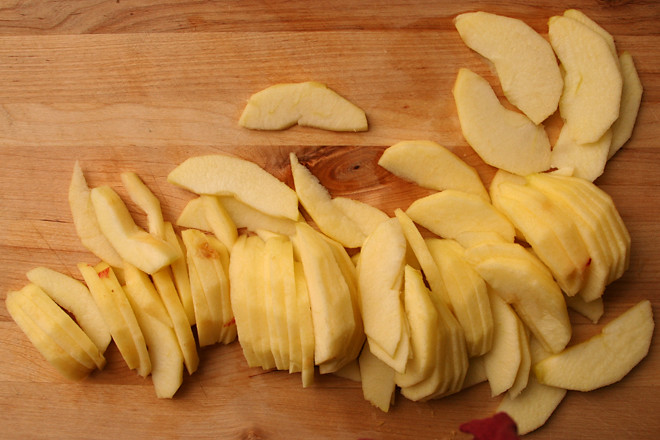
Just to prove that I can, indeed, tone things down, I kept myself from perfecting the edges of my pastry cloth that always get crinkled after washing. Also, I only rearranged the apple slices on this tart once when they didn’t look the way I’d hoped. Even then, it wasn’t perfect, and I had at least a third of the apple slices leftover, but I had to move on with my evening.

alsatian apple tart 3

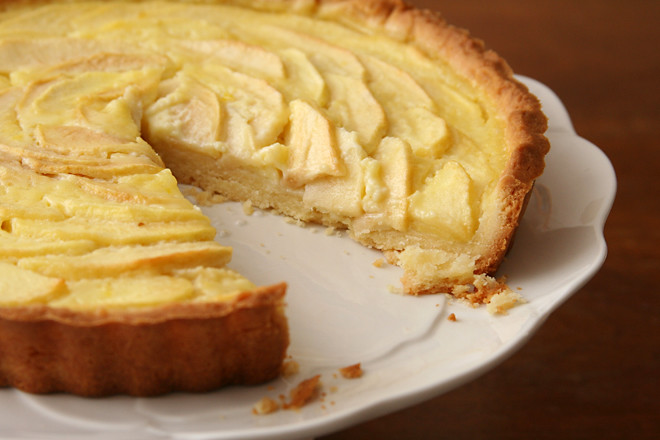
In the end, I think the tart came out very nicely. It’s pretty and it’s tasty. But. I think with the rest of the apples, it would have been even better – a little more tart to balance the sweet custard, and the apple slice design would have stood out more. I have to admit though, the difference isn’t so significant to make the time it would have taken to perfect it worthwhile. Sometimes, good enough is just fine.

alsatian apple tart 9

Jessica chose this tart for Tuesdays with Dorie, and she has the recipe posted. The recipe indicates that the tart will need to bake for 50-55 minutes, but mine was done around 35 minutes. The shorter time could be because it wasn’t as full, or it’s possible that I should have left it in the oven until the custard started to brown.

Two years ago: Alice Water’s Apple Tart
Three years ago: Basic Mashed Potatoes

alsatian apple tart 8

bittersweet brownies

bittersweet brownies 4

There have been a lot of brownies around here lately, and there hasn’t been a one that I haven’t enjoyed. But I think I’m starting to feel like Dave – without having them side by side, it’s hard to pick favorites. When it comes to something that’s defined by being a square of buttery floury chocolate, it’s the nuances that set recipes apart.

bittersweet brownies 1

This recipe, like Dorie’s classic brownies and her ginger brownies, show her preference for a squat, dense bar cookie. These brownies don’t have a bit of cake fluffiness to them, but they aren’t greasy like some so-called fudgy brownies. They’re tender, almost as if a sablé could be a brownie.

bittersweet brownies 2

In short, I like them. Really, I like any brownie with good chocolate flavor, which these certainly have. I won’t complain about making three different brownie recipes that, to me, all seemed similar, because they were similarly good.

bittersweet brownies 6

Leslie chose these for Tuesdays with Dorie, and she has the recipe posted. I followed the mixing instructions exactly, but then decided to change things up and bake these in a mini muffin pan. I baked them at 325 degrees (the temperature called for in the original recipe) for about 12 minutes.

One year ago: Cranberry Apple Galette
Two years ago: Cran-Apple Crisps
Three years ago: Rice Pudding

bittersweet brownies 5

cranberry sauce with port and dried figs

port cranberries 3

Have you ever looked at the ingredients of canned jellied cranberries? They’re exactly the same as homemade cranberry sauce: cranberries, sugar, water. The first time I made homemade cranberry sauce, I eagerly took my first bite and then…huh. It tastes exactly like the canned kind. Don’t bother making cranberry sauce from scratch if it’s because you’re expecting it to taste better than it is from the can.

port cranberries 4

But there are other reasons to make it from scratch. The first is that it’s fun. Raw cranberries are neat, pucker-inducing and hard and dry. Then when you cook them, they pop. It only takes 15 minutes and can be done up to a week in advance, so why not spend a few minutes playing with your food?

The other reason is that you can play around with flavors, personalizing the sauce. Orange is the most common addition and after doing that for several years, I was ready for more experimentation. Sweet port wine and balsamic vinegar seemed like they would complement the tart cranberries perfectly.

port cranberries 1

Even with all of the extra flavors in this – port, balsamic vinegar, figs, rosemary, black pepper, cinnamon – it didn’t taste so different from the stuff in the can. It had a warmer tone to it, and I liked the crunch of the fig seeds. But everyone would have been just fine with the canned stuff too. And that’s okay, because the few minutes I spent making this cranberry sauce were well spent just for the fun of it.

port cranberries 2

Two years ago: African Pineapple Peanut Stew
Three years ago: Pumpkin Goat Cheese Ravioli

Printer Friendly Recipe
Cranberry Sauce with Port and Dried Figs (adapted from Bon Appétit via epicurious)

At first, I served this as you see it here, but for the leftovers, I put the sauce through a food mill to separate the skins, and I much prefer the smoother version.

1½ cups ruby Port
¼ cup balsamic vinegar
¼ cup (1.75 ounces) packed brown sugar
8 dried black Mission figs, stemmed, chopped
1 6-inch-long sprig fresh rosemary
1 3-inch cinnamon stick
¼ teaspoon ground black pepper
1 12-ounce bag fresh cranberries
¾ cup (5.25 ounces) granulated sugar

Combine the port, vinegar, brown sugar, figs, rosemary, cinnamon, and pepper in a medium saucepan. Bring to a boil over medium-high heat, stirring until the sugar dissolves. Reduce the heat to low and simmer 10 minutes. Discard the rosemary and cinnamon. Mix in the cranberries and granulated sugar. Cook over medium heat until the liquid is slightly reduced and the berries burst, stirring occasionally, about 6 minutes. Transfer the sauce to a bowl; chill until cold. (Cranberry sauce can be prepared 1 week ahead. Cover and keep refrigerated.)

cauliflower with mustard-lemon butter

mustard cauliflower 3

While you don’t want to serve plain steamed vegetables on Thanksgiving, maybe not every dish needs to be drowned in cream, you know? These cauliflower have enough flavor from spicy mustard and tart lemon to stand up to the rich foods at Thanksgiving, but they’re also light enough to serve with any weeknight chicken dish.

mustard cauliflower 2

It’s almost too simple to provide a recipe for, as this is nothing more than roasted cauliflower topped with mustardy, lemony butter. Fortunately, that means it’s easy. Whether you’re making this for a busy holiday or on a busy weeknight, the cauliflower can be chopped in advance and the flavorings can be mixed. That means it takes even less time to make than green bean casserole – but it tastes a lot better and has a fraction of the calories.

mustard cauliflower 4

Two years ago: Pumpkin Biscotti
Three years ago: Bourbon Pumpkin Cheesecake

Printer Friendly Recipe
Cauliflower with Mustard-Lemon Butter (adapted from Bon Appétit via epicurious)

6 servings

If you aren’t a fan of cauliflower, I don’t see any reason that this method wouldn’t work just as well with broccoli or Brussels sprouts.

1 small head of cauliflower (about 1¾ pounds), cut into 1-inch florets
1 teaspoon kosher salt
2 tablespoons butter
2 tablespoons fresh lemon juice
4 teaspoons Dijon mustard
1 teaspoon finely grated lemon peel
1 tablespoon chopped fresh parsley

1. Heat the oven to 400 degrees. Arrange the cauliflower in a single layer on the prepared baking sheet; sprinkle with salt. Roast until the cauliflower is slightly softened, about 15 minutes.

2. Meanwhile, melt the butter in a small saucepan over medium heat. Whisk in the lemon juice, mustard, and lemon peel.

3. Scrape the mustard-lemon butter evenly over the cauliflower; toss to evenly coat the cauliflower and roast until crisp-tender, about 10 minutes longer. Transfer the cauliflower to a serving dish; sprinkle with parsley and serve warm.

mustard cauliflower 5

cheddar puffs with green onions

cheddar puffs 5

Are you afraid of yeast? Or at least resistant to adding complicated rising schedules to your already-stressful Thanksgiving to-do list? Try these puffs instead of yeast bread. They take about 10 minutes to put together, and you can shape the dough and freeze it until the big day. Then you just pop them in the oven while the turkey rests.

cheddar puffs 2

I admit that they don’t make the best gravy mop, but they have such great flavor on their own that you don’t really want to bury it anyway – even with this gravy. They resemble cream puffs, except instead of a sweet creamy filling, they’re full of onions bits and shredded cheese. They taste perfect with the turkey, and they fit perfectly into the turkey roasting schedule.

cheddar puffs 3

Two years ago: Croissants (Martha Stewart)
Three years ago: Asian Peanut Dip

Printer Friendly Recipe
Cheddar Puffs with Green Onions (adapted from Bon Appétit via epicurious)

Makes 24 puffs

½ cup water
2 tablespoon butter, cut into 4 pieces
¼ teaspoon salt
½ cup + 1 tablespoon (2.7 ounces) all-purpose flour
2 large eggs
3 ounces grated extra-sharp cheddar cheese
¼ cup minced green onions

1. Heat the oven to 375 degrees. Line 2 baking sheets with parchment paper.

2. Bring the water, butter, and salt to a boil in a heavy medium saucepan. Remove from the heat; mix in the flour. Stir over medium heat until the mixture becomes slightly shiny and pulls away from sides of the pan, about 3 minutes; transfer to a stand mixer fitted with the paddle attachment. Add the eggs one at a time, mixing well after each addition to form a sticky dough. Mix in the cheese and green onions.

3. Divide the dough into 24 equal portions; drop onto the baking sheet one inch apart. (Can be made ahead. Wrap in plastic, then foil. Refrigerate up to 2 days or freeze up to 2 weeks.)

3. Bake the cheese puffs until golden, about 30 minutes if at room temperature and 35 minutes if chilled or frozen. Serve immediately.

cheddar puffs 4

yukon gold and sweet potato gratin

sweet potato gratin 5

This is not the potato dish I made for my big Thanksgiving meal last year. Last year, I made a potato and wild mushroom gratin, which followed my goal of including more vegetables in the meal. This gratin doesn’t fit that theme.

sweet potato gratin 2

Here’s the thing though: I cannot remember anything about that dish. I don’t remember it being bad, at least, but I don’t remember how good it was. Maybe there were too many mushrooms? I don’t know.

sweet potato gratin 3

I only made this Yukon gold and sweet potato gratin last week, but even if it had been last year, I know I would remember it. Potatoes baked in herby cream sauce and topped with nutty cheese are usually a hit, but adding sweet potatoes to the mixture makes it even better. I can’t guarantee the same thing for adding wild mushrooms to potato gratin.

sweet potato gratin 4

One year ago: Green Chile Mayonnaise
Two years ago: Wheat Berries with Caramelized Onions, Feta, and Lentils
Three years ago: Bacon-Wrapped Pork Tenderloin Medallions

Printer Friendly Recipe
Yukon Gold and Sweet Potato Gratin (adapted from Bon Appétit via epicurious)

8 servings

1½ pounds medium Yukon Gold potatoes, peeled, sliced ⅛-inch thick
1½ pounds medium red-skinned sweet potatoes (yams), peeled, sliced ⅛-inch thick
1 cup heavy cream
1 cup whole milk
2 tablespoons butter
2 garlic cloves, minced
2 tablespoons minced fresh thyme
1½ teaspoons salt
¾ teaspoon black pepper
1¼ cups (5 ounces) coarsely grated Gruyére cheese

2. Heat the oven to 400 degrees. In a small saucepan, combine the cream, milk, butter, and garlic; bring to simmer. Remove from the heat.

2. Butter a 13x9x2-inch glass baking dish. Evenly spread half of the potatoes on the bottom of the dish. Top with half of the thyme, salt, pepper, and cheese. Repeat the layering with the remaining potatoes, salt, pepper, and cheese. Pour the cream mixture over the gratin, pressing lightly to submerge the potato mixture as much as possible. (Can be made 6 hours ahead. Cover with plastic wrap and chill. Remove plastic wrap before baking.)

3. Cover the gratin tightly with foil. Bake 30 minutes. Uncover and continue baking until the top of the gratin is golden and most of the liquid is absorbed, about 25 minutes longer. Let stand 10 minutes before serving.

sweet potato gratin 6

roasted root vegetable stuffing

root vegetable stuffing 6

When I was creating my Thanksgiving menu last year, it occurred to me that most of the traditional Thanksgiving courses are based on carbs – stuffing, potatoes, rolls. The only traditional non-carb sides are the green bean casserole that nobody likes and the sugar-laden cranberries. I have nothing against carbs, and I know all about splurging for a holiday, but I actually like vegetables. Plus, if you include lower calorie food in the menu, you can eat more before filling up!

root vegetable stuffing 1

I would go so far as to almost call this healthy, although it depends on the cornbread you use. It’s mostly vegetables – vegetables whose natural sugars are intensified through roasting. The sweet earthy root vegetables meld perfectly with similarly flavored cornbread.

root vegetable stuffing 2

Beyond the parsnips and rutabaga, it’s a typical dressing recipe with eggs and broth binding the ingredients together before the mixture is baked until it’s crisp on top (but maybe not dry and burned like mine). The result is a dressing that’s almost too good to be topped with white wine gravy.

root vegetable stuffing 4

Two years ago: Glazed Lemon Cookies
Three years ago: Wheatmeal Shortbread Cookies

Printer Friendly Recipe
Cornbread Dressing with Roasted Root Vegetables (adapted from Bon Appétit via epicurious)

Serves 6

6 ounces shallots, peeled, halved if small, quartered if large
8 ounces carrots, sliced ¼-inch thick on the diagonal
8 ounces parsnips, sliced ¼-inch thick on diagonal
8 ounces rutabaga, cut into ½-inch cubes
salt and pepper
olive oil
4 large garlic cloves, unpeeled
1 tablespoon fresh thyme
1 tablespoon chopped fresh rosemary
2 teaspoons minced fresh sage
2 cups ½-inch cubes of cornbread
2 large eggs, lightly beaten
2 tablespoons unsalted butter, melted
1 cup low-salt chicken broth (or Golden Turkey Stock)

1. Preheat the oven to 425 degrees. Spread the shallots, carrots, parsnips, and rutabaga in a single layer on a rimmed baking sheet. Season with a generous sprinkling of salt and pepper and drizzle with just enough olive oil to coat. Roast for about 45 minutes, stirring every 15 minutes, until the vegetables are soft and browned around the edges. Add the garlic during last 15 minutes. Set the roasted garlic aside; transfer the other vegetables to a large bowl.

2. Spread the cornbread cubes over the now-empty baking sheet. Bake until dry, 10-15 minutes, stirring about halfway through the cooking time.

3. Spray a baking dish with nonstick spray. Mince the garlic; add it to the vegetables along with the herbs and cornbread cubes. In a medium bowl, whisk the eggs, then whisk in the broth and butter; pour the egg mixture over the vegetable mixture and gently fold to combine.

4. Transfer the mixture to the prepared baking dish. Cover the pan with foil; bake until heated through, about 30 minutes. Uncover and bake until browned and crisp, about 15 minutes longer.

root vegetable stuffing 5

butternut squash pie

squash pie 7

The winter squashes are a multifaceted group. Pumpkin is obviously perfect with sweet flavors and can be used in custards, pies, cakes, quick breads, cookiesthe whole dessert (or breakfast!) spectrum. Pumpkin does take well to savory dishes, but it’s more common that you’ll see butternut squash used in dinner instead – despite their very similar flavor.

squash pie 3

Furthermore, pumpkin in desserts is nearly always pureed. Squash in dinner is often diced, sometimes pureed. This pie, with its diced butternut squash, did not follow the rules.

squash pie 4

My brain had some trouble deciding if this was dessert or dinner, is what I’m saying. The pears and raisins were obviously sweet, but the big chunks of squash had a strong earthy tone. I think with more sugar and smaller chunks of squash, they would blend into the other pie ingredients, and the whole thing would seem more dessert-like. It isn’t bad as it is, but, perhaps, a little confusing.

squash pie 9

Valerie chose this for Tuesdays with Dorie, and she has the recipe posted. Instead of steaming the squash, I roasted all of the filling ingredients except the orange juice in the oven until the squash was softened, mostly because my oven was already on but also to potentially get some delicious caramelization.  Because roasting drove off some liquid, I didn’t feel I needed to add the breadcrumbs to the filling.

Two years ago: Buffalo Chicken Pizza
Three years ago: Gallitos (Costa Rican Breakfast Tacos)

squash pie 6

brown sugar honey madeleines

brown sugar honey madeleines 4

My poor madeleine pan doesn’t get a lot of use. I love it; I got it for Christmas years ago, and seeing it in the cabinet has always made me happy. But I seldom bake with it.

brown sugar honey madeleines 1

There’s no good reason for this, because I love madeleines. They’re miniature handheld cakes. The batter is easy to mix up. They look fancy with no extra effort on my part. There are endless variations to experiment with. I think I just convinced myself to like madeleines more than cupcakes.

brown sugar honey madeleines 2

It’s possible that it’s just this recipe I love so much, with its brown sugar caramel notes. I wouldn’t know, since my only experience with traditional madeleines was years ago and a very qualified success at best. Clearly I need to try that recipe for madeleines again – and many more.

brown sugar honey madeleines 3

Di chose this recipe for Tuesdays with Dorie, and she has it posted. It’s originally designed for a mini madeleine pan, but considering how rarely I use my regular madeleine pan, I think a mini version is the last thing I need. I just added a couple minutes to the baking time recommended for minis. I had a difficult time prying the cakes out of the pan, even though it’s nonstick and I sprayed it with cooking spray. Next time I’ll give it a more thorough spritz of floury baking spray.

One year ago: Cranberry Shortbread Cake
Two years ago: Chocolate Caramel Chestnut Cake
Three years ago: Kugelhopf

brown sugar honey madeleines 5

white wine gravy

white wine gravy 8

Here’s why this gravy is so good:

First, homemade turkey stock. I know, I go overboard, and while you aren’t wrong, keep in mind that this is not a difficult step. You throw turkey wings – they’re not expensive – in the oven, caramelize vegetables in a stockpot, and then mix the two with water and leave it alone for a few hours while it simmers away. Oh, and deglaze the roasting pan the turkey wings were in. That’s where the good stuff is.

white wine gravy 1

Second, a medium-dark roux. You aren’t just cooking the raw flavor out of the flour here, you want the flour itself to contribute a nutty flavor. It loses some of its thickening power when you do this, but you didn’t want gloppy gravy anyway, did you?

white wine gravy 2

Third, wine. You might be doing this already, but if not, what the heck? Deglaze that roasting pan after your turkey roasts with wine. If you want flavor, and why wouldn’t you, water isn’t enough.

white wine gravy 3

The first time I made gravy like this, I poured it over everything on the plate, and that’s the thing about gravy – it affects the turkey, the stuffing, and the potatoes. That’s half the Thanksgiving plate, which means that gravy shouldn’t be an afterthought. This gravy was so good I ate the leftovers with a spoon. The method isn’t so different from any other gravy, so why not follow these simple tricks for such a payoff?

white wine gravy 6

One year ago: Prosciutto-Wrapped Neufchatel-Stuffed Jalapenos
Two years ago: Pumpkin Scones
Three years ago: Gratin Dauphinois (Potatoes au Gratin)

Printer Friendly Recipe
White Wine Gravy (adapted from Emeril and Cook’s Illustrated)

4 cups Golden Turkey Stock (recipe below)
4 tablespoons unsalted butter
¼ cup all-purpose flour
1 cup dry white wine
Salt and freshly ground black pepper

1. In a small saucepan, bring the turkey broth to a simmer. Reduce the heat to low; cover to keep warm.

2. In a large heavy saucepan, melt the butter over medium-high heat. Stir in the flour and cook, whisking constantly, until the flour just starts to smell nutty and become caramel-colored, 6-8 minutes. Add the broth and bring to a simmer, whisking often. Turn off the heat and cover.

3. After the turkey has roasted, strain the pan juices through a fine-mesh strainer into a glass-measuring cup; skim or pour off the fat from the strained liquid. Discard the solids in the strainer.

4. Place the roasting pan on 2 stovetop burners over medium heat; add the wine and defatted pan juices to the pan, bring to a simmer, and scrape to loosen any brown bits from the bottom of the pan.

5. Add the liquids from the deglazed roasting pan to the broth mixture. Bring to a simmer over medium-high heat, then reduce the heat to low and simmer for 10 minutes, whisking occasionally. Adjust the seasonings with salt and pepper if necessary.

white wine gravy 4

Golden Turkey Stock (from Bon Appétit via epicurious)

Makes about 7 cups

If you’re roasting a salted or brined turkey, don’t add salt to the broth, because the gravy might end up too salty.

4½ pounds turkey wings, cut in half
1 large onion, chopped coarse
1 large carrot, chopped coarse
1 large celery stalk, chopped coarse
6 fresh Italian parsley sprigs
1 bay leaf
½ teaspoon dried thyme
¼ teaspoon whole black peppercorns

1. Heat the oven to 400 degrees. Arrange the turkey wings in a large roasting pan; roast until deep brown, turning once, about 2 hours total.

2. Transfer the wings to a large bowl. Spoon about 3 tablespoons of the turkey fat from the roasting pan into a large pot (reserve roasting pan). Add the onion, carrot, and celery to the pot. Sauté over medium-high heat until the vegetables are golden, about 20 minutes.

3. Meanwhile, add 2 cups of water to the roasting pan; place the pan over 2 burners and bring to a boil, scraping up the browned bits. Add the liquid from the roasting pan to the pot with the sautéed vegetables. Add the turkey wings, herbs, and enough cold water to cover the wings by 1 inch.

4. Bring the water to a boil. Reduce the heat to medium-low; simmer uncovered until the stock is very flavorful and reduced to 7½ to 8 cups, about 2½ hours. Strain the stock into a large bowl. Cool 1 hour, then refrigerate until cold, about 3 hours. (Can be made 3 days ahead. Cover and keep chilled. Can also be made and frozen 2 weeks ahead.) Spoon off the fat from the surface before using.

white wine gravy 7