grilled pita

pita 4

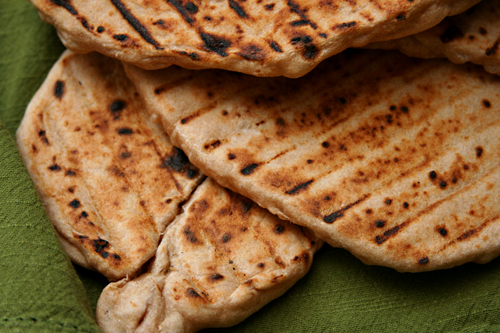
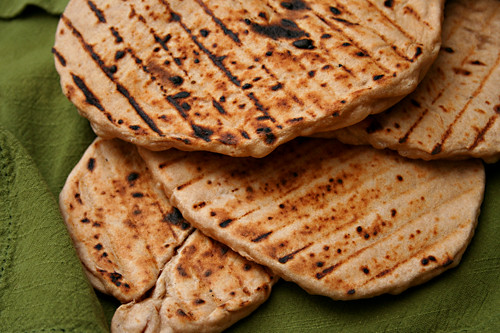
It’s news to no one that homemade pita is a hundred times better than storebought pita. But it might be news to some that grilled homemade pita is a hundred times better than baked homemade pita. True story.

pita 7

Pita dough and pizza dough are so similar that I keep batches in the freezer (actually lately I’ve been using Tartine’s country bread dough) and use them interchangeably. Both are rounds of dough that are stretched out thin, and when cooked, are expected to be spotty browned but still tender. So if grilled pizza is so popular lately, why not grilled pita?

pita 6

Grilling pita is particularly convenient for me because all of my favorite pita fillings are grilled. So once the chicken comes off the grill and is resting, I plop a round of dough on the hot coals, wait a minute until it bubbles and browns, then flip it. Your pita breads likely won’t be perfectly round, because transferring sticky stretchy dough to hot hot coals isn’t a trivial process. But what they might lack in symmetry, they make up for in grill lines – not to mention crisp edges, soft middles, and that touch of smoke that only the grill can provide.

pita 1

One year ago: Baked French Toast
Two years ago: Pasta with No-Cook Tomato Sauce and Fresh Mozzarella
Three years ago: Blackberry Swirl Ice Cream

Printer Friendly Recipe
Grilled Pocketless Pitas

12 pitas

2½ pounds pizza dough, fully risen
nonstick spray or olive oil

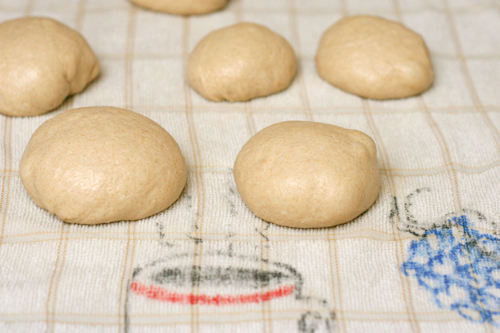
1. Working on a damp towel, cut the dough into 12 pieces. Shape each into a ball by gently pulling the edges toward one side and pinching the seam to seal it. Roll the ball of dough on the towel to smooth and even the shape. Let the dough rest for 15-30 minutes. Meanwhile, heat the grill to medium-high heat.

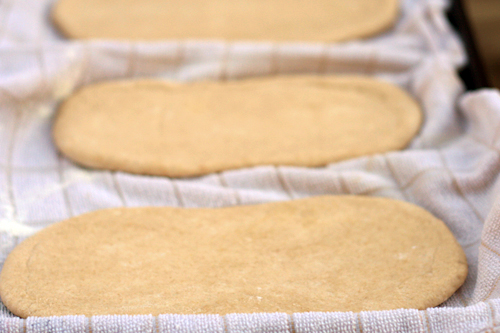
2. Pick up one ball of dough by an edge; stretch and pull it into a 5- to 6-inch round. If it becomes too elastic to shape, set it aside, loosely covered, for 5 minutes before trying again. Spray the tops of the shaped rounds with nonstick spray or brush with olive oil.

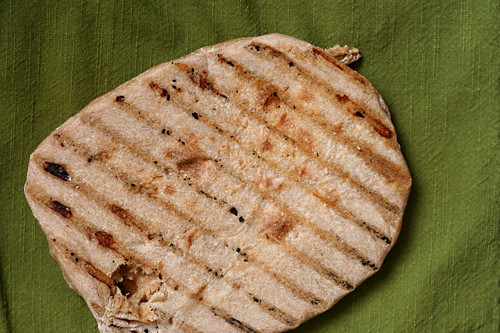
3. Carefully lay the pita rounds, oiled side down, directly on the grill. When the pita bubbles and the bottom is spottily browned, after 1-2 minutes, use tongs to flip the pita. Continue cooking until the second side begins to brown, about 1 minutes. Serve immediately or wrap in a kitchen towel for up to 30 minutes.

pita 3

golden brioche loaves

brioche 6

Saturday I had a cooking extravaganza. I chose five fun recipes and spaced out the eating and the cooking over the course of the evening. I spent hours in the kitchen, and I had a great time.

brioche 3

I spent most of Sunday in the kitchen as well, but it wasn’t planned, so it wasn’t as fun. Plus, I made bread dough for three types of bread, but one (completely delicious) grilled pita was the only bread I ate all day. It’s a good reminder that the best part of cooking is eating.

brioche 4

Of course it’s worth it in the end. I was thankful for the Sunday’s batch of bagels at work Monday morning, and I was grateful for the brioche on Tuesday. My coworkers were particularly grateful for the brioche. Who can say no to bread that’s this flakey, and most importantly, buttery?

brioche 9

Margie chose brioche for Tuesdays with Dorie, and she has the recipe posted. Despite Dorie’s recommendation that the full recipe (enough for two loaves) of dough be made at once, I was able to make only half the recipe with no problems. For tiny brioches baked in a mini muffin pan, I divided the half recipe into 36 portions and baked them at 450 degrees for 12 minutes.

One year ago: Crunchy and Custardy Peach Tart
Two years ago: Applesauce Spice Bars
Three years ago: Chocolate-Banded Ice Cream Torte

brioche 7

sweet corn hash

sweet corn hash 5

I went to the local farmer’s market for the first time in over a year this morning and was sadly reminded why I hadn’t gone to the local farmer’s market for over a year. Apparently a farmer to the locals is someone who makes little crafts, not someone who grows stuff. The only vegetable for sale was zucchini, and we already have plenty of that.

sweet corn hash 2

So I’ve been buying my summer corn at the grocery store, which just seems wrong, doesn’t it? Ears of corn should be bought out of the back of a truck on the side of the road. That doesn’t seem to be an option here, but it would be a shame to go the whole summer without eating corn just because I can’t find a local vendor selling it.

sweet corn hash 1

It doesn’t take much more than the word “hash” to get me excited about a recipe. It’s hard to go wrong with a dish based on browned potatoes topped with eggs. Buying corn at the grocery store instead of the farmers market might not feel as satisfying, but it works just fine, especially once the corn is mixed with lightly caramelized onions, browned potatoes, and crisp bacon.

sweet corn hash 7

One year ago: Whole Wheat Challah
Two years ago: Potato Tomato Tart
Three years ago: Fruit Bruschetta

Printer Friendly Recipe
Sweet Corn Hash (adapted from Joy the Baker)

Serves 4

Joy roasted her potatoes, but I thought it would be easier to brown them in the skillet with the rest of the ingredients. She also adds butter at the end to increase the richness of the dish, but I figured a couple slices of bacon would have the same affect, while contributing great flavor of its own.

We also stirred in some chopped roasted green chile, because ‘tis the season.

4 slices bacon, chopped
4 medium red potatoes, cubed
1 onion, chopped
4 ears corn, kernels removed
¼ cup parsley, minced
salt and ground black pepper
4 eggs

1. In a large nonstick skillet over medium heat, cook the bacon until almost crisp. While the bacon cooks, put the potatoes in a medium microwave-safe bowl; spoon a couple teaspoons of rendered bacon fat from the skillet into the bowl; stir. Cover the potatoes loosely and microwave on high for 3 minutes, stirring twice.

2. Add the onions and potatoes to the skillet with the bacon; cook, stirring occasionally, until browned, about 8 minutes. Stir in the corn and most of the parsley. Lower the heat to medium-low. Using the back of a spoon, create 4 wells in the hash. Break one egg into each well; season with salt and pepper. Cover the pan and cook, without stirring, until the white is set, about 8 minutes. Garnish with the remaining parsley; serve immediately.

sweet corn hash 6

chocolate friands

friands 12

These are hard to describe. They resemble brownies, but are so far on the fudgy end of the brownie spectrum that they’re almost candy. They’re served in candy cups if you can find them, but the alternative option is mini muffin cups, which makes the friands resemble cake. These don’t fall neatly into any category.

friands 1

They’re made similarly to brownies too, with a few interesting variations. One is that, instead of melting the butter and chocolate in a bowl set over a pot of simmering water like most brownie recipes, hot melted butter was poured over chopped chocolate, and the residual heat of the butter melted the chocolate. It provides the same effect as a double boiler, but it’s simpler.

friands 5

The other difference I noted is that the eggs are stirred in last. Usually flour is the last thing added to batters and doughs, because the more flour is worked (stirred or kneaded), the chewier and less tender the resultant baked good becomes. Plus, eggs are mostly water and they don’t easily mix into the fatty mixture of butter and chocolate, so seeing that worrisome “do not overmix” warning right after the eggs are added at the end was extra stressful.

friands 6

And lastly, and I believe most importantly, there is no leavener – no baking powder or soda, no whipped eggs. This is what makes the confections so rich that they’re almost more candy than brownie. And that is what makes them so hard to figure out.

friands 10

Apparently they’re hard to pronounce too, as I had multiple coworkers come by my office to thank me for the ‘chocolate friends’ that I brought in to share. It’s an appropriate name for a treat I chose to make for Josie’s virtual baby shower. Josie is in the no-dessert-is-too-rich club, like me, so I definitely consider her a chocolate friend. Congratulations Josie! I wish you and your family the best.

friands 11

One year ago: Banana Peanut Butter Muffins
Two years ago: Vegetable Curry
Three years ago: Country Egg Scramble

Printer Friendly Recipe
Chocolate Friands (from Tartine)

Batter:
6 ounces bittersweet chocolate, coarsely chopped
16 tablespoons (1 cup) unsalted butter
1½ cups + 1 tablespoon (11 ounces) sugar
¾ cups (3.75 ounces) all-purpose flour
2 tablespoons cornstarch
¼ teaspoon salt
4 large eggs

Ganache:
4 ounces bittersweet chocolate, finely chopped
⅔ cup heavy cream

1. Preheat the oven to 350 degrees. Line up 48 1½-by-½ inch candy cups on 2 baking sheets, or butter and flour 24 mini-muffin-tin wells, knocking out the excess flour.

2. To make the batter, place the chocolate in a large mixing bowl. In a small saucepan, melt the butter over medium heat until very hot. Pour the butter over the chocolate and whisk or stir until smooth. In a medium mixing bowl, combine the sugar, flour, cornstarch, and salt and mix well. Add the flour mixture to the chocolate mixture in 3 batches, whisking well after each addition. Add 2 of the eggs and whisk until combined, and then add the remaining 2 eggs and whisk just until incorporated. Be careful not to overmix the batter.

3. Transfer the batter to a liquid measuring cup for pouring, and fill the cups three-fourths full. Bake until the cakes just start to crack on top, 12 to 15 minutes. Let cool for 10 minutes on a wire rack, and then unmold them if you have baked them in the muffin tins and let cool completely. If you have baked them in the paper cups, just let them cool in the cups.

3. To make the ganache, place the chocolate in a small heatproof bowl. Bring the cream to just under a boil in a small saucepan. Pour the cream over the chocolate and let sit for a minute or two. Stir gently with a rubber spatula until the chocolate is melted and smooth.

4. Make sure the friands are cool before dipping them into the ganache. Holding each friand by its sides, dip the top into the ganache and then shake gently to let the excess run off the side. Return the friand to the rack and let the ganache set up in a cool place for about 1 hour.

5. Don’t put the friands in the refrigerator to set up if your kitchen is hot because condensation will form on the tops when you take them out, ruining the smooth look of the ganache. The only way to avoid the condensation is to place them in an airtight container before putting them in the refrigerator adn then to leave them in the refrigerator and then leave them in the container when you remove them from the refrigerator until they come to room temperature, or to serve them right away.

6. Serve the friands within a day of making, or store them in an airtight container in the refrigerator for up to 5 days.

friands 8

tropical crumble

tropical crumble 4

My family’s beach vacations in Mexico always include swimming, beer drinking, wave watching, margarita drinking, cooking, and wine drinking. And so far, they’ve always included hovering neaby while someone cuts cubes of perfectly ripe mangoes, which are snatched up as soon as the knife is out of the way. There are few things in life better than eating mangoes on the beach in Mexico while on vacation.

tropical crumble 1

Baking a banana-mango crumble the day after vacation is less fun. For one thing, after a week of fried fish tacos, I was ready for some detox. For another thing, I do not feel that chunks of banana are meant to be baked.

tropical crumble 2

To compromise, I made the recipe with many changes. I cut the butter in the fruit filling by half, then cooked only the banana, over medium-high heat to brown it in the sugar mixture, bananas foster style. I reduced the butter in the crumble topping to 6 tablespoons and doubled the flour. Alongside a scoop of lowfat Greek yogurt, this dessert wasn’t half-bad, and it was only half-bad for me too.

tropical crumble 3

Gaye chose this for Tuesdays with Dorie, and she has the recipe posted. However, other members of TWD had a number of problems with it. With the changes I noted above, mine came out well.

One year ago: Oatmeal Breakfast Bread
Two years ago: Brownie Buttons
Three years ago: Granola Grabbers

tropical crumble 5

spice-rubbed picnic chicken

picnic chicken 7

Family vacations require a careful balance of time together and time apart. Originally, my family found that cruises worked well – everyone does their own thing during the day and we meet up for dinner. The last few years, we’ve started renting a house on the beach for a week. We still make sure to have dinner together every evening, but now we have to cook it ourselves.

picnic chicken 1

Despite my love for spending time in the kitchen, I have a greater love of sitting on the beach drinking margaritas. No one in my family is willing to cook dinner for the group every night. Instead, we take turns. On one trip, I made pasta with tomatoes and fresh mozzarella, salad, and crostini topped with white beans and with tuna. Last year, everyone built and then grilled their own pizza. Fajitas and chicken gyros are also crowd-pleasers.

picnic chicken 2

Between shredding cheese, preparing toppings, and stretching out ten rounds of dough, last year’s pizza extravaganza was ambitious. This year, I wanted something easier. This baked chicken is perfect because it’s actually meant to be cooked in advance, which means I can do it whenever I need a quick break from the sun.

picnic chicken 4

I mixed up the spices at home, so all I need to do on vacation is rub them on the raw chicken the day before it’s my turn to cook and store the meat in the refrigerator overnight. The chicken soaks up spice and salt, which also helps it retain moisture as it bakes. It ends up tasting like barbecued chicken that’s been smoking all day on the grill, but it’s completely undemanding. Undemanding is what vacation is all about.

picnic chicken 5

One year ago: Green Goddess Salad
Two years ago: Lemon Meringue Cake
Three years ago: Tuscan-Style Couscous Salad

Printer Friendly Recipe
Spice-Rubbed Picnic Chicken (from Cooks Illustrated)

Serves 8

If you have space to store 5 pounds of chicken pieces in your refrigerator all lined up on a baking sheet, you are lucky to be so rich in fridge space. I just pile the spiced chicken in a bowl with a cover.

As you can see from the pictures, I did not cut the breasts into smaller pieces. Obviously it took longer to cook, but it worked fine.

5 pounds bone-in, skin-on chicken pieces (breasts, thighs, drumsticks, or a mix with breasts cut into 3 pieces or halved if small), trimmed of excess fat and skin
2 tablespoons kosher salt
3 tablespoons brown sugar
2 tablespoons chili powder
2 tablespoons sweet paprika
2 teaspoons ground black pepper
¼-½ teaspoon cayenne pepper

1. Use a sharp knife to make 2 or 3 short slashes in the skin of each piece of chicken, taking care not to cut into meat. Combine the salt, sugar, and spices in a small bowl and mix thoroughly. Coat the chicken pieces with the spices, gently lifting the skin to distribute the spice rub underneath but leaving it attached to chicken. Transfer the chicken skin side up to wire rack set over rimmed foil-lined baking sheet, lightly tent with foil, and refrigerate 6 to 24 hours.

2. Secure the skin of each breast piece with 2 or 3 toothpicks placed near the edges of the skin.

3. Adjust an oven rack to the middle position; heat the oven to 425 degrees. Roast the chicken until the thickest part of smallest piece registers 140 degrees on an instant-read thermometer, 15 to 20 minutes. Increase the oven temperature to 500 degrees and continue roasting until the chicken is browned and crisp and the thickest parts of the breast pieces register 160 degrees, 5 to 8 minutes longer, removing pieces from the oven and transferring to a clean wire rack as they finish cooking. Continue to roast the thighs and/or drumsticks, if using, until the thickest part of the meat registers 170 to 175 degrees, about 5 minutes longer. Remove from the oven; transfer the chicken to a rack and let it cool completely before refrigerating or serving.

picnic chicken 6

carrot spice muffins

carrot spice muffins 4

I am against vegetables in cake, but I am pro vegetables in muffins. I am against raisins in cake, but I am pro raisins in muffins. The same goes with nuts. Basically, carrot cake is an abomination, or at best just a vehicle for cream cheese frosting, but carrot muffins are awesome.

carrot spice muffins 1

Awesome to eat, that is; they’re a bit of a pain to make, what with the carrot shredding and nut toasting and spice measuring. But they’re worth it in the end, hearty and moist and studded with sweet raisins and bitter pecans. I have to confess to wondering if they would be even better topped with cream cheese frosting though.

carrot spice muffins 2

Nancy chose these for Tuesdays with Dorie, and she has the recipe posted. I reduced the oil to ½ cup, replaced 1 cup of all-purpose flour with whole wheat pastry flour, doubled the salt, and increased the carrot slightly.

One year ago: Chocolate Ganache Ice Cream
Two years ago: Banana Bundt Cake
Three years ago: Blueberry Sour Cream Ice Cream

carrot spice muffins 5

pesto

pesto 4

Pesto is super simple, right? Just dump some ingredients into the food processor, and thirty seconds later, you have pesto. And while that’s true, with a few extra simple steps, you can ensure that your pesto will live up to its maximum potential every single time.

pesto 1

Traditionally, pesto was made in a mortar and pestle, which smashes the ingredients into each other instead of cutting them like the food processor does. It sounds horribly tedious. You don’t want to do that.

pesto 2

However, it is important to do more than slice basil with the food processor blade. Consider that when you want to smell an herb, what do you do? You rub it between your fingers, not tear it in half, because bruising the leaves is what produces flavor. So to maximize the flavor of your basil, you need to bruise the leaves before cutting them.

pesto 3

You can do this with almost no extra effort using a trick I picked up from Jamie Oliver – just put the basil in the food processor, but with the plastic dough blade instead of the knife blade. It takes only a few seconds longer and produces just one more small utensil to clean, but it makes a big difference in flavor. Before I started using this trick, sometimes my pesto would taste grassy, but now it always tastes basil-y.

pesto 8

You probably also know that toasting nuts brings out their flavor, and it isn’t hard to do on the stovetop. I also like to toast the garlic, because I am not a fan of the tongue-stinging sharpness of raw garlic. Toasting the unpeeled cloves in a dry skillet tames garlic’s bite with very little effort. And that’s it – you’ve maximized the potential of every ingredient in pesto, ensuring dependably outstanding pesto, and it only took an extra minute or two.

pesto 7

One year ago: Yogurt-Marinated Lamb Kebabs
Two years ago: Tortellini Soup with Carrots, Peas, and Leeks
Three years ago: Summer Rolls

Printer Friendly Recipe
Pesto

2 ounces pine nuts
2 cloves garlic, unpeeled
Salt
1 large bunch (6 ounces) basil leaves, washed and dried
1-3 tablespoons extra virgin olive oil
½ ounce (¼ cup) freshly grated parmesan

1. Heat a small empty not-nonstick skillet over medium heat for several minutes. Add the pine nuts and cook, stirring constantly, for about a minute, until they’re golden brown and fragrant. Pour the nuts into a food processor bowl fitted with the knife attachment. Add the garlic to the skillet and toast, without stirring, for about 1 minute. When the first side is dark brown, turn the garlic cloves onto another flat side and continue toasting for another minute. Peel the garlic and transfer it to the food processor with the pine nuts.

2. Add ¼ teaspoon salt to the garlic and pine nuts. Process until the nuts and garlic are finely ground, 10-15 seconds. Replace the knife attachment with the plastic dough blade. Add the basil to the food processor and pulse until the basil is bruised and fragrant, about ten 1-second pulses. Remove the dough blade from the bowl and return the knife attachment. Process until basil is finely chopped, a few seconds.

3. With the machine running, slowly pour the oil into the feed tube. Scrape the sides of the bowl; process until evenly mixed. Stir in the parmesan. Serve, refrigerate for a few days, or freeze for months.

pesto 5

farro and pine nut salad

farro tabbouleh 6

It’s a good thing I really like farro, because I accidentally bought 26 dollars worth of it. Apparently I need to pay more attention to the prices on the bulk bins. I should also start enjoying barley or wheat berries or some other equally healthy grain that doesn’t cost $12 per pound. (I actually looked at the prices the next time I was at the store, and farro cost about five times as much as the other grains.)

farro tabbouleh 1

I can’t pinpoint exactly what it is about farro that I like so much. I don’t think the flavor of the different grains are so different that I notice a big difference once dressing and other ingredients are mixed in, so it must be more textural. It’s all about a balance of the tender and the chewy. Rice is soft and tender. Barley is very chewy. Farro is just right.

farro tabbouleh 3

Usually I mix it with caramelized onions and feta, which, with a squirt of hot sauce, becomes one of my favorite meals that also happens to be incredibly healthy. But having two pounds of farro is good incentive to branch out. There are few things that aren’t improved with the addition of summer vegetables, pine nuts, chickpeas, and a squirt of lemon juice, farro included. It looks like I have another delicious farro meal that also happens to be healthy.

farro tabbouleh 4

One year ago: Grilled Potato and Vegetable Salad
Two years ago: Casatiello
Three years ago: Soba Salad with Feta and Peas

Printer Friendly Recipe
Farro and Pine Nut Salad (adapted from Self magazine via epicurious)

If you choose a grain other than farro, your cooking time will probably be different.

The original recipe included jalapenos, which is why they’re shown in the photo above, but I decided not to use them.

1 cup farro (or another whole grain, such as wheat berries, barley, or brown rice)
salt
1 clove garlic, unpeeled
¼ cup pine nuts
Juice from 1 lemon
½ small red onion, very thinly sliced
2 large heirloom tomatoes, chopped, or 1 pint grape tomatoes, halved
1 small cucumber, quartered and sliced ⅛-inch thick
1 (15-ounce) can chickpeas, rinsed and drained
1 cup feta, crumbled
3 tablespoons extra-virgin olive oil
¼ cup chopped fresh parsley

1. Bring 2 quarts of water to a roiling boil; add the farro and 2 teaspoons of salt. Cook for 20 minutes, until the farro is tender but slightly chewy. Drain.

2. Squeeze the juice of the lemon into a large bowl; add the onions and a pinch of salt. Set aside.

3. Heat a small not-nonstick pan over medium heat. Add the garlic and toast it, turning once, until browned, about 2 minutes. Remove the garlic from the pan. Add the pine nuts to the pan and cook, stirring constantly, until fragrant and slightly browned, 3-4 minutes. Remove from the pan. When the garlic is cool enough to handle, peel and mince it.

4. Stir the drained farro into the onion vinegar mixture, then add the remaining ingredients. Let the salad stand at room temperature for at least 10 minutes before serving.

farro tabbouleh 5

cocoa almond meringues

almond cocoa meringues 3

Sometimes I ignore the rules of baking, and other times I over-follow them. For example, when I see DO NOT OVERMIX in big bold capital letters, I will overcompensate, undermix, and bake clumps of raw flour into my genoise cake. On the other hand, if it’s raining and I decide I want to make meringues, I will make meringues, despite knowing that you’re not supposed to make meringues when it’s humid.

almond cocoa meringues 1

That first meringue cookies I made, years ago, while it was raining, were sticky and heavy and not good at all. Now I live in the desert in the middle of a drought. Humidity isn’t so much an issue.

almond cocoa meringues 2

Because this was only my second attempt at meringue cookies and the first was a bust, I’m not sure how they’re supposed to be. The outside of the cookies is crisp and light and shatters into tiny pieces when you bite into it. The inside was chewy. Is this because I didn’t follow the rules and opened the oven halfway through baking? Or did I, heaven forbid, OVERMIX? Or is this how they’re supposed to be?

almond cocoa meringues 5

Either way, it turns out that I like meringue cookies, especially meringue cookies that have cocoa and chocolate chips in them. And other than cracking open the oven door to sneak in the crème brulee I made with the egg yolk leftover after making meringues, I made the exact recipe – which can be found on Mike’s blog, as he chose this for Tuesdays with Dorie.

One year ago: Gingered Carrot Cookies
Two years ago: Banana Bundt Cake
Three years ago: Black and White Banana Loaf

almond cocoa meringues 4