lemon poppy seed muffins

copy-of-dscn4303.jpg

Soon after I started dating Dave, we spent the weekend in his hometown, staying with his best friends (who are now also my best friends). Our hostess made lemon poppy seed muffins one morning for breakfast, and they were fantastic. A few months later, I asked my friend for the recipe, and she couldn’t find it. How does someone lose a recipe? I don’t get it. I have a number of recipe sources (cookbooks and websites), and if I can’t remember which one a recipe came from, I can generally figure it out with a few minutes of searching. Maybe my friend made the muffins from a mix and didn’t want to tell me. I don’t know.

Since then, I’ve tried a number of lemon poppy seed muffin recipes, looking for one that lived up to that memory. I won’t complain about any of them, because it’s an unbeatable combination of flavors, but none were as good as I was hoping for, until this recipe. These are light and tender and lemony without being sour, with a satisfying crunch from the poppy seeds. I’ll be sure not to lose this recipe.

copy-of-dscn4305.jpg

Lemon Poppy Seed Muffins (from Cooks Illustrated January 1997)

Makes 1 dozen large muffins

CI note: Remember, if you’re short on time, you can melt the butter, mix it with the eggs, and stir it into the dry ingredients. When thoroughly mixed, beat in the yogurt and proceed with the recipe.

3 cups unbleached all-purpose flour
1 tablespoon baking powder
½ teaspoon baking soda
3 tablespoons poppy seeds
½ teaspoon table salt
10 tablespoons unsalted butter, softened
1 cup granulated sugar, less 1 tablespoon
1 tablespoon grated lemon zest
2 large eggs
1½ cups plain low-fat yogurt
Vegetable cooking spray or additional unsalted butter for muffin tins
¼ cup granulated sugar
¼ cup lemon juice

1. Adjust oven rack to lower middle position and heat oven to 375 degrees. Mix flour, baking powder, baking soda, poppy seeds, and salt in medium bowl; set aside.

2. Beat butter and sugar with electric mixer on medium-high speed until light and fluffy, about 2 minutes. Add lemon zest to butter-sugar mixture. Add eggs, one at a time, beating well after each addition. Beat in one-half of dry ingredients. Beat in one-third of yogurt. Beat in remaining dry ingredients in two batches, alternating with yogurt, until incorporated.

3. Spray twelve-cup muffin tin with vegetable cooking spray or coat lightly with butter. Use large ice cream scoop to divide batter evenly among cups. Bake until muffins are golden brown, 25 to 30 minutes. Set on wire rack to cool slightly, about 5 minutes. Remove muffins from tin and glaze.

4. For Glaze: While muffins are baking, heat 1/4 cup granulated sugar and lemon juice in small saucepan until sugar dissolves and mixture forms light syrup, 3 to 4 minutes. Brush warm syrup over warm muffins and serve.

(almost) no-knead bread

32.jpg

If it weren’t for Smitten Kitchen, I wouldn’t have known what Cooks Illustrated was referring to in their article about Mark Bittman’s No-Knead Bread recipe that “instantly won over legions of followers”, including Deb. I’ve never made the original recipe, so I can’t attest to Cooks Illustrated’s claim that it sometimes produces “flat, irregular blobs” with a flat-tasting crumb. Their Almost No-Knead Bread recipe aims to solve any problems that were encountered with the original.

I made Cooks Illustrated’s updated version, and I thought it was great. This might be the most attractive loaf of bread I have ever baked. I loved the flavor as well. I thought it had a bit of a sourdough flavor to it, but without the work involved with real sourdough. I also like the open structure of the crumb – I love breads with lots of air bubbles. Another great thing – I estimate that all of the work for the recipe, from getting out ingredients to cleaning up, took a total of about 20 minutes.

22.jpg

One thing I don’t understand about both recipes is why we need a no-knead bread recipe? I don’t know anyone who kneads bread by hand. Most people who are interested enough in food to know about this recipe own Kitchenaid mixers or bread machines that do their bread-kneading for them. I actually mixed up this dough in my Kitchenaid’s mixer bowl and considered letting the mixer stir the dough for me. Leaving the machine on for another 8 minutes while it kneads wouldn’t have been any more work. The No-Knead bread fad would make more sense to me if the bread could be mixed the night before and immediately baked upon getting home from work the next day, but both the original and CI’s revised recipe require about the same amount of babysitting on the day they’re baked as a traditional bread recipe.

On the other hand, if this recipe is popular not for its lack of kneading, but simply because it produces a lovely and tasty loaf of bread, well then I can understand.

13.jpg

Almost No-Knead Bread (from Cooks Illustrated January 2008)

Makes 1 large round loaf

CI note: An enameled cast-iron Dutch oven with a tight-fitting lid yields best results, but the recipe also works in a regular cast-iron Dutch oven or heavy stockpot. (See the related information in “Making Your Dutch Oven Safe for High-Heat Baking” for information on converting Dutch oven handles to work safely in a hot oven.) Use a mild-flavored lager, such as Budweiser (mild non-alcoholic lager also works). The bread is best eaten the day it is baked but can be wrapped in aluminum foil and stored in a cool, dry place for up to 2 days.

3 cups unbleached all-purpose flour (15 ounces), plus additional for dusting work surface
¼ teaspoon instant or rapid-rise yeast
1½ teaspoons table salt
¾ cup plus 2 tablespoons water (7 ounces), at room temperature
¼ cup plus 2 tablespoons mild-flavored lager (3 ounces)
1 tablespoon white vinegar

1. Whisk flour, yeast, and salt in large bowl. Add water, beer, and vinegar. Using rubber spatula, fold mixture, scraping up dry flour from bottom of bowl until shaggy ball forms. Cover bowl with plastic wrap and let sit at room temperature for 8 to 18 hours.

2. Lay 12- by 18-inch sheet of parchment paper inside 10-inch skillet and spray with nonstick cooking spray. Transfer dough to lightly floured work surface and knead 10 to 15 times. Shape dough into ball by pulling edges into middle. Transfer dough, seam-side down, to parchment-lined skillet and spray surface of dough with nonstick cooking spray. Cover loosely with plastic wrap and let rise at room temperature until dough has doubled in size and does not readily spring back when poked with finger, about 2 hours.

3. About 30 minutes before baking, adjust oven rack to lowest position, place 6- to 8-quart heavy-bottomed Dutch oven (with lid) on rack, and heat oven to 500 degrees. Lightly flour top of dough and, using razor blade or sharp knife, make one 6-inch-long, ½-inch-deep slit along top of dough. Carefully remove pot from oven and remove lid. Pick up dough by lifting parchment overhang and lower into pot (let any excess parchment hang over pot edge). Cover pot and place in oven. Reduce oven temperature to 425 degrees and bake covered for 30 minutes. Remove lid and continue to bake until loaf is deep brown and instant-read thermometer inserted into center registers 210 degrees, 20 to 30 minutes longer. Carefully remove bread from pot; transfer to wire rack and cool to room temperature, about 2 hours.

42.jpg

daring bakers feb 2008: julia child’s french bread

18.jpg

I was excited to see that this month’s Daring Baker hosts, Mary and Sara, chose Julia Child’s french bread recipe. I’d heard of this recipe before and wanted to try it, but I didn’t want to buy the book it’s in, so this worked out great for me. The recipe is really long, and it sounds like that intimidated a few Daring Bakers. However, much of that length is because Julia’s writing style is so personal and friendly, and she gives a lot of detail. I really enjoyed making my way through her recipe. This is a quote I particularly liked, which also sums up my philosophy toward homemade bread: “It will turn into bread in the oven whatever happens, but you will have an easier time and a better loaf if you aim for ideal conditions.” Homemade bread is good even if you screw it up.

28.jpg

While I’m not a bread novice, I picked up a few tips from this recipe. One is to let the dough rise seam-side up and then flip it over before baking. This way the dough on top in the oven has no hardened crust that might impede the oven-rise. I also like the idea of using water to estimate what level the dough should rise to in its bowl.

All in all, this was great bread (although most of it is still in my overly stocked freezer). I have some other French bread recipes that I like at least as much, that have the added advantage of providing the baker with some more freedom in the timing. Probably the biggest difficulty of this recipe is finding the time to do it all in one day.

37.jpg

I made myself a tasty little sandwich with one of my mini-loaves, and now I’m trying to think of a great accompaniment to the baguette. I hear Julia Child’s coq au vin is amazing, and I do have the cookbook with that recipe. Although I hear that recipe is quite a project as well!

You can find the whole recipe here, and be sure to check out the rest of the Daring Bakers‘ bread!

46.jpg
Heehee…

challah

17.jpg

Obviously I like to cook. Hence the food blog. And I like to eat, so that works out well, but I also like to show off what I cook. (Hence the food blog.) Dave and I live hours away from his family and days away from mine, and we haven’t made many friends since we moved two months ago, so my opportunities to cook for people are few and far between.

The last time our best friends visited us, I was so busy getting married that all I managed to do was bake some brownies for intermittent snacking. I even had the bad manners to wake up the morning of the wedding and make myself some breakfast and then tell my friends “um, there’s probably more bagels.”

They’re visiting again in two weeks, and I’d love to make up for lost time. But they’re getting here the same day I get back from a trip to New Mexico to see my new nephew, so it’s going to be tricky. I’m trying to stock the freezer with some goodies. (They’re going to be here for less than 2 days. I’m ridiculous, I know.)

27.jpg

Challah, like all breads, happens to take well to freezing. It also happens to make some excellent French toast, which is (sort of) what I plan to do with this loaf.

This bread is beautiful, tender, and slightly sweet, with a subtle butter flavor. I did put most of it in the freezer, but the one slice I ate was delicious. Hopefully the breakfast I make out of it in a few weeks is just as good.

36.jpg

Challah (from Cooks Illustrated, January 2006)

CI note: We prefer to knead this dough in a standing mixer, but a food processor or your hands can do the job. If using a food processor, place the flour mixture in a processor fitted with the dough blade. Mix together the eggs, yolk, butter, and water in a large measuring cup and, with the processor running, add the egg mixture in a steady stream. Process until a ball of dough forms, about 1 minute. Remove the dough to a lightly floured surface and knead by hand for an additional minute, or until the dough becomes smooth and elastic. Alternatively, you can mix the dough by hand in a large bowl with a wooden spoon, until the dough comes together. Then transfer the dough to a lightly floured surface and knead until the dough forms a smooth ball. If the dough remains tacky, add more flour 1 tablespoon at a time. This method will take longer than using a standing mixer, but you will get the same results.

Makes 1 large loaf

3-3 ¼ cups unbleached all-purpose flour (15-16 ¼ ounces), plus more for dusting work surface
¼ cup sugar (1¾ ounces)
1 envelope instant yeast (about 2¼ teaspoons)
1 ¼ teaspoons salt
2 large eggs plus 1 large egg yolk
4 tablespoons unsalted butter (½ stick), melted
½ cup warm water plus 1 tablespoon (about 110 degrees)
1 large egg white (for wash)
1 teaspoon poppy seeds, or sesame (optional)
1. Whisk together 3 cups of flour, sugar, yeast, and salt in medium bowl; set aside. Mix together 2 eggs, egg yolk, melted butter, and ½ cup of water in bowl of standing mixer fitted with dough hook. Add flour mixture to wet mixture; knead at low speed until dough ball forms, about 5 minutes, adding remaining ¼ cup flour, 1 tablespoon at a time, as needed to prevent dough from sticking. Whisk reserved egg white with remaining 1 tablespoon water in small bowl, cover with plastic wrap, and refrigerate.

2. Transfer dough to very lightly oiled large bowl, turning dough over to coat with oil. Cover with plastic wrap and let rise in warm place until doubled in size, 1 ½ to 2 hours. Gently press dough to deflate, cover with plastic wrap, and let rise until doubled in size again, 40 to 60 minutes.

3. Lightly grease large baking sheet and set aside. Transfer dough to lightly floured work surface. Divide dough into 2 pieces, one roughly half size of other. (Small piece will weigh about 9 ounces, larger piece about 18 ounces.) Divide large piece into 3 equal pieces. Roll each piece into 16-inch-long rope, about 1 inch in diameter. Line up ropes of dough side by side and pinch ends together. Take dough rope on bottom and lay it over center rope. Take dough rope on top and lay it over center rope. Repeat until ropes of dough are entirely braided, then pinch ends together. Place braid on baking sheet. Divide smaller piece of dough into 3 equal pieces. Roll each piece into 16-inch-long rope, about ½ inch in diameter. Braid together, pinching ends to seal. Brush some of egg wash on top of large loaf and place small braid on larger braid. Loosely drape loaf with plastic wrap and let rise in warm place until loaf becomes puffy and increases in size by a third, 30 to 45 minutes.

4. Adjust oven rack to lower-middle position and heat oven to 375 degrees. Brush loaf with remaining egg wash and sprinkle with poppy or sesame seeds, if using. Bake until loaf is golden brown and instant-read thermometer inserted into side of loaf reads 190 degrees, 30 to 40 minutes. Place baking sheet on wire rack. Cool loaf completely before slicing.

45.jpg

salmon cakes, flaky biscuits, hashed brussels sprouts

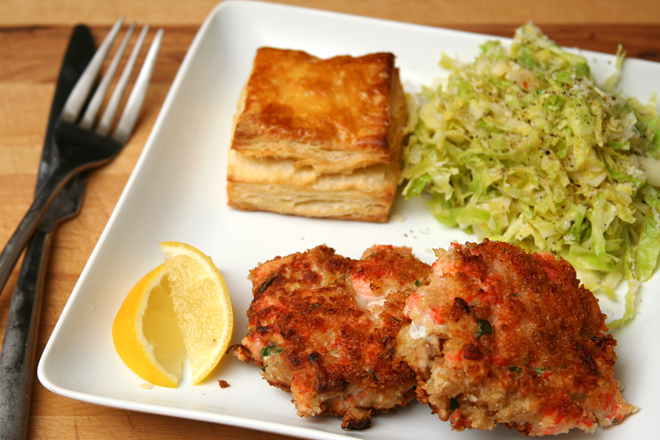
salmon cakes new
(Photo updated 12/30/12)

I made the best meal for dinner one Saturday a few weeks ago. It was one of those “I really want to cook something great tonight. Don’t worry, it won’t take too long” kind of meals. Famous last words. But it was worth it.

15.jpg

My favorite part of the meal was these biscuits. Look at those layers! They’re not quite the pain in the ass I remember them being from the last time I made them. They involve all of the steps required for regular biscuits, plus some extra rolling and folding. Not simple, but not a huge deal either.

25.jpg

The hashed Brussels sprout recipe comes from Orangette’s blog. I love Brussels sprouts, and my favorite way of cooking them is braised in heavy cream. I know, yikes on the health-factor of that, but it’s so good. Too heavy to go with this meal though, so I thought I’d try this recipe, in which they’re sliced, then braised in wine. I used sesame seeds instead of poppy seeds, because it’s what I had. It was good and light. It went with the rest of the meal wonderfully.

34.jpg

43.jpg

These were accompanying salmon cakes, and really, how can you go wrong? Chopped fresh salmon, mayonnaise, a few flavorings, all breaded and pan-fried. As I was breading the cakes, they seemed like they were falling apart, but once I got them into the frying pan, they become more structurally sound. I served them with a lemon-herb dipping sauce, but I think it was overkill – they would have been fine with just a wedge of lemon.

Altogether, one of the best meals I’ve eaten in a while.

Oh…there was one casualty.

51.jpg

Pan-Fried Fresh Salmon Cakes (from Cooks Illustrated January 2000)

CI note: A big wedge of lemon is the simplest accompaniment to salmon cakes, but if you decide to go with dipping sauce, make it before preparing the cakes so the sauce flavors have time to meld. If possible, use panko (Japanese bread crumbs).

Makes eight 2½- by ¾-inch cakes

1¼ pounds salmon fillet
1 slice white sandwich bread, such as Pepperidge Farm, crusts removed and white part chopped very fine (about 5 tablespoons)
2 tablespoons mayonnaise
¼ cup grated onion
2 tablespoons chopped fresh parsley leaves
¾ teaspoon table salt
1½ tablespoons lemon juice from 1 lemon
½ cup unbleached all-purpose flour
2 large eggs, lightly beaten
½ cup vegetable oil, plus 1 1/2 teaspoons vegetable oil
¾ cup fine, unflavored dried bread crumbs, preferably panko

1. Locate and remove any pin bones from salmon flesh. Using sharp knife, cut flesh off skin, then discard skin. Chop salmon flesh into ¼- to 1/3-inch pieces and mix with chopped bread, mayonnaise, onion, parsley, salt, and lemon juice in medium bowl. Scoop a generous ¼-cup portion salmon mixture from bowl and use hands to form into a patty measuring roughly 2½-inches in diameter and ¾-inch thick; place on parchment-lined baking sheet and repeat with remaining salmon mixture until you have 8 patties. Place patties in freezer until surface moisture has evaporated, about 15 minutes.

2. Meanwhile, spread flour in pie plate or shallow baking dish. Beat eggs with 1½ teaspoons vegetable oil and 1½ teaspoons water in second pie plate or shallow baking dish, and spread bread crumbs in a third. Dip chilled salmon patties in flour to cover; shake off excess. Transfer to beaten egg and, using slotted spatula, turn to coat; let excess drip off. Transfer to bread crumbs; shake pan to coat patties completely. Return now-breaded patties to baking sheet.

3. Heat remaining ½ cup vegetable oil in large, heavy-bottomed skillet over medium-high heat until shimmering but not smoking, about 3 minutes; add salmon patties and cook until medium golden brown, about 2 minutes. Flip cakes over and continue cooking until medium golden brown on second side, about 2 minutes longer. Transfer cakes to plate lined with paper towels to absorb excess oil on surface, if desired, about 30 seconds, and then serve immediately, with one of the sauces that follow, if you like.

Creamy Lemon Herb Dipping Sauce (from Cooks Illustrated January 2000)

Makes generous ½ cup

½ cup mayonnaise, preferably homemade
2½ tablespoons lemon juice from 1 lemon
1 tablespoon minced fresh parsley leaves
1 tablespoon minced fresh thyme leaves
1 large scallion, white and green part minced
½ teaspoon table salt
Ground black pepper

Mix all ingredients in small bowl; season to taste with ground black pepper. Cover with plastic wrap and chill until flavors blend, at least 30 minutes.

Flaky Buttermilk Biscuits (from Cooks Illustrated January 2006)

CI note: The dough is a bit sticky when it comes together and during the first set of turns. Set aside about 1 cup of extra flour for dusting the work surface, dough, and rolling pin to prevent sticking. Be careful not to incorporate large pockets of flour into the dough when folding it over. When cutting the biscuits, press down with firm, even pressure; do not twist the cutter. The recipe may be prepared through step 2, transferred to a zipper-lock freezer bag, and frozen for several weeks. Let the mixture sit at room temperature for 15 minutes before proceeding.

Makes 12 biscuits

2½ cups unbleached all-purpose flour (12½ ounces), plus additional flour for work surface
1 tablespoon baking powder
½ teaspoon baking soda
1 teaspoon table salt
2 tablespoons vegetable shortening, cut into ½-inch chunks
8 tablespoons unsalted butter (1 stick), cold, lightly floured and cut into 1/8-inch slices
2 tablespoons unsalted butter, melted
1¼ cups low-fat buttermilk, cold

1. Adjust oven rack to lower-middle position; heat oven to 450 degrees. Whisk flour, baking powder, baking soda, and salt in large bowl.

2. Add shortening to flour mixture; break up chunks with fingertips until only small, pea-sized pieces remain. Working in batches, drop butter slices into flour mixture and toss to coat; pick up each slice of butter and press between floured fingertips into flat, nickel-sized pieces. Repeat until all butter is incorporated; toss to combine. Freeze mixture (in bowl) until chilled, about 15 minutes.

3. Spray 24-inch-square area of work surface with nonstick cooking spray; spread spray evenly across surface with kitchen towel or paper towel. Sprinkle 1/3 cup of extra flour across sprayed area; gently spread flour across work surface with palm to form thin, even coating. Add all but 2 tablespoons of buttermilk to flour mixture; stir briskly with fork until ball forms and no dry bits of flour are visible, adding remaining buttermilk as needed (dough will be sticky and shaggy but should clear sides of bowl). With rubber spatula, transfer dough onto center of prepared work surface, dust surface lightly with flour, and, with floured hands, bring dough together into cohesive ball.

4. Pat dough into approximate 10-inch square; roll into 18 by 14-inch rectangle about ¼ inch thick, dusting dough and rolling pin with flour as needed. Following illustrations below, using bench scraper or thin metal spatula, fold dough into thirds, brushing any excess flour from surface; lift short end of dough and fold in thirds again to form approximate 6 by 4-inch rectangle. Rotate dough 90 degrees, dusting work surface underneath with flour; roll and fold dough again, dusting with flour as needed.

5. Roll dough into 10-inch square about ½ inch thick; flip dough and cut nine 3-inch rounds with floured biscuit cutter, dipping cutter back into flour after each cut. Carefully invert and transfer rounds to ungreased baking sheet, spaced 1 inch apart. Gather dough scraps into ball; roll and fold once or twice until scraps form smooth dough. Roll dough into ½-inch-thick round; cut three more 3-inch rounds and transfer to baking sheet. Discard excess dough.

6. Brush biscuit tops with melted butter. Bake, without opening oven door, until tops are golden brown and crisp, 15 to 17 minutes. Let cool on baking sheet 5 to 10 minutes before serving.

Hashed Brussels Sprouts with Poppyseed and Lemon (from Orangette)

Makes 4-6 servings

1¼ pounds Brussels sprouts
1½ tablespoon lemon juice
2 tablespoon olive oil
1 garlic clove, minced
1 tablespoon poppy seeds
¼ cup white wine
¼ teaspoon salt

Cut the stems from the Brussels sprouts and remove any blemished leaves. When all the sprouts are trimmed, you should be left with about 1 pound total. Halve each sprout lengthwise, and slice each half into thin slices, about 1/8 inch thick; or, alternatively, hash them in a food processor fitted with the slicing disc attachment.

In a large bowl, toss the hashed Brussels sprouts with the lemon juice.

In a large skillet or sauté pan, warm the olive oil over high heat, almost to the smoking point. Stir in the hashed sprouts, garlic, and poppy seeds. Add the wine, and cook for about 3-4 minutes, stirring constantly, until the sprouts are bright green and lightly softened but still barely crunchy. Reduce the heat to low, season with salt, and cook for 1 minute more. Remove the pan from the heat, and serve.

olive oil bread

8.jpg

My plan for this loaf of bread was to have it and the rest of dinner ready before Dave got home from work on a Friday evening. The kitchen would be clean, a bottle of wine would be open, garlic would be roasted. We’d sit down together, drink the wine, spread roasted garlic on fresh bread while the rest of dinner was on hold until we were good and ready. Doesn’t that sound nice?

It didn’t work out that way. I was still rolling out pasta for the lasagna and because I was behind on cooking, I was way behind on cleaning. It was almost an hour after Dave got home before the lasagna was built and I could take a break to enjoy this bread and drink some wine. We spread roasted garlic on it (the bread, not the wine – ew), and when we ran out of garlic, we dipped it in green extra virgin olive oil.

Eventually I got the lasagna in the oven, but ignored the mess in the kitchen. When the lasagna was done baking, it was apparent that something had gone very wrong with it. In my hurry to finish cooking, I had taken some shortcuts. I skipped a step that Marcella Hazan specifically calls “something of a nuisance, but necessary.” All too true. The lasagna was sort of a disaster actually, but that was fine, because I was happy to fill up on bread.

The bread is based on two recipes – the method comes from Peter Reinhart’s recipe for Italian Bread in The Bread Baker’s Apprentice. This is a great book if you’re pretty serious about baking bread at home. Reinhart is all about forcing the maximum flavor out of each ingredient, which I love. The addition of olive oil stems from a recipe for Mantovana Olive Oil Bread in Ultimate Bread, by Eric Treuille and Ursula Ferrigno. This book is great for the less-serious home bread baker. The pictures throughout the book are wonderful and the recipes are varied and interesting, but I think you’ll have more consistent results following Reinhart’s methods.

The olive oil bread was delicious, although I would have preferred an even stronger olive oil flavor. I admit that I got a little scared by the amount of olive oil Treuille and Ferrigno call for and went easy on it. Also, I used regular olive oil, when I meant to use extra virgin. In short, it was really good – but there’s a potential for it could be even better. That just gives me an excuse to try it again soon.

Mantovana Olive Oil Bread (adapted from Peter Reinhart’s The Bread Baker’s Apprentice and Eric Treuille and Ursula Ferrigno’s Ultimate Bread)

Makes one 1-pound loaf

1 recipe biga (recipe follows)
4½ ounces (1 cup) unbleached bread flour
1¼ ounce (¼ cup) whole wheat flour
1 teaspoon salt
½ teaspoon instant yeast
½ teaspoon barley malt syrup (optional)
¼ cup water
¼ cup olive oil

1. Remove the biga from the refrigerator 1 hour before making the dough. Cut it into about 10 small pieces with a pastry scraper or serrated knife. Cover with a towel or plastic wrap and let sit for 1 hour to take off the chill.

12.jpg

2. Stir together the flour, salt, sugar, and yeast in a 4-quart bowl (or in the bowl of an electric mixer). Add the biga pieces, olive oil, barley malt, and water, and stir together (or mix on low speed with the paddle attachment) until a ball forms, adjusting the water or flour according to need. The dough should be slightly sticky and soft, but not batterlike or very sticky. If the dough feels tough and stiff, add more water to soften (it is better to have the dough too soft than too stiff at this point).

3. Sprinkle flour on the counter, transfer the dough to the counter, and begin kneading (or mixing on medium speed with the dough hook). Knead (or mix) for about 10 minutes, adding flour as needed, until the dough is tacky, but not sticky, and supple. The dough should pass the windowpane test (see below) and register 77 to 81 degrees. Lightly oil a large bowl and transfer the dough to the bowl, rolling it to coat it with the oil. Cover the bowl with plastic wrap.

To perform the windowpane test, cut off a small piece of dough from the larger batch and gently stretch, pull, and turn it to see if it will hold a paper-thin, translucent membrane. If it falls apart before it makes this windowpane, continue mixing for another minute or two and test again.

22.jpg

4. Ferment at room temperature for approximately 2 hours, or until the dough doubles in size.

31.jpg

5. Gently pat the dough into a rough rectangle. Without degassing the piece of dough, fold the bottom third of dough, letter style, up to the center and press to seal, creasing surface tension on the outer edge. Fold the remaining dough over the top and use the edge of your hand to seal the seam closed and to increase the surface tension all over. Lightly dust with a sprinkle of flour, cover with a towel or plastic wrap, and let rest for 5 minutes. Then complete the shaping, extending the loaves to about 12 inches in length. Line a sheet pan with baking parchment and dust with semolina flour or cornmeal. Place the loaves on the pan and lightly mist with spray oil. Cover loosely with plastic wrap.

41.jpg

6. Proof at room temperature for about 1 hour, or until the loaves have grown to about 1½ times their original size.

7. Place an empty heavy-duty sheet pan or cast-iron frying pan on either the top shelf of the oven or the oven flour. Preheat the oven to 500 degrees. Have hot water standing by. Score the bread with 2 parallel, diagonal slashes or 1 long slash.

5.jpg

8. Transfer the dough on the parchment paper to a peel or the back of a sheet pan. Transfer the dough to the baking stone (or bake on the sheet pan). Pour 1 cup hot water into the steam pan and close the door. After 30 seconds, spray the walls of the oven with water and close the door. Repeat once more after another 30 seconds. After the final spray, lower the oven setting to 450 degrees and bake until done, rotating 180 degrees, if necessary, for even baking. It should take about 20 minutes. The loaf should be golden brown and register at least 200 degrees at the center.

9. Transfer the loaves to a cooling rack and cool for at least 1 hour before slicing or serving.

6.jpg

Biga

Biga will keep in the refrigerator for up to 3 days, or in the freezer for about 3 months. You can use it as soon as it ferments, but I prefer to give it an overnight retarding to bring out more flavor.

5½ ounces (1¼ cups) unbleached bread flour
¼ teaspoon instant yeast
7 tablespoons to ½ cup water, at room temperature

1. Stir together the flour and yeast in a 4-quart bowl (or in the bowl of an electric mixer). Add 7 tablespoons of the water, stirring until everything comes together and makes a coarse ball (or mix on low speed for 1 minute with the paddle attachment). Adjust the flour or water, according to need, so that the dough is neither too sticky nor too stiff. (It is better to err on the sticky side, as you can adjust easier during kneading. It is harder to add water once the dough firms up.)

2. Sprinkle some flour on the counter and transfer the dough to the counter. Knead for 4 to 6 minutes (or mix on medium speed with the dough hook for 4 minutes), or until the dough is soft and pliable, tacky but not sticky. The internal temperature should be 77 to 81 degrees.

3. Lightly oil a bowl and transfer the dough to the bowl, rolling it around to coat it with oil. Cover the bowl with plastic wrap and ferment at room temperature for 2 to 4 hours, or until it nearly doubles in size.

4. Remove the dough from the bowl, knead it lightly to degas, and return it to the bowl, covering the bowl with plastic wrap. Place the bowl in the refrigerator overnight. You can keep this in the refrigerator for up to 3 days, or freeze it in an airtight plastic bag for up to 3 months.

salty little fish (pissaladiere)

copy-of-dscn2900.jpg

Like many people I know, I worked at a pizza joint as a teenager. One night, as another employee handed a pizza to a customer, I caught a whiff of an awful odor – like rotting fish, ruining a perfectly good pizza. This was my first firsthand experience with anchovies. Yuck.

It took Cooks Illustrated (of course) and their recipe for pasta e fagioli to convince to me give the little fishies another chance. In this soup, the anchovies are used much like garlic, first minced and then used to flavor the sauce. When I opened the can, I expected to be confronted with the rotted smell that I still remembered from ten years before. Instead, I smelled…nothing. Nothing rotted, nothing even the least bit fishy. I took a hesitant nibble of one.

Whoa!!! Careful eating anchovies straight from the can! It’s like eating a fillet of salt.

dscn2850.jpg

These days, I love anchovies. My husband, unfortunately, does not. One too many anchovy pizza deliveries as he worked his way through college, I suspect. I don’t know what those pizza places do to their anchovies to make them smell so horrid; my theory is incorrect storage. Also, to me, slabs of fish on tomato sauce and cheese seems inconsistent.

Not that I don’t like anchovies on pizza, mind you. But I like to skip the tomatoes and cheese and lay the little fishes on a pile of caramelized onions, dotted with nicoise olives and sprinkled with parsley. Ah, pissaladiere. This was one of my favorite dinners for myself before I married an anchovy-hater.

And now it’s my entry for Hay Hay It’s Donna Day, hosted this month by Joey of 80 breakfasts. I certainly encourage you to give anchovies a chance if you’ve always been convinced that they’re nothing but a foul pizza topping. They are far more than that – subtly meaty and a bit salty even after being rinsed. I admit, however, that this is probably not a good recipe for the anchovy un-initiated.

But for the rest of us, what a treat of contrasting flavors that play so well together!

copy-of-dscn2906.jpg

Pissaladiere – Provencal Pizza (from Cooks Illustrated)

Instant yeast is almost always sold under a marketing name; look for “rapid rise,” “perfect rise,” or “quick rise.” If your food processor includes a plastic dough blade attachment, use it; its short blades and dull edges make kneading easier on the motor. If not, the regular metal blade works almost as well. For best flavor, use high-quality oil-packed anchovies; in a recent tasting, Ortiz were our favorite. The dough in this recipe rises for 1 to 1 ½ hours. If a longer or overnight rise is more convenient, make the dough with ½ teaspoon of instant yeast and let it rise in the refrigerator for 16 to 24 hours. The caramelized onions can also be made a day ahead and refrigerated.

Makes 2 tarts, 8 to 10 first course servings

Dough:
2 cups bread flour (11 ounces), plus extra for dusting work surface
1 teaspoon instant yeast
1 teaspoon table salt
1 tablespoon olive oil, plus additional oil for brushing dough and greasing hands
1 cup water (8 ounces), warm (about 110 degrees)

Caramelized Onions:
2 tablespoons olive oil
2 pounds yellow onions, sliced 1/4 inch thick
½ teaspoon table salt
1 teaspoon brown sugar
1 tablespoon water

Olives, Anchovies, and Garnishes:
olive oil
½ teaspoon ground black pepper
½ cup niçoise olives, pitted and chopped coarse
8 anchovy fillets, rinsed, patted dry, and chopped coarse (about 2 tablespoons)
12 anchovy fillets, rinsed and patted dry for (optional) garnish
2 teaspoons minced fresh thyme leaves
1 teaspoon fennel seeds (optional)
1 tablespoon minced fresh parsley leaves (optional)

1. For the dough: In workbowl of food processor fitted with plastic dough blade (see note), pulse flour, yeast, and salt to combine, about five 1-second pulses. With machine running, slowly add oil, then water, through feed tube; continue to process until dough forms ball, about 15 seconds. Generously dust work surface with flour; using floured hands, transfer dough to work surface and knead lightly, shaping dough into ball. Lightly oil 1-quart measuring cup or small bowl, place dough in measuring cup, cover tightly with plastic wrap, and set aside in draft-free spot until doubled in volume, 1 to 1 1/2 hours.

2. For the caramelized onions: While dough is rising, heat oil in 12-inch nonstick skillet over high heat until shimmering but not smoking; stir in onions, salt, and brown sugar and cook, stirring frequently, until moisture released by onions has evaporated and onions begin to brown, about 10 minutes. Reduce heat to medium-low and cook, stirring frequently, until onions have softened and are medium golden brown, about 20 minutes longer. Off heat, stir in water; transfer to bowl and set aside. Adjust oven rack to lowest position, set baking stone on rack, and heat oven to 500 degrees.

3. To shape, top, and bake the dough: When dough has doubled, remove from measuring cup and divide into 2 equal pieces using dough scraper. Working with one piece at a time, form each piece into rough ball by gently pulling edges of dough together and pinching to seal. With floured hands, turn dough ball seam-side down. Cupping dough with both hands, gently push dough in circular motion to form taut ball. Repeat with second piece. Brush each lightly with oil, cover with plastic wrap, and let rest 10 minutes. Meanwhile, cut two 20-inch lengths parchment paper and set aside.

4. Coat fingers and palms of hands generously with oil. Using dough scraper, loosen 1 piece of dough from work surface. With well-oiled hands, hold dough aloft and gently stretch to 12-inch length. Place on parchment sheet and gently dimple surface of dough with fingertips. Using oiled palms, push and flatten dough into 14- by 8-inch oval. Brush dough with oil and sprinkle with 1/4 teaspoon pepper. Leaving ½-inch border around edge, sprinkle ¼ cup olives, 1 tablespoon chopped anchovies, and 1 teaspoon thyme evenly over dough, then evenly scatter with half of onions. Arrange 6 whole anchovy fillets, if using, on tart and sprinkle with fennel seeds, if using. Slip parchment with tart onto pizza peel (or inverted rimless baking sheet), then slide onto hot baking stone. Bake until deep golden brown, 13 to 15 minutes. While first tart bakes, shape and top second tart.

5. Remove tart from oven with peel or pull parchment onto baking sheet; transfer tart to cutting board and slide parchment out from under tart. Cool 5 minutes; sprinkle with 1½ teaspoons parsley, if using. Cut tart in half lengthwise, then cut crosswise to form 8 pieces; serve immediately. While first tart cools, bake second tart.

copy-of-dscn2903.jpg

not a chinese burrito (moo shu pancakes)

dscn2770-copy.jpg

I haven’t been reading food blogs long – only about a week longer than I’ve had my own, in fact – but I’m already playing favorites. One of the blogs that first caught my attention and held it is Jen’s use real butter. Jen’s blog has what I consider the three requisite aspects of a good food blog: beautiful pictures, entertaining writing, and recipes I actually want to make. Something else I love about Jen’s blog is that some of those recipes are authentic Chinese food. At least, I’m assuming they’re authentic. As an all-American mutt, I’m not exactly an expert on spotting traditional ethnic cuisine.

The latest such recipe is moo shu pork. I’d heard of moo shu before – the term seems to get tossed around a lot just because it sounds cute and is fun to say. Moo shu. Moooooo shu. But I actually had no idea what it was until Jen’s post about it. Turns out, it’s a bunch of stir-fried goodness all wrapped up in flatbread. Sounds delicious!

The recipe is fairly simple, but it did involve some ingredients that weren’t familiar to me. The first is hoisin sauce. Jen says that she prefers to buy hoisin sauce with more Chinese on the label that English. That sounds reasonable. My grocery store has a well-stocked ethnic section, so I was pretty confident that I’d be able to find something that fit the bill. I ended up with a bottle with about 50% English, 50% Chinese on the label. Close enough.

The moo shu shells were a bigger problem. Even Wegman’s ethnic section can only go so far. I had a bit of hope when I saw an “asian” sign in the freezer section, but there was no luck to be had there. I had two options at this point: find an asian grocery store or make my own moo shu shells. I just moved to Philadelphia a week ago and didn’t relish the idea of driving around looking for an asian grocery store, so homemade it was.

Okay, let’s be honest. I could have found an asian grocery store – I know how to use the internet, after all. The truth is, I’m just not very comfortable in them. The merchandise is unfamiliar to me, I don’t know how anything is arranged, and most of the labels are in Chinese. Last time I went to one, I wandered up and down the aisles looking for dried shrimp. When I gave up and asked the cashier for help, she yelled, “in the cooler!” The cooler encompassed an entire aisle of this store. I wandered over there and searched around, all the while with her yelling from the cash register which direction I needed to be looking. Why she didn’t just walk the 10 steps over to the cooler and grab the damn shrimp off the shelf for me is a mystery. Then, as I was checking out, she asked if I was making pad thai. Apparently little white girls have one use for dried shrimp and one use only. I said I was, and she told me I needed Thai basil. I know Thai basil is a traditional pad thai ingredient, but I’m assuming that it has the same shelf life of regular basil – so about 3 hours. My pad thai had always been damn good without it, so I declined, admitting that my pad thai must not be that authentic. So there you go – my desire to make traditional ethnic food lies somewhere between dried shrimp and Thai basil.

So, homemade moo shu shells it was. Turns out making moo shu shells is even easier than finding a recipe for them on the internet. (Hint: Don’t google “moo shu shells”, regardless of how you spell the “moo.” You need to look up “mandarin pancakes.”) The process is a little strange, but it worked out beautifully in the end. Flour is mixed with boiling water, then the dough is allowed to rest. It’s rolled into a rope, then cut into pieces. Each piece is flattened, brushed with oil, and then stacked on another piece with the oiled sides together. Each pair of dough segments is rolled out together, then cooked in an ungreased skillet. The only tricky part is tearing the two pieces apart after they cook, and the only difficulty there stems from the fact that it’s hot!

dscn2752-copy.jpg

dscn2762-copy.jpg

So, in the end, moo shu pork is good. Really good, in fact. I can’t wait to make it again. And hoisin sauce? Also really good. All salty and sweet and just altogether tasty.

Now, Jen insists that these shouldn’t be called Chinese burritos. I can understand this I suppose – after all, I’ve never heard of a burrito referred to as Mexican moo shu. But I’m sure you can see the resemblance. In fact, when I handed Dave his plate, guess what he said? “Oh, cool. It’s a Chinese burrito.”

dscn2763-copy.jpg

Mandarin Pancakes (from Fine Cooking)

The only change I’ll probably make in the future is to add a pinch of salt to the dough.

Makes 12

1¾ cups (8 ounces) unbleached flour
¾ cup boiling water
1 tablespoon toasted sesame oil

In a bowl, mix the flour and the boiling water with chopsticks or a wooden spoon to combine. Turn the shaggy dough onto a lightly floured board, gather it into a heap, and knead it until smooth, about 3 minutes. Cover with a towel and let it rest for about 1/2 hour.

With your hands, shape the dough into an even cylinder about 12 inches long. With a sharp knife, preferably serrated, cut the roll into 1-inch pieces. If the cutting squashes any of the pieces, stand them on end and shape them back into rounds.

Lightly flour your palms and use them to flatten the pieces into 2-inch rounds. Brush the top of each round generously with sesame oil. Lay one round on top of another, oiled sides together. Flatten the pair together with the heel of your hand. Continue until you have 6 pairs.

With a floured rolling pin, roll each pair into a thin pancake about 7 inches in diameter, flipping the pancake over now and again to roll evenly on both sides. Stack the pancakes as you finish rolling them.

In an ungreased cast-iron skillet or nonstick pan over medium-high heat, cook the pancakes one at a time. Heat one side until it becomes less opaque and starts to bubble slightly, and just a few brown spots appear, about 1 min. Flip it over and cook it until a few light brown spots appear on the other side, about 30 seconds.

While the pancake is still hot, pick it up, look for a seam to grab, and separate it into two very thin pancakes. Stack them on a plate as you go and wrap them in foil to keep them warm and prevent drying. If not using right away, refrigerate until ready to use.

For Jen’s mu-shu pork filling, check out her blog.

farming fungus (country crust bread)

dscn2603.jpg

Recently, I’ve noticed a lot of people trying out homemade bread for the first time. I remember my first time making yeast bread. I was nervous about everything – the amount of flour I was kneading into the dough, the rising time, the baking temperature. There’s so much uncertainty involved with bread baking, and I’m not sure why. Bread isn’t any different from a recipe for anything else – just follow the directions and everything should go smoothly. There are a few more variables to take into account – the freshness of the yeast and the temperature of the room can affect the rate of rising, but as long as you follow the visual clues, everything should come out okay. Plus, I’ve found bread to be relatively forgiving. You can add some extra flour, knead too long, let it rise a bit longer (or less) than ideal, but the effect on the final product will be minor. No worries!

dscn2572.jpg

One thing about bread though, is that I always feel like kind of a jerk when I make it. It all starts with these little fungal yeasties. So you give them some food, and a nice warm place to the live. Give them plenty of time to grow and start a little community. Then you cook them and eat them. Poor little dudes. (Yes, yes, I eat meat, I know it’s considerably worse. I’m a bad person.)

dscn2588.jpg

This is one of my favorite breads. It’s just a nice, simple sandwich bread, but it has plenty of flavor. My mom serves it at holiday meals, and it’s one of my favorite foods on the table. For this particular loaf, we snacked on it a few hours after it came out of the oven in between doing chores, and then I made French toast with it the next day. Both were really satisfying.

Update 3/16/10: I’ve successfully used this method to make this bread whole wheat.  Complete instructions for adapting this recipe are included in that post.

Country Crust Bread (called Rich Egg Bread in recent additions of Betty Crocker cookbooks)
Adapted from Betty Crocker and Cooks Illustrated

Makes one 9-inch loaf

I used honey and butter, and I substituted about 1/3 of the white flour for whole wheat flour. You can increase that to half the total flour without any detrimental affects to the bread, although the rising time will probably need to be increased.

To braid the loaf instead of baking it in a loaf pan, divide the dough into three equal portions. Gently roll each portion into a 16-inch length. Braid the pieces together, then pinch the ends together and tuck them under the loaf. Reduce the baking time by 15 minutes.

3 – 3½ cups (15 – 17½ ounces) unbleached flour, plus extra for work surface
1½ teaspoons table salt
1 cup water, warm (110 degrees)
1 egg
2 tablespoons vegetable oil or unsalted butter, melted
¼ cup (1.75 ounces) granulated sugar or 3 tablespoons honey
1 package (2 1/4 teaspoons) rapid-rise yeast (also called instant)

1. Adjust oven rack to low position and heat oven to 200 degrees. Once oven temperature reaches 200 degrees, maintain heat 10 minutes, then turn off oven heat.

2. Mix flour, salt, and yeast in bowl of standing mixer fitted with dough hook. Mix water, egg, butter, and honey in 1-quart Pyrex liquid measuring cup. Turn machine to low and slowly add liquid. When dough comes together, increase speed to medium (setting number 4 on a KitchenAid mixer) and mix until dough is smooth and satiny, stopping machine two or three times to scrape dough from hook if necessary, about 10 minutes. Turn dough onto lightly floured work surface; knead to form smooth, round ball, about 15 seconds.

3. Place dough in very lightly oiled bowl, rubbing dough around bowl to lightly coat. Cover bowl with plastic wrap; place in warm oven until dough doubles in size, 40 to 50 minutes.

4. Form dough into loaf by gently pressing the dough into a rectangle, one inch thick and no wider than the length of the loaf pan. Next, roll the dough firmly into a cylinder, pressing with your fingers to make sure the dough sticks to itself. Turn the dough seam side up and pinch it closed.  Finally, place dough in greased 9-by-5-by-3-inch loaf pan and press it gently so it touches all four sides of the pan.

5. Cover with plastic wrap; set aside in warm spot until dough almost doubles in size, 20 to 30 minutes. Heat oven to 350 degrees, placing empty loaf pan on bottom rack. Bring 2 cups water to boil.

6. Remove plastic wrap from loaf pan. Place pan in oven, immediately pouring heated water into empty loaf pan; close oven door. Bake until instant-read thermometer inserted at angle from short end just above pan rim into center of loaf reads 195 degrees, about 40 to 50 minutes. Remove bread from pan, transfer to a wire rack, and cool to room temperature. Slice and serve.

dscn2625.jpg