banana nutella crepes

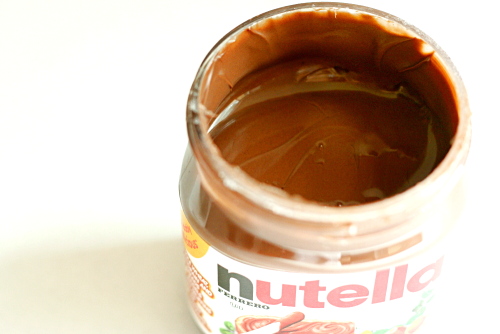
I ate Nutella, a chocolate hazelnut spread, for the first time just about a month ago. I’d been hearing great things about it for years, but I never got around to trying it until a friend sent me some. (Along with a jar of Marmite, which is so good.) I can see what all the hype about Nutella is for – this stuff basically tastes like milk chocolate, so of course everyone likes it!

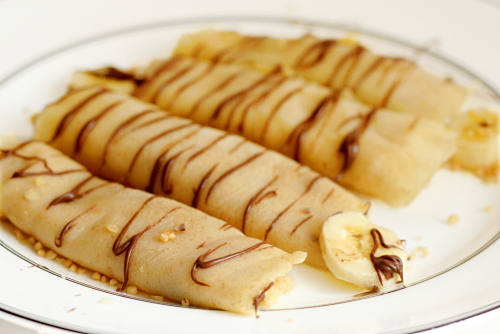
I’ve been putting it on all kinds of things, but mostly I eat it on bananas to break up the monotony of my daily banana. And how much better would bananas and Nutella be if they were wrapped up in a crepe?

Crepes are one of those recipes that seem scarier than they really are. I’m always hearing stories about how the first crepe will have to be thrown out, and they’re so delicate, and all these things, but I’ve never had any problems cooking crepes. Maybe that means I’m doing something wrong, like making them too thick, but since I’m happy with the way they turn out, I see no reason to change anything.

I used Jess’s crepe recipe, as she describes her family as quite the experts in crepe-making. But, I didn’t trust the 100% whole wheat flour idea, so I used half white and half whole wheat. I also had to make them tiny, because I was between medium-sized nonstick pans at the time.

This seems like a great crepe recipe! The bananas and Nutella were really good, and I sprinkled over some hazelnut praline I had leftover from the filbert cake. I’m eager to see what else I can come up with to put in crepes. Sweet variations are almost too easy, and I know sausage and maple syrup are delicious in crepes. What about savory options? I need to do some exploring.

Whole Wheat Crepes (adapted from hogwash)

Jess implores her readers to eat the crepes as soon as they come out of the pan, but I didn’t. I stored them in a 200 degree oven until they were all cooked, so that Dave and I could eat together.

6 servings

2 cups milk (plus more, if needed)
2 large eggs
8 tablespoons unsalted butter, melted, plus more for the pan
1½ tablespoons sugar
½ teaspoon salt
1⅔ cups (8⅓ ounces) whole wheat flour (or a mix of white and whole wheat)

6 bananas, sliced
6 tablespoons Nutella

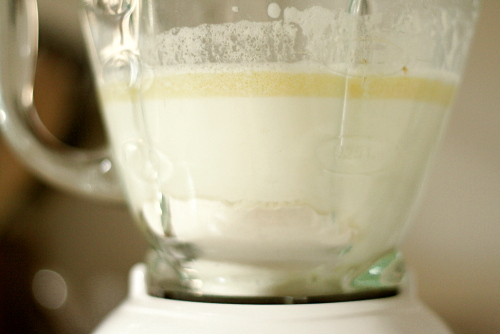
1. Combine the milk, eggs, melted butter, sugar, salt and 1 cup flour in a blender, and whirl until smooth, scraping down the sides of the glass, if necessary. Add all or most of the remaining flour, a bit at a time, until the batter has roughly the consistency of drinkable yogurt (very thin for pancake batter, but not runny). Let the batter sit at least 30 minutes at room temperature, or overnight in the refrigerator. (Bring the batter back to room temperature before continuing.)

2. Before cooking, thin the batter with a bit more milk, if it seems substantially thicker.

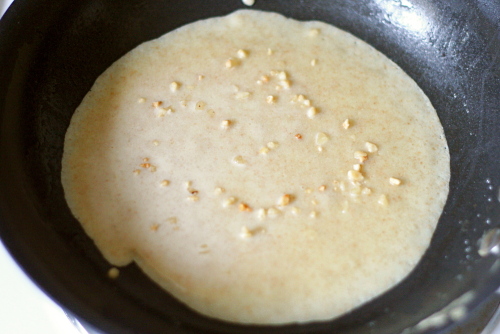
3. Preheat a crepe pan or large nonstick skillet over medium-high heat. When hot, grease with a dollop of butter (using a stick of butter to smear some directly on the skillet works nicely), and add enough batter to coat the skillet in a thin, even layer when you swivel the skillet around in your hand. Cook for a couple minutes, until you see bubbles in the center of the crepe and the bottom side is nicely browned. Flip carefully and cook another couple minutes on the other side. Fill as desired (in this case, with the sliced bananas and Nutella) and serve immediately. Repeat with the remaining batter.

fruit bruschetta

Lately I’ve been on a major breakfast kick. It seems like I want to try something different every weekend morning. This fruit bruschetta is definitely different – it doesn’t even fit into my simple sweet versus savory categorization of breakfasts. (Obviously it’s a sweet option, but it isn’t the standard pancakes/waffles/French toast offering.)

The bruschetta are easy to make. Toast and butter bread, sprinkle with cinnamon sugar and broil until the sugar caramelizes, top with fruit and yogurt. And except for the bit of sugar and butter, it’s actually healthy. As much as Dave loves the croque-madame, I think if it was up to him, we’d eat breakfasts like this far more often.

I used the last loaf of pain a l’ancienne for the brushetta. I noted when I made the pain a l’ancienne that the crust was too thick, and that, combined with maybe overtoasting it a bit, caused my bruschetta to be way too crispy. That’s an understatement – I worried for my teeth, eating this. But if you’re using normal bread, I’m sure you won’t have the same problem.

I think these would be perfect for a brunch. They can sit at room temperature for a while without a problem, and they’re easy finger food. They’re simple, they’re fairly healthy, and they’re certainly an original option.

Peach, Strawberry, and Banana Bruschetta (from Gourmet August 1994, but really epicurious.com)

Bridget note: I used vanilla yogurt to drizzle over the toasts instead of plain yogurt, so I skipped the honey and sprinkled lemon zest over the yogurt instead.

Makes 16 bruschetta

16 ½-inch-thick slices crusty Italian or French bread
2 tablespoons melted unsalted butter
1½ tablespoons sugar
1½ tablespoons cinnamon, or to taste
1 peach, peeled, pitted, and cut into fine dice
½ banana, cut into fine dice
8 large strawberries, cut into fine dice
3 to 4 tablespoons plain yogurt
honey for drizzling

Preheat oven to 375°F.

Arrange bread slices in one layer in a shallow baking pan and bake in middle of oven until golden, about 10 minutes. Brush toasts with butter on one side. Toasts may be made 1 week ahead and kept in an airtight container.

In a small bowl stir together 1 tablespoon sugar and cinnamon and sprinkle evenly over buttered side of each toast. Broil toast about 5 inches from heat under preheated broiler 30 seconds, or until tops are bubbling, and cool.

In a bowl stir together fruit and remaining ½ tablespoon sugar and mound about 1 tablespoon on each toast. Top each toast with about 1 teaspoon yogurt and drizzle with honey.

country egg scramble

In my mind, there are basically two kinds of breakfasts – there are savory breakfasts, which are generally based around eggs, and then there are sweet breakfasts, which include pancakes and waffles and the like. The best savory breakfasts involve potatoes in addition to the eggs. And bacon of course, unless you’re saving the bacon for BLTs and have to use sausage instead.

This skillet scramble is a simple but tasty example of a savory breakfast.  I did make some changes to the recipe here and there. Like most Betty Crocker recipes, this one tries to trick you into thinking it’s easier than it is by calling for cooked bacon in the ingredient list, rather than including the instructions for cooking bacon. Like I’m going to have cooked bacon laying around, just waiting to be sprinkled over breakfast. And why would I brown the potatoes in butter when there’s bacon fat right there?

Still, this recipe for a great savory breakfast is not complicated. You pretty much cook some tasty breakfast meat, then brown some par-boiled potatoes and add beaten eggs, cooking until they set. Easy though it might be, it involves most of my favorite breakfast ingredients – eggs, meat, and potatoes – and thus makes for a delicious and classic meal.

Printer Friendly Recipe
Country Egg Scramble
(adapted from Betty Crocker)

Serves 4

1 pound (6 to 7) new red potatoes, cubed
6 slices (6 ounces) bacon (or breakfast sausage), chopped
6 eggs
2 tablespoons milk
Salt
⅛ teaspoon pepper
4 medium green onions, sliced (¼ cup)

1. Place potatoes and ¼ teaspoon salt in 2-quart saucepan. Add water until it reaches 1 inch above potatoes. Heat to boiling over medium-high heat. Once the water boils, cook for 6 minutes or until potatoes are almost tender, then drain.

2. Meanwhile, cook bacon in a medium nonstick skillet over medium heat until crisp. Using a slotted spoon, transfer to paper towel-lined plate. Drain all but 2 tablespoons fat from skillet.

3. Beat eggs, milk, ¼ teaspoon salt, the pepper, and the green onions with fork or wire whisk until it’s a uniform yellow color; set aside.

4. Cook potatoes in bacon fat over medium-high heat for 5 to 8 minutes, turning occasionally, until browned. Stir in reserved bacon.

5. Pour egg mixture into skillet. As mixture begins to set at bottom and side, gently lift cooked portions with spatula so that thin, uncooked portion can flow to bottom. Avoid constant stirring. Cover pan and cook 3 to 4 minutes or until eggs are thickened throughout but still moist.

banana coconut muffins

Dave’s been eating muffins everyday, which is good for me because it gives me an actual reason to bake. Plus, I buy enough bananas for Dave and I to each eat one per day, but I’m so freakin’ bored of bananas that I never eat mine. I eat batter or dough instead. Did I mention that I bake a lot?

If I’m going to be making banana muffins constantly, I figure I might as well make some interesting ones. The recipe for these banana coconut muffins has a lot of great reviews on epicurious, which is always a good sign. Also, Dave likes coconut more than I do, and since I do all of the cooking for us, I don’t think he gets to eat it as often as he’d like.

I was really happy with the muffins. I can never resist eating one after I bake them, even though I’m making them for Dave to bring to work. They were light and tender and flavorful, with a good balance of banana and coconut flavor. Some of the coconut shreds on top of the muffin fell off, so next time I’ll pat those into the batter a bit. Other than that detail, these were perfect.

Banana Coconut Muffins (from epicurious.com)

Makes 8

1¼ cups (6.25 ounces) all-purpose flour
1 teaspoon baking powder
¼ teaspoon salt
2 very ripe bananas, mashed (¾ cup)
1 stick (½ cup) unsalted butter, melted
⅔ cup (4.65 ounces) sugar
1 large egg
½ teaspoon vanilla
¾ cup sweetened flaked coconut

Put oven rack in middle position and preheat oven to 375°F. Line muffin cups with liners.

Whisk together flour, baking powder, and salt in a bowl. Whisk together bananas, butter, sugar, egg, vanilla, and ½ cup coconut in a large bowl until combined well, then fold in flour mixture until flour is just moistened.

Divide batter among lined muffin cups and sprinkle with remaining ¼ cup coconut. Bake until muffins are puffed and golden, about 25 minutes. Transfer muffins to a rack and cool slightly.

fried egg and sausage ciabbata breakfast pizzas

By now it must be obvious that I like eggs on top of stuff. Poached are my favorite, but fried is fine too. With some potatoes or bread to soak up the creamy yolk and any number of other additions, a lot of my favorite breakfasts are based around eggs on stuff.

I’m not completely sure that this particular breakfast deserves its own recipe, although I apparently needed one to give me the idea. All it really is some crusty bread, halved horizontally, brushed with oil and topped with green onions, cheese, and cooked sausage. The pizzas are cooked until the cheese melts, then topped with a fried egg and more green onions.

I kept the basic structure of the recipe the same, but varied the details. I used some extra pain a l’ancienne that I had in the freezer, plus cheddar instead of pepper jack and breakfast sausage instead of Italian. The recipe instructs that chopped green onions should be mixed with a half cup of olive oil, which is rubbed on the bread and then drizzled over the egg at the end. I’m sure I don’t have to tell you that is a heck of a lot of oil (even for eight servings). I used just enough to coat the bread before adding the other toppings, and I (meant to but forgot to) sprinkled more chopped green onions over the egg, leaving the oil behind.

Dave and I couldn’t quite figure out if we should eat these with silverware or hands. Dave tried using silverware, and it seemed like sort of a disaster. I ended up picking mine up to eat it with my hands, and it worked pretty well. I was thinking that the yolk might be a drippy mess, but it mostly soaked into the bread below. So disregard the silverware in the pictures – I’m pretty sure silverware is not the way to go here. It is pizza, after all.

You can vary the ingredients to use whatever seems good to you. Any crusty chewy bread will work, and any cheese or cooked meat. Any way you go about it, this should be an easy and fun breakfast to put together and eat.

Fried Egg and Sausage Ciabatta Breakfast Pizzas (from Bon Appétit January 2008, but really epicurious.com)

BA note: Make this recipe your own by using different sausages and cheeses. For a Middle Eastern spin, sub in lamb sausage and feta. Serve pizzas with hot sauce.

Bridget note: I used breakfast sausage, cheddar cheese, pane a l’ancienne, and far less oil.

Makes 8 servings

1 loaf ciabatta bread (about 1 pound)
1 cup chopped green onions
8 tablespoons olive oil, divided
8 ounces sliced hot pepper Monterey Jack cheese
1 pound spicy or sweet Italian sausages, casings removed
8 large eggs

Preheat oven to 450°F. Cut bread horizontally in half. Place bread halves, cut side up, on separate baking sheets. Mix onions and 6 tablespoons oil in small bowl. Season with salt and pepper. Reserve 2 tablespoons onion oil and spread remaining onion oil over bread. Top with cheese.

Sauté Italian sausages in large nonstick skillet over medium-high heat until cooked through, breaking up with spoon, about 7 minutes. Divide sausage among bread halves. Bake pizzas until cheese melts and bread begins to crisp, about 10 minutes.

Meanwhile, heat 1 tablespoon oil in each of 2 large skillets over medium-high heat. Crack 4 eggs into each skillet. Sprinkle with salt and pepper. Cook 2 minutes. Remove from heat and let eggs stand in skillets while pizzas bake.

Arrange 4 eggs atop each pizza. Spoon reserved onion oil over eggs. Cut each pizza between eggs into 4 pieces.

yeasted waffles with vanilla butter, sliced bananas and candied macadamia nuts

I try to resist having too many kitchen gadgets squeezed into my apartment’s small galley-style kitchen, but somehow I ended up with two waffles irons. One for flatter, traditional waffles and then one of those huge Belgian waffle makers that you see in hotel complementary breakfast line-ups.

Yikes. That’s a big waffle maker. But I figure the more I use it, the more justification I have for owning it. Danielle recently described a breakfast she had in a restaurant as a “dance in your seat meal” – sourdough waffles with candied walnuts and sliced bananas, served with vanilla butter. Hmm…yum.

I was pretty sure I could recreate it with just a few adjustments. I don’t have sourdough starter, but one of the recipes that came with my waffle iron uses yeast. It’s an easy recipe to put together, and in fact, most of it is done the night before, which I always like with breakfast recipes. The waffles ended up tasting fairly sourdoughy actually, plus they were wonderfully crisp on the outside and tender on the inside.

I didn’t have walnuts, but I sugared macadamia nuts using the same method used for the peanuts in the Snickery Squares recipe. For the vanilla butter, I mixed softened butter with my homemade vanilla extract and just a little powdered sugar. I considered using a real vanilla bean, but I got lazy.

Overall, it was great! I wasn’t crazy about the banana, either because it was too ripe, or because I eat bananas so much that I’m just not interested in them in a weekend breakfast. But the nuts were great, and it was nice not having to slather everything in maple syrup. The real find of this meal was the waffle recipe, which is the best I’ve ever made, and will certainly be my standard recipe in the future.

Good Night Waffles (adapted from the Waring Pro Belgian Waffle Maker instruction booklet)

I reduced the butter in this recipe from 8 tablespoons to 6 tablespoons since I knew I’d be topping the waffles with vanilla butter. Because the waffles seemed so good with the lower amount of butter, I figured I might as well stick with it.

½ cup water
1 tablespoon granulated sugar
2¼ teaspoons (one packet) instant dry yeast
2 cups whole milk
6 tablespoons unsalted butter, melted and cooled
1 teaspoon salt
2 cups all-purpose flour
2 large eggs, lightly beaten
2 teaspoons vanilla extract
¼ teaspoon baking soda

1. The night before, or at least 8 hours before baking, combine the warm water, granulated sugar, yeast, milk, melted butter, and salt. Beat in the flour until smooth (this may be done using a hand mixer on low speed). Wrap bowl tightly with plastic wrap and let stand overnight (or for 8 hours) on the countertop – do not refrigerate.

2. When ready to bake, preheat your waffle maker on your preferred setting. While the waffle maker is heating, stir the eggs, vanilla extract, and baking soda into the batter. Measure out enough batter for your waffle maker and pour into the preheated waffle maker. Use a heat-proof spatula to spread the batter evenly over the grids. Close lid and bake the Belgian waffle in the waffle maker until it indicates the waffle is done.

3. Remove waffle and repeat until the desired number of Belgian waffles has been made. Cover remaining batter and place in the refrigerator for up to 3 days. Waffles may be kept warm in an oven at low-heat (200°F). Place Belgian waffles on a cookie sheet on a rack in the warm oven.

This made 6 waffles for me. I served it with 3 sliced bananas, 1 cup sugared macadamia nuts, and 3 tablespoons vanilla sugar. Vanilla sugar was made by mixing 3 tablespoon butter with 1 teaspoon vanilla extract and 2 tablespoons powdered sugar.

croque-madame


If you’re looking for the best decadent breakfast ever, here it is. Even better than Eggs Benedict. I think. It’s basically Eggs Benedict with cheese.

The first time I made this, I thought I was making something complicated. But as I slowly worked my way through the recipe, I realized that it’s really a fancy ham and cheese sandwich. One slice of bread is slathered with swiss cheese sauce and the other slice with mustard. The sandwich is “grilled” the same way grilled cheese sandwiches are – browned on the stove with butter, and then it’s smeared with more cheese sauce and broiled until the sauce is spottily browned. The sandwich is topped with a fried egg. (Without the egg, it’s a Croque-Monsieur.)

The first time I had this, I got that heavy feeling afterwards that’s clearly a result of a meal full of fatty proteins and refined carbs. The next time, I made some efforts to lighten up the recipe. Mostly I eliminated some of the nice-but-not-necessary butter and reduced the cheese sauce. I have to admit that the most influential adjustment had to be my portion size.

It’s worth the indulgence. While it’s nigh on impossible to pick favorites, the combination of crispy bread, salty ham, spicy mustard, creamy cheese sauce and smooth yolk certainly makes this a contender for the best breakfast out there. Especially if you have plans to get in some activity later to work off some of that guilt…

Croque-madame (adapted from Gourmet March 2007, as found on epicurious)

Makes 4 servings

Bridget note: You can of course use all shredded cheese. I found it easier to only shred what was going into the sauce and to slice the rest. I’ve used both Country Crust Bread and storebought Italian bread for this recipe and enjoyed both.

3 tablespoons unsalted butter
2 tablespoons all-purpose flour
1½ cups whole milk
⅛ teaspoon salt
pinch teaspoon black pepper
pinch teaspoon freshly grated nutmeg
¼ cup (1 ounce) shredded swiss cheese
4 slices (1.5 ounces) sliced swiss cheese
8 slices firm white sandwich bread
4 teaspoons Dijon mustard
½ pound thinly sliced cooked ham (preferably Black Forest)
4 large eggs

1. Melt 2 tablespoons butter in a 1- to 1½-quart heavy saucepan over moderately low heat, then whisk in flour and cook roux, whisking, for 1 minute. Whisk in milk and bring to a boil over medium-high heat, whisking constantly. Reduce heat to low and simmer, whisking occasionally, for 5 minutes. Whisk in salt, pepper, nutmeg, and shredded cheese until cheese is melted. Remove from heat. Stir occasionally while preparing sandwiches to keep hard surface from forming on top of sauce. (Alternatively, place plastic wrap directly on surface of sauce.)

2. Adjust an oven rack to the top position and heat the broiler. Spray a baking sheet with nonstick spray.

3. Spread 1 tablespoons sauce evenly over each of 4 slices of bread, then cover evenly with remaining cheese. Spread mustard evenly on remaining 4 bread slices and top with ham, dividing it evenly, then invert onto cheese-topped bread to form sandwiches.

4. Melt ½ tablespoon butter in a 12-inch nonstick skillet over medium heat. Once melted, add the sandwiches and cook until golden, 3-4 minutes. Remove sandwiches from pan, add remaining ½ tablespoon butter, and return sandwiches, unbrowned side down, to pan. Cook until golden on second side. Transfer sandwiches to prepared baking pan. Do not wash skillet.

5. Top sandwiches with remaining sauce, spreading evenly. Broil sandwiches until sauce is bubbling and golden in spots, 2 to 4 minutes.

6. While sandwiches are broiling, heat the same nonstick pan over medium heat. Spray the pan with nonstick spray if there’s not butter leftover from browning the sandwiches. Crack eggs into skillet and season with salt and pepper. Fry eggs, covered, until whites are just set and yolks are still runny, about 3 minutes. Top each sandwich with a fried egg and serve immediately.

pecan honey sticky buns (twd)

My experience with sticky buns is limited; I guess we were more of a cinnamon roll family. Madam Chow’s TWD choice for this week would be something new for me then.

Dorie is insistent that you don’t cut the brioche dough in half. But, I did anyway. (Actually, I made a third of the recipe.) It would have been the same amount of effort to make the whole thing, and it freezes well, but do I really need this incredibly buttery bread dough to be conveniently at my fingertips? Nah. I admit I had to get a little creative with my mixer since I was making such a small amount – I mixed with the paddle for a while after adding the butter, then switched to the dough hook for the last few minutes of kneading.

I had the same problem that a number of other TWD members did with this recipe – 2 hours of rising in the morning, plus putting the rolls together and baking makes for a long wait until breakfast. I think it would work to form the rolls the night before, put them in the fridge overnight, and let them rise in a warmed oven the next morning. That should cut the waiting time in half.

The brioche made for a really light and airy base for sticky buns. But, I wonder if all that butter is worth it once it’s drowned in glaze? I’m thinking my base for cinnamon rolls would work just fine, with only about a third of the butter.

Overall, I thought these were great. The bread was light and tender, the glaze wasn’t too sweet, and they weren’t nearly as sticky as I was expecting. I almost wish I had made some extra to store in the freezer!

Pecan Honey Sticky Buns (from Dorie Greenspan’s Baking: From My Home to Yours)

Makes 15 buns

For the Glaze:
1 cup (7 ounces) packed light brown sugar
1 stick (8 tablespoons) unsalted butter, cut into 4 pieces
¼ cup honey
1½ cups pecans (whole or pieces)

For the Filling:
¼ cup (1.75 ounces) sugar
3 tablespoons (packed) light brown sugar
1 tablespoon ground cinnamon
3 tablespoons unsalted butter, at room temperature

For the Buns:
½ recipe dough for Golden Brioche loaves (see below), chilled and ready to shape (make the full recipe and cut the dough in half after refrigerating it overnight)

Generously butter a 9 by 13-inch baking pan (a Pyrex pan is perfect for this).

To make the glaze: In a heavy-bottomed saucepan, bring the brown sugar, butter, and honey to a boil over medium-low heat, stirring frequently to dissolve the sugar. Pour the glaze into the buttered pan, evening it out as best you can by tilting the pan or spreading the glaze with a heatproof spatula. Sprinkle over the pecans.

To make the filling: Mix the sugars and cinnamon together in a bowl. If necessary, in another bowl, work the butter with a spatula until it is soft, smooth and spreadable.

To shape the buns: On a flour-dusted work surface, roll the chilled dough into a 16-inch square. Using your fingers or a pastry brush, spread the softened butter over the dough. Sprinkle the dough with the cinnamon sugar, leaving a 1-inch strip bare on the side farthest from you. Starting with the side nearest you, roll the dough into a cylinder, keeping the roll as tight as you can. (At this point, you can wrap the dough airtight and freeze it for up to 2 months . . . . Or, if you want to make just part of the recipe now, you can use as much of the dough as you’d like and freeze the remainder. Reduce the glaze recipe accordingly).

With a chef’s knife, using a gentle sawing motion, trim just a tiny bit from the ends of the roll if they’re very ragged or not well filled, then cut the log into 1-inch thick buns. (Because you trim the ragged ends of the dough, and you may have lost a little length in the rolling, you will get 15 buns, not 16.) Fit the buns into the pan cut side down, leaving some space between them.

Lightly cover the pan with a piece of wax paper and set the pan in a warm place until the buns have doubled in volume, about 1 hour and 45 minutes. The buns are properly risen when they are puffy, soft, doubled and, in all likelihood, touching one another.

Getting ready to bake: When the buns have almost fully risen , center a rack in the oven and preheat the oven to 375 degrees F.

Remove the sheet of wax paper and put the pan on a baking sheet lined with parchment or a silicone mat. Bake the sticky buns for about 30 minutes, or until they are puffed and gorgeously golden; the glaze will be bubbling away merrily. Pull the pan from the oven.

The sticky buns must be unmolded minutes after they come out of the oven. If you do not have a rimmed platter large enough to hold them, use a baking sheet lined with a silicone mate or buttered foil. Be careful – the glaze is super-hot and super-sticky.

Golden Brioche Loaves

2 packets active dry yeast (each packet of yeast contains approx. 2 1/4 teaspoons)
1/3 cup just-warm-to-the-touch water
1/3 cup just-warm-to-the-touch whole milk
3 1/3 cups all-purpose flour
2 teaspoons salt
3 large eggs, at room temperature
1/4 (1.75 ounces) cup sugar
3 sticks (12 ounces) unsalted butter, at room temperature but still slightly firm

What You’ll Need for the Glaze (you would brush this on brioche loaves, but not on the sticky buns):
1 large egg
1 tablespoon water

To Make The Brioche: Put the yeast, water and milk in the bowl of a stand mixer and, using a wooden spoon, stir until the yeast is dissolved. Add the flour and salt, and fit into the mixer with the dough hook, if you have one. Toss a kitchen towel over the mixer, covering the bowl as completely as you can – this will help keep you, the counter and your kitchen floor from being showered in flour. Turn the mixer on and off a few short pulses, just to dampen the flour (yes, you can peek to see how you’re doing), then remove the towel, increase the mixer speed to medium-low and mix for a minute or two, just until the flour is moistened. At this point, you’ll have a fairly dry, shaggy mess.

Scrape the sides and bottom of the bowl with a rubber spatula, set the mixer to low and add the eggs, followed by the sugar. Increase the mixer speed to medium and beat for about 3 minutes, until the dough forms a ball. Reduce the speed to low and add the butter in 2 tablespoon-sized chunks, beating until each piece is almost incorporated before adding the next. You’ll have a dough that is very soft, almost like batter. Increase the speed to medium-high and continue to beat until the dough pulls away from the sides of the bowl, about 10 minutes.

Transfer the dough to a clean bowl (or wash out the mixer bowl and use it), cover with plastic wrap and leave at room temperature until nearly doubled in size, 40 to 60 minutes, depending upon the warmth of your room.

Deflate the dough by lifting it up around the edges and letting it fall with a slap to the bowl. Cover the bowl with the plastic wrap and put it in the refrigerator. Slap the dough down in the bowl every 30 minutes until it stops rising, about 2 hours, then leave the uncovered dough in the refrigerator to chill overnight. (After this, you can proceed with the recipe to make the brioche loaves, or make the sticky buns instead, or freeze all or part of the dough for later use.)

The next day, butter and flour two 8½ by 4½-inch pans.

Pull the dough from the fridge and divide it into 2 equal pieces. Cut each piece of the dough into 4 equal pieces and roll each piece into a log about 3½ inches long. Arrange 4 logs crosswise in the bottom of each pan. Put the pans on a baking sheet lined with parchment or a silicone mat, cover the pans lightly with wax paper and leave the loaves at room temperature until the dough almost fills the pans, 1 to 2 hours. (Again, rising time with depend on how warm the room is.)

Getting Ready To Bake: Center a rack in the oven and preheat the oven to 400 degrees F.
To Make the Glaze: Beat the egg with the water. Using a pastry brush, gently brush the tops of the loaves with the glaze.

Bake the loaves until they are well risen and deeply golden, 30 to 35 minutes. Transfer the pans to racks to cool for 15 minutes, then run a knife around the sides of the pans and turn the loaves out onto the racks. Invert again and cool for at least 1 hour.

hash browns with sauteed vegetables and poached eggs

I’ve become enamored with poached eggs lately. They’re such a great topping for so many breakfast ideas. Besides eggs benedict, I like to serve them on toast with a bit of cheddar cheese sprinkled over. Hash browns and a bed of sautéed vegetables is my favorite poached eggs base.

The trick to great hash browns is to use starchy potatoes like russets, but to rinse some of the outside starch off of the shreds, then thoroughly dry them before starting to cook. Because I consider this breakfast one of my healthier options, I use olive oil for cooking both the vegetables and the potatoes, although vegetable oil and butter are also good choices. How often you stir the potatoes depends on how you like your hash browns. If you want a crispy base and a tender interior within a bed of potatoes, pack the shreds into a medium-size pan and leave them alone until the bottom browns, 5-6 minutes. Then flip the whole mound over and brown the second side. I tend to put the potatoes in a large skillet and stir every few minutes. After 10-15 minutes, they’re pretty evenly split between crispy browned and tender.

The vegetables you use are completely adaptable. My favorite combination is red onion, red peppers, and mushrooms. This time I used spinach instead of the red peppers, and I loved it. I like the vegetables chopped so that I can get some of each in one bite, so pretty small. (I’m particular about how vegetables are chopped anyway.)

Mound some cooked potatoes on a plate, spread the sautéed vegetables over it, and top with a poached egg – it’s a perfect combination of flavors and nutrition. Once the egg is cut into, warm yolk drips down and blends with the potatoes, and your morning is off to a terrific start.

Hash Browns, Sautéed Vegetables, and Poached Eggs (Poached Egg recipe from Cooks Illustrated)

Serves 2

1½ tablespoons olive oil
6-8 cremini or button mushrooms, halved if large and sliced thin
salt
½ small red onion, halved and sliced thin
1½ ounces spinach, cleaned and chopped very coarse
ground black pepper
1 pound russet potatoes, peeled and washed
2-4 eggs, each cracked into a small handled cup
2 tablespoons white vinegar

1. Heat oven to 200 degrees, then turn it off. Place 2 large plates in warm oven.

2. Heat ½ tablespoon of olive oil in a large nonstick skillet over medium-high heat. When shimmering but not smoking, add mushrooms and a pinch of salt. Cook, stirring occasionally, until liquid released by mushrooms has evaporated. Add onion and cook until browned at edges. Add spinach and cook, stirring constantly, until just wilted. Season with salt and pepper to taste and transfer to a bowl. Put bowl in warmed oven.

3. While vegetables cook, shred potatoes in food processor with shredding blade or on large holes of box grater. Rinse thoroughly in a strainer, then move to a clean kitchen towel and squeeze and pat dry.

4. Heat 1 tablespoon olive oil in the same skillet (no need to wash) over medium heat until shimmering but not smoking. Add potatoes and ¼ teaspoon salt and mix thoroughly. Cook potatoes, stirring every 2-3 minutes, until slightly browned and cooked throughout, a total of 15-20 minutes.

5. While potatoes cook, fill an 8- to 10-inch nonstick skillet nearly to the rim with water, add 1 teaspoon salt and the vinegar, and bring the mixture to boil over high heat. Lower the lips of each cup just into water at once; tip eggs into boiling water, cover, and remove from heat. Poach until yolks are medium-firm, exactly 4 minutes. For firmer yolks (or for extra large or jumbo eggs), poach 4 ½ minutes; for looser yolks (or for medium eggs), poach 3 minutes.

6. While eggs are cooking, divide potatoes between warmed plates. Top with sautéed vegetables. With a slotted spoon, carefully lift and drain each egg over skillet, then lay each over vegetables. Season to taste with salt and pepper and serve immediately.

breakfast strata with sausage, mushrooms, and monterey jack

I hear a lot of requests for breakfast casserole recipes. They’re popular for good reason. Waking up to a tasty and filling breakfast that needs nothing more than to be thrown into a hot oven is a great way to start the weekend. I’ve made and loved Deb’s Boozy Baked French Toast, but it’s missing some sort of fruit to round out the nutrition. This sausage and mushroom strata has it all – protein, starch, and vegetables.

I’ve eaten a lot of different breakfast casseroles, and I’ve found that there are some tricks to making a good one. One is to use hearty bread and to dry it out so you don’t have a soggy casserole. You want to replace the moisture that’s naturally in the bread with your own flavored liquids. Also, don’t use so many eggs that they can’t be evenly mixed in and absorbed. I have a recipe for a breakfast casserole that I love the flavors of, but the original recipe calls for so many eggs that I once got a bite of nothing but unmixed egg white while eating it. Finally, of course you need to use a combination of flavors that you love, and adding lots of cheese never hurts.

Casseroles like this are perfect when you have a long day ahead of you and don’t have time to prepare a good breakfast in the morning. I’ve eaten them before skiing, hiking, and moving. They also make a great addition to a brunch menu.

Breakfast Strata with Sausage, Mushrooms, and Monterey Jack (from Cooks Illustrated November 2001)

Makes one 8 by 8-inch strata, serving 6

CI note: To weigh down the assembled strata, we found that two 1-pound boxes of brown or powdered sugar, laid side by side over the plastic-covered surface, make ideal weights. A gallon-sized zipper-lock bag filled with about 2 pounds of sugar or rice also works. This recipe doubles easily; use a 9 by 13-inch baking dish greased with only 1½ tablespoons butter and increase the baking time as directed in step 4. Feel free to substitute any good melting cheese, such as Havarti, sharp cheddar, or colby.

Bridget note: This time when I made this recipe, it ended up a bit too salty. I’m guessing the necessary salt will vary based on the sausage, so start low and add more if necessary. Pictures show a half recipe made in a loaf pan.

8-10 slices supermarket French bread (½-inch thick) or Italian bread (6 – 7 ounces)
3 tablespoons unsalted butter, softened
8 ounces bulk breakfast sausage, crumbled
3 medium shallots, minced (about 1/3 cup)
8 ounces white button mushrooms, cleaned and quartered
Table salt and ground black pepper
½ cup medium-dry white wine, such as Sauvignon Blanc
6 ounces Monterey Jack cheese, grated (about 1½ cups)
6 large eggs
1¾ cups half-and-half
2 tablespoons minced fresh parsley leaves
1. Adjust oven rack to middle position and heat oven to 225 degrees. Arrange bread in single layer on large baking sheet and bake until dry and crisp, about 40 minutes, turning slices over halfway through drying time. (Alternatively, leave slices out overnight to dry.) When cooled, butter slices on one side with 2 tablespoons butter; set aside.

2. Fry sausage in medium nonstick skillet over medium heat, breaking sausage apart with wooden spoon, until sausage has lost raw color and begins to brown, about 4 minutes; add shallots and cook, stirring frequently, until softened and translucent, about 1 minute longer. Add mushrooms to skillet, and cook until mushrooms no longer release liquid, about 6 minutes; transfer mixture to medium bowl and season to taste with salt and pepper. Add wine to skillet, increase heat to medium-high, and simmer until reduced to ¼ cup, 2 to 3 minutes; set aside.

3. Butter 8-inch square baking dish with remaining 1 tablespoon butter; arrange half the buttered bread slices, buttered-side up, in single layer in dish. Sprinkle half of sausage mixture, then ½ cup grated cheese evenly over bread slices. Arrange remaining bread slices in single layer over cheese; sprinkle remaining sausage mixture and another ½ cup cheese evenly over bread. Whisk eggs and parsley in medium bowl until combined; whisk in reduced wine, half-and-half, 1 teaspoon salt, and pepper to taste. Pour egg mixture evenly over bread layers; cover surface flush with plastic wrap, weigh down (see note, above), and refrigerate at least 1 hour or up to overnight.

4. Remove dish from refrigerator and let stand at room temperature 20 minutes. Meanwhile, adjust oven rack to middle position and heat oven to 325 degrees. Uncover strata and sprinkle remaining ½ cup cheese evenly over surface; bake until both edges and center are puffed and edges have pulled away slightly from sides of dish, 50 to 55 minutes (or about 80 minutes for doubled recipe). Cool on wire rack 5 minutes; serve.