black (and pink) and white chocolate cake

I thought long and hard about what to make for my birthday cake. The thing about this obsessed-with-baking phase that I’m going through is that the eating of the cake is almost secondary to the fun of making it. I had a fairly long list of desserts I was considering, split almost evenly between cheesecakes and somewhat-elaborate layer cakes. I settled on Dorie Greenspan’s Black and White Chocolate Cake because it seemed like a good balance between fancy and not so much work that I’d spend all day (the day before my birthday) baking. Or so I had hoped.

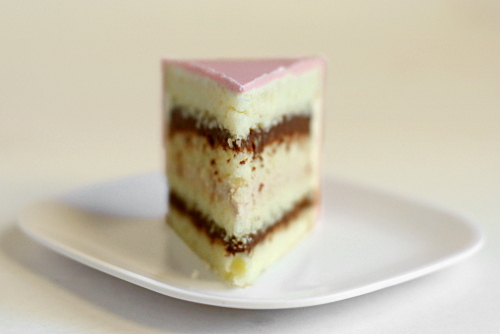
The cake consists of a straightforward buttermilk-vanilla cake, layered with chocolate pastry cream and vanilla cream. The chocolate pastry cream was easy and delicious, and the cake itself came together without any problems.

The white chocolate cream, unfortunately, was not so smooth (literally). This was one of the first TWD recipes, back when there were only a handful of members, so I had scanned a few of their entries and seen that the white chocolate cream might be a problem. I knew enough to use high quality white chocolate, which is less prone to problems in baking than cheaper versions. Valrhona and Guittard are recommended most often, but both require a special, out-of-my-way trip to either Whole Foods or Williams-Sonoma, and I’ve had good experiences with Green and Black’s White Chocolate, which is available at my regular grocery store.

The white chocolate cream is made by melting white chocolate with cream, then adding that mixture to cream that’s been whipped to very soft peaks and continuing to beat until firm peaks are achieved. Firm peaks. Not stiff peaks. I guess I should have considered the difference between those two more carefully. I knew, knew, that there was the potential to overbeat the mixture and cause curdling, and I was so careful, only beating for about a second at a time, then checking the consistency. I was waiting until the peaks could hold their shape.

But the mixture curdled first. I tried to save it, the same way I’ve saved curdled buttercream in the past, and I thought for a while that it might work, but it didn’t. I kicked myself over and over for not stopping whipping the cream mixture early enough. Then I mentally berated Dorie for not being more specific. She gives such wonderful detailed instructions sometimes, describing exactly what the food processor should sound like when tart dough is ready, but she can’t add a warning about this “firm peaks” issue. Bleah.

Even if I’d had the right ingredients, which I didn’t, I wasn’t enthusiastic about trying the white chocolate cream again. Instead, I made a white chocolate buttercream. But I accidentally only made enough to give the cake the thinnest of coatings. I was tired of dealing with fussy white chocolate, and I’d already incorporated raspberries into the cake, so then I made another buttercream, this time flavored with raspberries. But I was frustrated and bored by this time, so I screwed up the buttercream, twice (cooked the egg whites), because of I was inattentive.

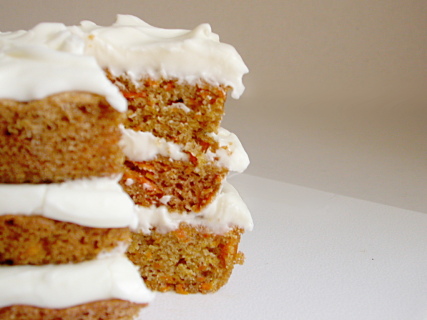
So much for my relatively straightforward cake. To assemble, I mixed a portion of the white chocolate buttercream with some raspberry pastry cream I had leftover from another project, and used that as the white chocolate layer in the cake. I used the white chocolate buttercream as a crumb coat and the raspberry buttercream as a final layer.

I wasn’t disappointed in the final product. For one thing, it was really pretty. The cake itself was tasty, although it probably could have used a quick brush with a simple syrup. The dark chocolate pastry cream was fantastic. I wasn’t totally happy with either the white chocolate or the raspberry buttercream, but neither detracted from the final product, even if they didn’t add much. All in all, a satisfactory birthday cake.

Black and White Chocolate Cake (from Dorie Greenspan’s Baking: From My Home to Yours)

Makes 10 servings

For the Cake
2 cups cake flour
2 teaspoons baking powder
⅛ teaspoon baking soda
¼ teaspoon salt
1¼ sticks (10 tablespoons) unsalted butter, at room temperature
1 cup sugar
3 large eggs
1 large egg yolk
1 teaspoon pure vanilla extract
¾ cup buttermilk

For the Dark Chocolate Cream
2 cups whole milk
4 large egg yolks
6 tablespoons sugar
3 tablespoons cornstarch, sifted
¼ teaspoon salt
7 ounces bittersweet chocolate, melted
2½ tablespoons unsalted butter, cut into 5 pieces, at room temperature

For the White Chocolate Whipped Cream
6 ounces premium-quality white chocolate (such as Valrhona Ivoire or Guittard), finely chopped
1½ cups heavy cream

Chocolate shavings or curls, dark or white or a combination, for decoration (optional)

Getting Ready:
Center a rack in the oven and preheat the oven to 350 degrees F. Butter two 9-x-2-inch round cake pans, dust the insides with flour, tap out the excess and line the bottoms of the pans with parchment or wax paper. Put the pans on a baking sheet.

To Make the Cake:
Sift together the cake flour, baking powder, baking soda, and salt.

Working with a stand mixer, preferably fitted with a paddle attachment, or with a hand mixer in a large bowl, beat the butter on medium speed until soft and creamy. Add the sugar and beat for another 3 minutes. Add the eggs one by one, and then the yolk, beating for 1 minute after each addition. Beat in the vanilla; don’t be concerned if the mixture looks curdled. Reduce the mixer speed to low and add the dry ingredients alternately with the buttermilk, adding the dry ingredients in 3 additions and the milk in 2 (begin and end with the dry ingredients); scrape down the sides of the bowl as needed and mix only until the ingredients disappear into the batter. Divide the batter evenly between the two pans and smooth the tops with a rubber spatula.

Bake for 28 to 30 minutes, rotating the pans at the midway point. When fully baked, the cakes will be golden and springy to the touch and a thin knife inserted into the centers will come out clean. Transfer the cakes to a rack and cool for about 5 minutes, then unmold, remove the paper and invert to cool to room temperature right side up on the rack.

To Make the Dark Chocolate Cream:
Bring the milk to a boil.

Meanwhile, in a large heavy-bottomed saucepan, whisk the egg yolks with the sugar, cornstarch and salt until thick and well blended. Whisking without stopping, drizzle in about ¼ cup of the hot milk – this will temper, or warm, the yolks so they won’t curdle – then, still whisking, add the remainder of the milk in a steady stream. Put the pan over medium heat and, whisking vigorously, constantly and thoroughly (make sure to get into the edges of the pan), bring the mixture to a boil. Keep at a boil, still whisking, for 1 to 2 minutes. Remove the pan from the heat.

Whisk in the melted chocolate, and let stand for 5 minutes. Then whisk in the pieces of butter, stirring until they are fully incorporated and the chocolate cream is smooth and silky. Press a piece of plastic wrap against the surface of the cream to create an airtight seal and refrigerate the cream until chilled, or for up to 3 days. Or, if you want to cool the cream quickly, put the bowl with the cream into a large bowl filled with ice cubes and cold water and stir the cream occasionally until it is thoroughly chilled, about 20 minutes.

To Make the White Chocolate Whipped Cream:
Put the white chocolate in a heatproof bowl and put the bowl over a saucepan of gently simmering water. Stir frequently to melt the chocolate evenly. Meanwhile, bring ½ cup of the heavy cream to a boil.

When the white chocolate is melted, remove the bowl from the pan. Pour the hot cream into the melted chocolate and let it sit for a minute. Using a small spatula, stir the chocolate gently until it is smooth. Let it sit on the counter until it reaches room temperature – it can’t be the least bit warm when you add it to the whipped cream.

Working with the stand mixer with the whisk attachment or with a hand mixer in a large bowl, beat the remaining 1 cup heavy cream only until it holds the softest peaks. Turn the machine to high, add the cooled white chocolate all at once and continue to beat until the whipped cream holds firm peaks. Turn the whipped cream into a bowl, press a piece of plastic wrap gently against the surface to create an airtight seal and refrigerate for at least 2 hours, or up to 6 hours.

To Assemble the Cake:
If the tops of the cake layers have crowned, use a long serrated knife and a gentle sawing motion to even them. Slice each layer horizontally in half. Place one layer cut side down on a cardboard cake round or on a cake plate protected by strips of wax or parchment paper.

Remove the dark and white chocolate creams from the refrigerator and whisk each of them vigorously to loosen and smooth them. With a long metal icing spatula, spread enough dark chocolate cream (about 1 cup) over the cake layer to cover it completely. Top the cream with another cake layer, cut side up, and cover this layer with white chocolate whipped cream, making the white layer about the same thickness as the dark layer. Cover with a third layer, cut side up, and cover with another cup or so of the dark chocolate cream. (You’ll have some dark chocolate cream left over – use it as a dip for madeleines or sables.) Top with the final layer of cake, cut side down, and frost the sides and top with the remaining white chocolate whipped cream. If you’d like to decorate the top with chocolate shavings or curls, do it now.

Refrigerate for at least 3 hours, or overnight.

Serving: Remove the cake from the fridge about 20 minutes before serving. Use a serrated knife and a gentle sawing motion to cut it. Though the cake is particularly good with coffee or tea, it also goes well with a sweet or sparkling dessert wine.

Storing: While both the dark chocolate cream and white chocolate cream can be made ahead and kept tightly covered in the refrigerator, once assembled, the cake is best after about 3 hours in the fridge. However, it can be refrigerated overnight – just cover it loosely and keep it away from foods with strong odors.

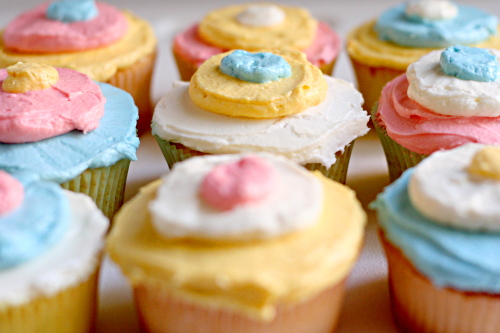
The Raspberry Buttercream is the same recipe used for Dorie’s Perfect Party Cake, with raspberry puree substituting for the lemon juice. The White Chocolate Buttercream is the ingredients in this recipe using the method for Dorie’s buttercream.

black and white banana loaf (twd)

I couldn’t figure out at first whether the banana loaf Ashlee chose for TWD this week was supposed to be a cake or a quick bread. Eventually I realized that it’s in the cake section of the book, only a few pages after the pound cake recipe. But that didn’t stop me from baking it in a muffin pan.

Other TWD members had a lot of problems with this recipe, claiming that the batter was too liquidy. I didn’t really have any issues, although the batter was curdled at the end and looked really gross. Also – for something that I thought would be pretty straightforward, this used a surprising amount of dishes.

My correctly-sized loaf pan is in the freezer full of mushroom lasagna, so I had to bake the recipe in smaller dishes. That meant I could play around with some different methods of combining the batters. I was eager to try polka-dots.  It was fairly successful; I think they’d work better in a larger pan, but this was a good learning experience.

But I thought it was really good. Dave said that it was good but not something that he’d ever really ask me make, so I must have liked it more than he did. I thought the little cakes had a nice texture – they’re really moist, but also nice and firm. The banana flavor is pretty subtle, which I don’t prefer in banana bread, but I liked in this cake.

The recipe can be found on Ashlee’s blog.

filbert gateau with praline buttercream (daring bakers)

There were a lot of similarities between the Filbert Gateau that Chris chose for this month’s Daring Baker challenge and the opera cake we made a few months ago. This works out well for me, because I could definitely use the cake-building practice. And I don’t know if I’m getting better at this whole baking thing or what, but this cake came together quite nicely for me.

I made the entire opera cake, from start to finish, in one day. I thought it would be fun, and while there were fun aspects, by the end, I never wanted to bake again (for two days). This time I got smart and did at least a small portion of the recipe ahead of time. There was still a good amount of baking to be done on the final day – most of the cake, the buttercream, the ganache, and the assembly, but it was manageable and fun.

The only part of the recipe that gave me fits was the praline. I have made caramel so many times before with nary a problem. But this time, I screwed it up four times in a row. I tried different methods, but each time, sugar crystals formed, interrupting my smooth caramel. I never did get it right – on the last attempt, there were only a few crystals in the liquid, and I decided that it would be a good learning experience for me to see what a screwed-up caramel was like. (How’s that for justification?) It turns out that screwed-up caramel is opaque and looks milky instead of being shiny and amber-colored and jewel-like. The taste was fine though, and I was grinding a good portion of it into paste anyway.

Everything else went smoothly. This was my most successful experience with these light egg-leavened cakes. But cutting the cake into layers created a lot of crumbs. I think I’ve heard that if I refrigerate or partially freeze the cake (wrapped well with plastic, I assume), it makes this process easier with no detrimental effects on the cake? Is this true?

This is the first time I’ve covered a cake with chocolate ganache. It’s not as smooth on the sides as I’d prefer, which I think is because my cake had fallen in the middle just a bit, so a lot of the ganache pooled there and there wasn’t as much to cover the sides. Even with my less-than-perfect coating, I think ganache makes for an impressive presentation.

Dave and I both enjoyed the flavor of the cake as well. The unsweetened whipped cream in between layers kept the cake from being too sweet, and the bittersweet chocolate was the perfect contrast to the sweet cake and buttercream. The cake wasn’t as praliney as I might have liked though. I wonder if I could mix in more praline paste with the buttercream? In the end though, this was a great learning experience and a lot of fun, with tasty results.

Filbert Gateau with Praline Buttercream (from Great Cakes, by Carol Walter)

Makes 1 10-inch cake, about 12 servings

1 Filbert Genoise
1 recipe sugar syrup, flavored with dark rum
1 recipe Praline Buttercream
½ cup heavy cream, whipped to soft peaks
1 recipe Apricot Glaze
1 recipe Ganache Glaze, prepared just before using

Filbert Genoise
Because of the amount of nuts in the recipe, this preparation is different from a classic genoise.

1½ cups hazelnuts, toasted/skinned
⅔ cup (2.65 ounces) cake flour, unsifted
2 tablespoons cornstarch
7 large egg yolks
1 cup (7 ounces) sugar, divided ¼ and ¾ cups
1 teaspoon vanilla extract
½ teaspoon grated lemon rind
5 large egg whites
¼ cup warm, clarified butter (100 – 110 degrees)

Position rack in the lower 3rd of the oven and preheat to 350 degrees. Grease and flour a 10″ X 2″ inch round cake pan.

Using a food processor, process nuts, cake flour, and cornstarch for about 30 seconds. Then, pulse the mixture about 10 times to get a fine, powdery mixture. You’ll know the nuts are ready when they begin to gather together around the sides of the bowl. While you want to make sure there aren’t any large pieces, don’t over-process. Set aside.

Put the yolks in the bowl of an electric mixer, with the whisk attachment, and beat until thick and light in color, about 3-4 minutes on med-high speed. Slowly, add ¾ cup of sugar. It is best to do so by adding a tablespoon at a time, taking about 3 minutes for this step. When finished, the mixture should be ribbony. Blend in the vanilla and grated lemon rind. Remove and set aside.

Place egg whites in a large, clean bowl of the electric mixer with the whisk attachment and beat on medium speed, until soft peaks. Increase to med-high speed and slowly add the remaining ¼ cup of sugar, over 15-20 seconds or so. Continue to beat for another ½ minute. Add the yolk mixture to the whites and whisk for 1 minute.

Pour the warm butter in a liquid measure cup (or a spouted container). Put the nut meal in a mesh strainer (or use your hand – working quickly) and sprinkle it in about 2 tablespoons at a time – folding it carefully for about 40 folds. Be sure to exclude any large chunks/pieces of nuts. Again, work quickly and carefully as to not deflate the mixture. When all but about 2 tablespoons of nut meal remain, quickly and steadily pour the warm butter over the batter. Then, with the remaining nut meal, fold the batter to incorporate, about 13 or so folds.

With a rubber spatula, transfer the batter into the prepared pan, smoothing the surface with the spatula or back of a spoon. (If collected butter remains at the bottom of the bowl, do not add it to the batter! It will impede the cake rising while baking.)

Tap the pan on the counter to remove air bubbles and bake in the preheated oven for 30-35 minutes. You’ll know the cake is done when it is springy to the touch and it separates itself from the side of the pan. Remove from oven and allow to stand for 5 minutes. Invert onto a cake rack sprayed with nonstick coating, removing the pan. Cook the cake completely.

*If not using the cake right away, wrap thoroughly in plastic wrap, then in a plastic bag, then in the refrigerator for up to 3 days. If freezing, wrap in foil, then the bag and use within 2-3 months.

Sugar Syrup
Makes 1 cup, good for one 10-inch cake – split into 3 layers

1 cup water
¼ cup (1.75 ounces) sugar
2 tablespoons dark rum or orange flavored liqueur

In a small, yet heavy saucepan, bring the water and sugar to a boil and simmer for 5 minutes. Remove from heat, add the liqueur. Cool slightly before using on the cake. *Can be made in advance.

Praline Buttercream
1 recipe Swiss Buttercream
⅓ cup praline paste
1½-2 tablespoons Jamaican rum (optional)

Blend ½ cup buttercream into the paste, then add to the remaining buttercream. Whip briefly on medium-low speed to combine. Blend in rum.

Swiss Buttercream
4 large egg whites
¾ cup sugar
1½ cups (3 sticks) unsalted butter, slightly firm
1½-2 tablespoons Grand Marnier or liqueur of your choice
1 teaspoon vanilla

Place the egg whites in the bowl of a electric mixer and beat with the whisk attachment until the whites are foamy and they begin to thicken (just before the soft peak stage). Set the bowl over a saucepan filled with about 2 inches of simmering water, making sure the bowl is not touching the water. Then, whisk in the sugar by adding 1-2 tablespoons of sugar at a time over a minutes time. Continue beating 2-3 minutes or until the whites are warm (about 120 degrees) and the sugar is dissolved. The mixture should look thick and like whipped marshmallows.

Remove from pan and with either the paddle or whisk attachment, beat the egg whites and sugar on medium-high speed until it’s a thick, cool meringue – about 5-7 minutes. (Do not overbeat). Set aside.

Place the butter in a separate clean mixing bowl and, using the paddle attachment, cream the butter at medium speed for 40-60 seconds, or until smooth and creamy. (Do not overbeat or the butter will become too soft.)

On medium-low speed, blend the meringue into the butter, about 1-2 tablespoons at a time, over about 1 minute. Add the liqueur and vanilla and mix for 30-45 seconds longer, until thick and creamy.

Refrigerate 10-15 minutes before using.

Wait! My buttercream won’t come together! Reheat the buttercream briefly over simmering water for about 5 seconds, stirring with a wooden spoon. Be careful and do not overbeat. The mixture will look broken with some liquid at the bottom of the bowl. Return the bowl to the mixer and whip on medium speed just until the cream comes back together.

Wait! My buttercream is too soft! Chill the buttercream in the refrigerator for about 10 minutes and rewhip. If that doesn’t work, cream an additional 2-4 tablespoons of butter in a small bowl – making sure the butter is not as soft as the original amount, so make sure is cool and smooth. On low speed, quickly add the creamed butter to the buttercream, 1 tablespoon at a time.

Refrigerate in an airtight container for up to 5 days, or can be frozen for up to 6 months. If freezing, store in 2 16-oz. plastic containers and thaw in the refrigerator overnight or at room temperature for several hours.

Praline Paste
1 cup (4½ ounces) hazelnuts, toasted/skinless
⅔ cup (4.65 ounces) sugar

Line a jelly roll pan with parchment and lightly butter.

Put the sugar in a heavy 10-inch skillet. Heat on low flame for about 10-20 min until the sugar melts around the edges. Do not stir the sugar. Swirl the pan if necessary to prevent the melted sugar from burning. Brush the sides of the pan with water to remove sugar crystals. If the sugar in the center does not melt, stir briefly. When the sugar is completely melted and caramel in color, remove from heat. Stir in the nuts with a wooden spoon and separate the clusters. Return to low heat and stir to coat the nuts on all sides. Cook until the mixture starts to bubble. (Remember – extremely hot mixture.) Then onto the parchment lined sheet and spread as evenly as possible. As it cools, it will harden into brittle. Break the candied nuts into pieces and place them in the food processor. Pulse into a medium-fine crunch or process until the brittle turns into a powder. To make paste, process for several minutes. Store in an airtight container and store in a cook dry place. Do not refrigerate.

Apricot Glaze
Good for one 10-inch cake

⅔ cup thick apricot preserves
1 tablespoon water

In a small, yet heavy saucepan, bring the water and preserves to a slow boil and simmer for 2-3 minutes. If the mixture begins to stick to the bottom of the saucepan, add water as needed.

Remove from heat and, using a strainer, press the mixture through the mesh and discard any remnants. With a pastry brush, apply the glaze onto the cake while the cake is still warm. If the glaze is too thick, thin to a preferred consistency with drops of water.

Ganache Glaze
Makes about 1 cup, enough to cover the top and sides of a 9 or 10 inch layer or tube cake

6 oz. (good) semisweet or bittersweet chocolate, like Lindt
6 oz. (¾ cup heavy cream
1 tablespoon light corn syrup
1 tablespoon Grand Marnier, Cointreay, or dark Jamaican rum (optional)
¾ teaspoon vanilla
½ – 1 teaspoon hot water, if needed

Blend vanilla and liqueur/rum together and set aside.

Break the chocolate into 1-inch pieces and place in the basket of a food processor and pulse until finely chopped. Transfer into a medium sized bowl and set aside.

Heat the cream and corn syrup in a saucepan, on low, until it reached a gentle boil. Once to the gently boil, immediately and carefully pour over the chocolate. Leave it alone for one minute, then slowly stir and mix the chocolate and cream together until the chocolate is melted and incorporated into the cream. Carefully blend in vanilla mixture. If the surface seems oily, add ½ – 1 teaspoon hot water. The glaze will thicken, but should still be pourable. If it doesn’t thicken, refrigerate for about 5 minutes, but make sure it doesn’t get too cold!

Assembling Cake

Cut a cardboard disk slightly smaller than the cake. Divide the cake into 3 layers and place the first layer top-side down on the disk. Using a pastry brush, moisten the layer with 3-4 tablespoon of warm sugar syrup. Measure out 1 cup of praline buttercream and set aside.

Spread the bottom layer with a ¼-inch thickness of the remaining buttercream. Cover with ½ of the whipped cream, leaving ¼-inch border around the edge of the cake. Place the middle layer over the first, brush with sugar syrup, spreading with buttercream. Cover with the remaining whipped cream.

Moisten the cut side of the third layer with additional sugar syrup and place cut side down on the cake. Gently, press the sides of the cake to align the layers. Refrigerate to chill for at least 30 minutes.

Lift the cake by sliding your palm under the cardboard. Holding a serrated or very sharp night with an 8-inch blade held parallel to the sides of the cake, trim the sides so that they are perfectly straight. Cut a slight bevel at the top to help the glaze drip over the edge. Brush the top and sides of the cake with warm apricot glaze, sealing the cut areas completely. Chill while you prepare the ganache.

Place a rack over a large shallow pan to catch the ganache drippings. Remove the gateau from the refrigerator and put it the rack. With a metal spatula in hand, and holding the saucepan about 10 inches above the cake, pour the ganache onto the cake’s center. Move the spatula over the top of the ganache about 4 times to get a smooth and mirror-like appearance. The ganache should cover the top and run down the sides of the cake. When the ganache has been poured and is coating the cake, lift one side of the rack and bang it once on the counter to help spread the ganache evenly and break any air bubbles. (Work fast before setting starts.) Patch any bare spots on the sides with a smaller spatula, but do not touch the top after the “bang”. Let the cake stand at least 15 minutes to set after glazing.

Garnish.

white cake comparison

Several months ago for the Daring Bakers, I made Dorie Greenspan’s Perfect Party Cake. Most of the group members, including myself, had very positive things to say about this cake. However, many of us, again including myself, found that the cake didn’t rise much. Granted, the copy of the recipe I used had a typo in it regarding the amount of flour, but that wasn’t the case with everyone who had problems.

So a few weeks ago when I made white cupcakes, I used a different recipe, by Nick Malgieri. The recipe calls for 2 cups all-purpose flour, but I was pretty sure I’d like it better with cake flour, so I used 2¼ cups cake flour instead. The cupcakes were definitely good, but just the slightest bit dry.

Now I was on a mission. Is it just a characteristic of white cake that it’s dry? Would Dorie’s recipe be perfect if I used the correct amount of flour, or would Nick’s be better if I followed it exactly? And why not throw a third recipe into the mix, and try one from my old favorite, Cooks Illustrated?

I pared the recipes down so that they each used 2 eggs, and I made cupcakes. I made them all in one afternoon, leaving the oven on between batches and not adjusting the dial, to make sure oven temperature wasn’t a factor in any differences. I left out any flavorings besides vanilla, used the same amount of vanilla in each, and used whole milk in all three recipes.

You can see that the three look very different. Left to right, the photos show Dorie’s, Nick’s, and CI’s. Nick’s looks drastically different, which I can attest is due to the all-purpose flour. The photo below shows the result of Nick’s recipe when made with cake flour. It more closely resembles the other two.

The difference in taste and texture mirrors the difference in looks. Nick’s cupcakes are far drier than Dorie’s and CI’s. You can see that their texture looks more muffin-like with a coarser crumb. Dorie and CI’s are more similar. They’re both fluffy and light with a nice resiliency. Dorie’s cupcakes rose nicely, in contrast to when I made the layer cake in March.

At first, Dave and I agreed that CI’s beat out Dorie’s by a hair. They seemed moister and more flavorful. But later on, I did a comparison of just those two, unfrosted, and I was able to spot some subtle differences. CI’s cupcakes are undeniably moister. They are also sweeter. Dorie’s cupcakes aren’t as sweet, but I do like their flavor. Without the sweetness, some of the other flavors in the cupcake are noticeable.

The question then arises – what causes these differences? I’ve laid out the points of the recipe that I think would have the most significant impact on the outcome. I’ve entered Malgieri’s recipe as using 9 ounces (2¼ cups) cake flour instead of 10 ounces (2 cups) flour, since it seems pretty clear that all-purpose flour in a cake as light as white cake is a bad idea. I’m guessing Malgieri’s cupcakes are drier because they use less milk. Obviously CI’s are sweeter because they have more sugar. Dorie’s and CI’s recipes, which produced similar results, are actually pretty different. Dorie’s uses less butter and sugar, which I’m assuming is balanced by more milk and less egg whites so the cupcakes aren’t dry. I think the coarser, more muffin-like texture of Malgieri’s cupcakes might arise from the lack of a final beating step after all the ingredients are added.

I wonder if I can tweak the recipes to get my favorite aspects of each. It’s not as simple as just reducing the sugar in CI’s recipe, because sugar contributes moistness. But maybe I should reduce the sugar by 2 tablespoons and increase the milk by 2 tablespoons. It’s worth trying, but to be honest, after this experiment, I think it’s going to be a while before I feel the urge to make white cake again!

Classic White Layer Cake (from Cooks Illustrated)

Serves 12

CI note: If you have forgotten to bring the milk and egg white mixture to room temperature, set the bottom of the glass measure containing it in a sink of hot water and stir until the mixture feels cool rather than cold, around 65 degrees. Cake layers can be wrapped and stored for one day.

Nonstick cooking spray
2¼ cups cake flour (9 ounces), plus more for dusting the pans
1 cup whole milk, at room temperature
6 large egg whites (¾ cup), at room temperature
2 teaspoons almond extract
1 teaspoon vanilla extract
1¾ cups granulated sugar (12¼ ounces)
4 teaspoons baking powder
1 teaspoon table salt
12 tablespoons unsalted butter (1½ sticks), softened but still cool

1. For the Cake: Set oven rack in middle position. (If oven is too small to cook both layers on a single rack, set racks in upper-middle and lower-middle positions.) Heat oven to 350 degrees. Spray two 9-inch round cake pans with nonstick cooking spray; line the bottoms with parchment or waxed paper rounds. Spray the paper rounds, dust the pans with flour, and invert pans and rap sharply to remove excess flour.

2. Pour milk, egg whites, and extracts into 2-cup glass measure, and mix with fork until blended.

3. Mix cake flour, sugar, baking powder, and salt in bowl of electric mixer at slow speed. Add butter; continue beating at slow speed until mixture resembles moist crumbs, with no powdery streaks remaining.

4. Add all but ½ cup of milk mixture to crumbs and beat at medium speed (or high speed if using handheld mixer) for 1½ minutes. Add remaining ½ cup of milk mixture and beat 30 seconds more. Stop mixer and scrape sides of bowl. Return mixer to medium (or high) speed and beat 20 seconds longer.

5. Divide batter evenly between two prepared cake pans; using rubber spatula, spread batter to pan walls and smooth tops. Arrange pans at least 3 inches from the oven walls and 3 inches apart. (If oven is small, place pans on separate racks in staggered fashion to allow for air circulation.) Bake until thin skewer or toothpick inserted in the center comes out clean, 23 to 25 minutes.

6. Let cakes rest in pans for 3 minutes. Loosen from sides of pans with a knife, if necessary, and invert onto wire racks. Reinvert onto additional wire racks. Let cool completely, about 1½ hours.

Dorie Greenspan’s Perfect Party Cake recipe can be found here.

Classic White Cake (from Nick Malgieri)

12 tablespoons (1½ sticks) unsalted butter, softened
1½ cups sugar
2 cups all-purpose flour
2 teaspoons baking powder
¼ teaspoon salt
6 large egg whites (¾ cup)
¾ cup milk
2 teaspoons vanilla extract
2 (9-inch) diameter by 1 ½ -inch deep layer pans or 1 (13 by 9 by 2-inch) pan, buttered and bottoms lined with parchment or waxed paper

Set a rack at the middle level of the oven and preheat to 350 degrees. In a large mixing bowl, beat butter and sugar for about 5 minutes, until light and fluffy. Stir together flour, baking powder and salt. Set aside. Combine egg whites, milk and vanilla extract. Add ⅓ of the flour mixture to butter mixture then add half the milk mixture. Continue to alternate beginning and ending with flour mixture. Scrape bowl and beater often. Pour batter into prepared pan(s) and smooth top with a metal spatula. Bake cake(s) about 25 to 30 minutes, or until a toothpick inserted in the center emerges clean. Cool in pan on a rack for 5 minutes, then turn out onto a rack, remove paper and let cool completely.

*To make cupcakes from any of these recipes, line a standard-sized muffin pan with baking-cup liners. Fill cups just over ½ full with batter. Bake at 350 degrees for 18-21 minutes.

orange vanilla opera cake (db may 2008)

Lately I’ve become fixated with Bo Friberg’s The Professional Pastry Chef. I don’t want and have never wanted to be a professional pastry chef. But I flipped through this book and I was hooked. (Actually, in my arrogance, I grabbed The Advanced Pastry Chef first.) Page after page of beautifully plated desserts; this was more than food, this was art. Suddenly the fuss necessary to produce eye-catching desserts seemed worthwhile.

So I was elated when Ivonne, Lis, Fran, and Shea announced their choice of an opera cake for this month’s Daring Baker challenge. Layers of almond-based cake brushed with syrup, interspersed with buttercream, topped with mousse and glaze – this is exactly what I had in mind to try. I haven’t bought The Professional Pastry Chef yet, but at least I have a reason to get some practice.

The rules for the recipe were somewhat flexible in that we could flavor our cake any way we wanted – as long as it was light-colored. I would have enjoyed trying a traditional dark chocolate opera cake, but this was fun too. I’ve been loving creamsicle-like flavors lately, so I made my pastry orange and vanilla-flavored.

I hit a snag or two along the road, but nothing that couldn’t be overcome. A shortage of parchment paper meant I couldn’t adequately line my pan and the cake didn’t come out cleanly, but I was able to piece it together better than I expected. My first batch of white chocolate seized when I tried melting it, even though I used high-quality (Callebaut) chocolate and a double boiler. My orange glaze, which I adapted from a recipe Tyler Florence developed to top scones, wasn’t stable at room temperature, even though I added more powdered sugar than I’d expected to need.

No matter, everything came together in the end. The cake was good, although not as flavorful as I would have liked. I was warned before I made mine that it might be too sweet, so I added a pinch of salt to the jaconde to add some balance. I was also hoping that the orange would help balance the sweetness, but there wasn’t nearly enough orange or vanilla flavor. I didn’t end up using the zest of the orange anywhere, which certainly would have helped. And I’ve never been able to get a strong vanilla flavor in something baked. Maybe I should try rubbing the vanilla seeds into the sugar, like Dorie recommends with citrus zest?

Even if the flavor didn’t knock my socks off, I’m really glad I made this. I learned so much and used so many techniques that were new to me. I also think it’s great that we were given the freedom to develop our own flavors, which encouraged me to be creative. I’m eager to try the traditional dark chocolate version now, and this time I’ll make sure it’s rich and flavorful!

Orange-Vanilla Opera Cake

This is exactly the recipe I used, including my adaptations for orange and vanilla flavors. This recipe is half of what was given to us by the Daring Baker hosts this month. Double this amount of buttercream would probably provide the right amount to create layers of equal thickness to the cake; mine are a little thin.

Joconde: (adapted from Dorie Greenspan’s Paris Sweets)

The joconde can be made up to 1 day in advance and kept wrapped at room temperate

You can buy almond meal in bulk food stores or health food stores, or you can make it at home by grinding almonds in the food processor with two tablespoons of the flour that you would use in the cake.

2 tablespoons unsalted butter, melted and cooled
3 large egg whites, at room temperature
1 tablespoon granulated sugar
1 cup (112 grams) ground blanched almonds
1 cup (3.5 ounces) icing sugar, sifted
3 large eggs
1 vanilla bean, split and scraped
½ teaspoon vanilla
Pinch salt
¼ cup (1.25 ounces) all-purpose flour

1. Adjust an oven rack to the middle position. Preheat the oven to 425 degrees. Line a 12½ x 15½-inch jelly-roll pan with parchment paper and brush with ½ tablespoon of the melted butter.

2. In the bowl of a stand mixer fitted with the whisk attachment (or using a handheld mixer), whip the whites on low speed until they become foamy, then whip on medium-high speed until the whites reach soft peaks. Add the granulated sugar, and whip on high speed until the whites are stiff and glossy.

3. In a separate mixer bowl (or the same bowl, cleaned and dried) fitted with the paddle attachment, beat almond flour, icing sugar, eggs, salt and vanillas on medium speed until light and voluminous, about 3 minutes. Add flour and beat at low speed until it disappears.

4. Use a rubber spatula to gently fold the meringue into the almond mixture, then fold in the remaining melted butter until just combined. Spread the batter evenly in the prepared pan.

5. Bake the cake until it is lightly browned and just springy to the touch, 5-9 minutes.

6. Put the pan on a cooling rack and run a sharp knife along the edges of the cake to loosen it from the pan. Cover the pan with a sheet of parchment or wax paper, turn the pan over, and unmold. Carefully peel away the parchment, then turn the parchment over and use it to cover the cake. Let the cake cool to room temperature.

Syrup: (adapted from Dorie Greenspan’s Paris Sweets)

The syrup can be made up to 1 week in advance and kept covered in the refrigerator.

¼ cup water
1.2 ounces granulated sugar
1 tablespoon Grand Marnier

In a small saucepan, combine water and sugar. Bring to a boil, while stirring to dissolve ingredients. Stir in liqueur. Remove from heat and allow syrup to cool.

Buttercream: (adapted from Dorie Greenspan’s Baking: From My Home to Yours)

The buttercream, packed in an airtight container, can be frozen for 1 month or refrigerated for 4 days. Bring it to room temperature and beat it briefly to restore its consistency.

¼ cup (1.75 ounces) granulated sugar
1 large egg white
pinch salt
6 tablespoons unsalted butter, at room temperature
1 tablespoon fresh orange juice
¼ teaspoon pure vanilla extract

Put the sugar and egg whites in a mixer bowl or another large heatproof bowl, fit the bowl over a plan of simmering water and whisk constantly, keeping the mixture over the heat, until it feels hot to the touch (160 degrees on an instant-read thermometer), about 3 minutes. The sugar should be dissolved, and the mixture will look like shiny marshmallow cream. Remove the bowl from the heat. Working with the whisk attachment or with a hand mixer, beat the meringue on medium speed until it is cooledto room temperature, about 5 minutes.

Switch to the paddle attachment if you have one, and add the butter 2 tablespoons at a time. Once all the butter is in, beat the buttercream on medium-high speed until it is thick and very smooth, 6-10 minutes. During this time the buttercream may curdle or separate – just keep beating and it will come together again.

On medium speed, gradually beat in the orange juice, waiting until each addition is absorbed before adding more, and then the vanilla. You should have a shiny smooth, velvety, pristine white buttercream. Press a piece of plastic against the surface of the buttercream and set aside briefly.

White chocolate mousse: (from Tish Boyle and Timothy Moriarity’s Chocolate Passion)

The mousse can be made ahead and refrigerated until you’re ready to use it.

3.5 ounces white chocolate
½ cup plus 1½ tablespoons heavy cream
½ tablespoon Grand Marnier

1. Melt the chopped white chocolate and the 3 tablespoons of heavy cream. Whisk gently and let cool to room temperature.

2. Place the remaining heavy cream into a 4 1/2-quart bowl of a heavy-duty electric mixer fitted with the wire whisk attachment. Add the liqueur. Beat on high speed until soft peaks form.

3. Using a wire whisk, gently stir in about 1 cup of the whipped cream to the cooled white chocolate mixture. Using a rubber spatula, fold in the remaining cream. Do not over-mix or the mousse will become grainy. Cover and refrigerate until ready to use.

Orange glaze: (adapted from Tyler Florence)

2 tablespoons unsalted butter
2 cups (8 ounces) powdered sugar, sifted
2 oranges, juiced and zested

Combine butter, 2 cups (7 ounces) sugar, orange zest, and juice over a double boiler. Cook until butter and sugar are melted and mixture has thickened. Pour through fine mesh strainer, then beat until smooth and slightly cool, adding more sugar if necessary to reach desired consistency.

Assembly:

Line a baking sheet with parchment or wax paper. Cut and trim cake into three 10 x 5-inch rectangles. Place one section of cake on the baking sheet and moisten it gently with the 1/3 of the syrup. Spread half of the buttercream over this layer. Top with another piece of cake and moisten with 1/3 of the syrup. Spread the remaining buttercream on the cake and then top with the third section of cake. Use the remaining syrup to wet the cake and then refrigerate until very firm, at least half an hour.

Spread the mousse on the top of the last layer of cake. Refrigerate for 2-3 hours to give the mousse the opportunity to firm up.

Pour the cooled glaze over the top of the chilled cake, spreading to evenly coat the cake if necessary. Refrigerate the cake to set the glaze.

Serve the cake slightly chilled. This recipe will yield approximately 10 servings.

traditional madeleines (twd)

I hemmed and hawed about whether to try Tara’s choice of madeleines for this week’s TWD recipe. I don’t have a madeleine pan, and I’m feeling stubborn about buying a pan that has such a specific use. I found out that a mini-muffin pan can be substituted, but I don’t have one of those either. Some people tried baking their madeleines in spoons, but my spoons aren’t very rounded and I wasn’t keen on putting them in the oven. It was suggested that those of us without the proper equipment blog about a previous TWD recipe that we missed instead, and I was all ready with a Snickery Squares entry.

But once the Snickery Squares were eaten, I decided to try out the madeleines anyway, in a regular muffin pan. The recipe says that it makes 12 madeleines, so I planned to divide the batter evenly between the 12 muffin cups. (Actually, I halved the recipe and made six.) I lined the bottom of the muffin cups with cookie press stamps to add some decoration to my tea cakes. I figured that I had nothing to lose if things didn’t work out – the recipe is neither work nor calorie intensive.

I have to admit that this is my first madeleine experience; not just making them, but eating them as well. That means that I have no basis for comparison for how this recipe compares to others and how the muffin madeleines compare to the traditional shell shapes. However, I can make some judgments about what I want from a tea cake.

The muffin pans seemed to work well enough, although I didn’t get the characteristic and elusive hump that’s so desired. But I didn’t feel that my madeleines were tender enough. Honestly, I think there’s too much butter in them, and the batter just couldn’t support and incorporate all of it. I’m also a little surprised by how coarse my crumb was; I must not have beat the eggs and sugar long enough.

Overall though, I’m pleased by the idea of a cookie-sized cake. While I doubt that there’s a madeleine pan in my near future, I might try out some other shapes to see if I can come up with the light and tender tea cake that I want.

Traditional Madeleines (from Dorie Greenspan’s Baking: From My Home to Yours)

⅔ cup all-purpose flour
¾ teaspoon baking powder
Pinch of salt
½ cup sugar
Grated zest of 1 lemon
2 large eggs, at room temperature
2 teaspoons pure vanilla extract
¾ stick (6 tablespoons) unsalted butter, melted and cooled
Confectioners’ sugar, for dusting

Whisk together the flour, baking powder and salt.

Working in a mixer bowl, or in a large bowl, rub the sugar and lemon zest together with your fingertips until the sugar is moist and fragrant. Add the eggs to the bowl. Working with the whisk attachment, or with a hand mixer, beat the eggs and sugar together on medium-high speed until pale, thick and light, 2 to 3 minutes. Beat in the vanilla. With a rubber spatula, very gently fold in the dry ingredients, followed by the melted butter. Press a piece of plastic wrap against the surface of the batter and refrigerate it for at least 3 hours, or for up to 2 days. This long chill period will help the batter form the hump that is characteristic of madeleines. (For convenience, you can spoon the batter into the madeleine molds, cover and refrigerate, then bake the cookies directly from the fridge; see below for instructions on prepping the pans.)

GETTING READY TO BAKE: Center a rack in the oven and preheat the oven to 400 degrees F. Butter 12 full-size madeleine molds, or up to 36 mini madeleine molds, dust the insides with flour and tap out the excess. Or, if you have a nonstick pan (or pans), give it a light coating of vegetable cooking spray. If you have a silicone pan, no prep is needed. Place the pan(s) on a baking sheet.

Spoon the batter into the molds, filling each one almost to the top. Don’t worry about spreading the batter evenly, the oven’s heat will take care of that. Bake large madeleines for 11 to 13 minutes, and minis for 8 to 10 minutes, or until they are golden and the tops spring back when touched. Remove the pan(s) from the oven and release the madeleines from the molds by rapping the edge of the pan against the counter. Gently pry any recalcitrant madeleines from the pan using your fingers or a butter knife. Transfer the cookies to a rack to cool to just warm or to room temperature.

If you are making minis and have more batter, bake the next batch(es), making certain that you cool, then properly prepare the pan(s) before baking.

Just before serving, dust the madeleines with confectioners’ sugar.

peanut butter torte (twd)

I’m spending the first week of June on a beach. And since I spent February overeating and April underexercising, I can’t spend May eating super rich desserts. Unless…it’s peanut butter cream cheese mousse on an oreo cookie crust covered with a layer of ganache and sprinkled with peanuts, which is what Elizabeth chose for this week’s TWD recipe. Even if each slice, according to Dorie’s serving size recommendation, has 1250-1650 calories. I think it’s safe to say that Dorie’s serving sizes are wacko.

Because Dave and I can only eat so much crazy-rich peanut butter torte, I made a quarter of the recipe in a 4-inch pan. A springform pan is really necessary for neat slices, but I don’t have a tiny one that will fit a quarter of the recipe and wasn’t willing to buy one.

For the first week since I joined TWD, no one had any real problems with this recipe. The crust ended up being too thin and most people had to grind up a few more oreos. (Based on everyone’s reviews, it sounds like you’ll need 32-40 oreos for a full recipe, depending on how thick you like your crust.) The peanut butter mousse involves nothing more than beating softened cream cheese and peanut butter together, then folding in some flavorings and whipped cream. There were some complaints that the mousse was too salty, as Dorie calls for chopped salted peanuts to be mixed in. I used half salted and half unsalted and had no problems, although I prefer my mousses to be totally smooth, uninterrupted by bits of peanut and chocolate. The ganache is a classic mixture of chocolate and hot cream. It’s a relatively small amount of work for an impressive dessert, especially if the people you’re serving it to don’t realize that basically every ingredient in it is primarily fat.

Actually, Dave and I got eight servings just out of our mini torte – so 32 servings for a whole recipe. It was a nice, and necessary, compromise between treating ourselves and controlling ourselves.

Peanut Butter Torte (from Dorie Greenspan’s Baking: From My Home to Yours)

1¼ cup finely chopped salted peanuts (for the filling, crunch and topping)
2 teaspoons sugar
½ teaspoon instant espresso powder (or finely ground instant coffee)
¼ teaspoon ground cinnamon
Pinch of freshly grated nutmeg
½ cup mini chocolate chips (or finely chopped semi sweet chocolate)
24 Oreo cookies, finely crumbed or ground in a food processor or blender
½ stick (4 tablespoons) unsalted butter, melted and cooled
Small pinch of salt
2½ cup heavy cream
1¼ cup confectioners’ sugar, sifted
12 ounces cream cheese, at room temperature
1½ cup salted peanut butter – crunchy or smooth (not natural; I use Skippy)
2 tablespoons whole milk
4 ounces bittersweet chocolate, finely chopped
Getting ready: center a rack in the oven and preheat the oven to 350°F. Butter a 9-inch Springform pan and place it on a baking sheet lined with parchment or a silicone mat.

Toss ½ cup of the chopped peanuts, the sugar, espresso powder, cinnamon, nutmeg and chocolate chops together in a small bowl. Set aside.

Put the Oreo crumbs, melted butter and salt in another small bowl and stir with a fork just until crumbs are moistened. Press the crumbs evenly over the bottom and up the sides of the spring form pan (they should go up about 2 inches on the sides). Freeze the crust for 10 minutes.

Bake the crust for 10 minutes, then transfer it to a rack and let it cool completely before filling.

Working with a stand mixer fitted with the whisk attachment or with a hand mixer in a large bowl, whip 2 cups of the cream until it holds medium peaks. Beat in ¼ cup of the confectioners’ sugar and whip until the cream holds medium-firm peaks. Scrape the cream into a bowl and refrigerate until needed.

Wipe out (do not wash) the bowl, fit the stand mixer with the paddle attachment if you have one, or continue with the hand mixer, and beat the cream cheese with the remaining 1 cup confectioners’ sugar on medium speed until the cream cheese is satiny smooth. Beat in the peanut butter, ¼ cup of the chopped peanuts and the milk.

Using a large rubber spatula, gently stir in about one quarter of the whipped cream, just to lighten the mousse. Still working with the spatula, stir in the crunchy peanut mixture, then gingerly fold in the remaining whipped cream.

Scrape the mouse into the crust, mounding and smoothing the top. Refrigerate for at least 4 hours, or overnight; cover with plastic wrap as soon as the mousse firms.

To Finish The Torte: Put the chopped chocolate in a heatproof bowl and set the bowl over a saucepan of simmering water. Leave the bowl over the water just until the chocolate softens and starts to melt, about 3 minutes; remove the bowl from the saucepan.

Bring the remaining ½ cup cream to a full boil. Pour the cream over the chocolate and, working with a a rubber spatula, very gently stir together until the ganache is completely blended and glossy.

Pour the ganache over the torte, smoothing it with a metal icing spatula. Scatter the remaining ½ cup peanuts over the top and chill to set the topping, about 20 minutes.

When the ganache is firm, remove the sides of the springform pan; it’s easiest to warm the pan with a hairdryer, and then remove the sides, but you can also wrap a kitchen towel damped with hot water around the pan and leave it there for 10 seconds. Refrigerate until ready to serve.

fluted polenta and ricotta cake (twd)

When Caitlin announced her choice for this week’s TWD recipe, a few of the group members said they were put off by the unusual mix of ingredients, especially for a dessert. But I was excited – I think it’s recipes like this where Dorie’s book really shines. She has a lot of interesting and creative recipes that I’m excited to make. This cake in particular is worth making for no other reason than to find out what a ricotta polenta cake tastes like.

A few bakers who made their cake early in the week thought it was too sweet, so I reduced the sugar by 33%. There were also a lot of questions about the possibility of substituting a different fruit for the figs that the recipe called for. I was halving the recipe and baking it in tartlet pans, so I used a different fruit (figs, dates, dried cherries, and fresh strawberries) for each pan.

To me, ricotta polenta cake tastes like sweet cornbread. I wish I hadn’t reduced the sugar because I think the extra sugar would have made it seem more like a dessert. Dave and I both liked the strawberry cake the best, although it was a little too moist and delicate since strawberries are so much more wet than dried fruit. I also really enjoyed the dried cherries. The figs were okay too, but I didn’t think the dates contributed much flavor. I would have liked more fruit in the cakes as well.

I have to admit that this wasn’t my favorite dessert, but it was certainly an interesting recipe to try.

Fluted Polenta and Ricotta Cake (from Dorie Greenspan’s Baking: From my Home to Yours)

About 16 moist, plump dried Mission or Kadota figs, stemmed
1 cup medium-grain polenta or yellow cornmeal
½ cup all-purpose flour
1 teaspoon baking powder
1 cup ricotta
1/3 cup tepid water
¾ cup sugar
¾ cup honey (if you’re a real honey lover, use a full-flavored honey such as chestnut, pine, or buckwheat)
Grated zest of 1 lemon
2 large eggs
8 tablespoons butter, melted and cooled, plus 1 tablespoon, cut into bits and chilled

Getting Ready: Center a rack in the oven and preheat the oven to 325 degrees F. Butter a 10½-inch fluted tart pan with a removable bottom and put it on a baking sheet lined with parchment or a silicone mat.

Check that the figs are, indeed, moist and plump. If they are the least bit hard, toss them into a small pan of boiling water and steep for a minute, then drain and pat dry. If the figs are large (bigger than a bite), snip them in half.

Whisk the polenta, flour, baking powder, and salt together.

Working with a stand mixer fitted with the whisk attachment or with a hand mixer in a large bowl, beat the ricotta and water together on low speed until very smooth. With the mixer at medium speed, add the sugar, honey, and lemon zest and beat until light. Beat in the melted butter, then add the eggs one at a time, beating until the mixture is smooth. Reduce the mixer speed to low and add the dry ingredients, mixing only until they are fully incorporated. You’ll have a sleek, smooth, pourable batter.

Pour about one third of the batter into the pan and scatter over the figs. Pour in the rest of the batter, smooth the top with a rubber spatula, if necessary, and dot the batter evenly with the chilled bits of butter.

Bake for 35 to 40 minutes, or until a thin knife inserted into the center of the cake comes out clean. The cake should be honey brown and pulling away just a little from the sides of the pan, and the butter will have left light-colored circles in the top. Transfer the cake to a rack and remove the sides of the pan after about 5 minutes. Cool to warm, or cool completely.

cheesecake pops (daring bakers april 2008)

My first impression when I saw Elle and Deborah’s choice for this month’s Daring Bakers challenge was that it was going to be a pain in the ass. Then I convinced myself that it wouldn’t be so bad. I figured it would be a valuable recipe to have in my arsenal. It’s transportable, perfectly portioned, visually impressive, okay to sit at room temperature for a few hours, and well-liked. And how hard could it be? Scoop out some cheesecake, poke a stick in it, dunk it in melted chocolate. Easy cheesy.

Uh-huh.

Mixing up the cheesecake batter was as easy as I expected. The flour is an unusual ingredient in cheesecake which I’m assuming is there to stabilize the cake enough to form balls. I ate a lot of batter during this part. I like batter.

But after the batter-eating, things got dicey. I made half the recipe in a pan exactly half the area of the pan the recipe called for. I baked it far longer than the recipe stated and took it out when a normal cheesecake would be done – when an instant read thermometer read 150 degrees and it was a bit jiggly in the center. I let it chill overnight.

The next day, the center was far too liquidy to be formed into balls, although the outer half of the pan was more solid. I found out later that others had this problem as well. They came up with creative solutions such as piping the batter instead of rolling it and keeping the batter frozen. I just ate the too-soft middle portion with a spoon. Yum.

The rolling process was still a mess. It seemed like there was cheesecake everywhere. The dipping went similarly. Far messier than I had planned for.

But the real problem was that the balls weren’t stable outside of the freezer. Because the cake was so soft, the balls would fall right off the stick. Not good.

Tasty though. It’s hard to go wrong with cheesecake.

Cheesecake Pops

Makes 30-40 pops

5 8-oz. packages cream cheese at room temperature
2 cups (14 ounces) sugar
¼ cup (1.25 ounces) all-purpose flour
¼ teaspoon salt
5 large eggs
2 egg yolks
2 teaspoons pure vanilla extract
¼ cup heavy cream

Boiling water as needed

Thirty to forty 8-inch lollipop sticks

1 pound chocolate, finely chopped – you can use all one kind or half and half of dark,
milk, or white (Alternately, you can use 1 pound of flavored coatings, also known
as summer coating, confectionary coating or wafer chocolate – candy supply
stores carry colors, as well as the three kinds of chocolate.)
2 tablespoons vegetable shortening

(Note: White chocolate is harder to use this way, but not impossible)

Assorted decorations such as chopped nuts, colored jimmies, crushed peppermints, mini chocolate chips, sanding sugars, dragees) – Optional

Position oven rack in the middle of the oven and preheat to 325 degrees F. Set some water to boil.

In a large bowl, beat together the cream cheese, sugar, flour, and salt until smooth. If using a mixer, mix on low speed. Add the whole eggs and the egg yolks, one at a time, beating well (but still at low speed) after each addition. Beat in the vanilla and cream.

Grease a 10-inch cake pan (not a springform pan), and pour the batter into the cake pan. Place the pan in a larger roasting pan. Fill the roasting pan with the boiling water until it reaches halfway up the sides of the cake pan. Bake until the cheesecake is firm and slightly golden on top, 35 to 45 minutes.

Remove the cheesecake from the water bath and cool to room temperature. Cover the cheesecake with plastic wrap and refrigerate until very cold, at least 3 hours or up to overnight.

When the cheesecake is cold and very firm, scoop the cheesecake into 2-ounce balls and place on a parchment paper-lined baking sheet. Carefully insert a lollipop stick into each cheesecake ball. Freeze the cheesecake pops, uncovered, until very hard, at least 1 – 2 hours.

When the cheesecake pops are frozen and ready for dipping, prepare the chocolate. In the top of a double boiler, set over simmering water, or in a heatproof bowl set over a pot of simmering water, heat half the chocolate and half the shortening, stirring often, until chocolate is melted and chocolate and shortening are combined. Stir until completely smooth. Do not heat the chocolate too much or your chocolate will lose it’s shine after it has dried. Save the rest of the chocolate and shortening for later dipping, or use another type of chocolate for variety.

Alternately, you can microwave the same amount of chocolate coating pieces on high at 30 second intervals, stirring until smooth.

Quickly dip a frozen cheesecake pop in the melted chocolate, swirling quickly to coat it completely. Shake off any excess into the melted chocolate. If you like, you can now roll the pops quickly in optional decorations. You can also drizzle them with a contrasting color of melted chocolate (dark chocolate drizzled over milk chocolate or white chocolate over dark chocolate, etc.) Place the pop on a clean parchment paper-lined baking sheet to set. Repeat with remaining pops, melting more chocolate and shortening (or confectionary chocolate pieces) as needed.

Refrigerate the pops for up to 24 hours, until ready to serve.

carrot cake (twd)

I don’t really get carrot cake. I don’t hate it. But what’s the appeal? Vegetables in cake – it just ain’t right. Wouldn’t you rather have a more logical flavoring for cake – chocolate or vanilla or strawberries or butter? If it’s the spices you love, pair them with apples. If it’s the cream cheese frosting, spread it on chocolate cake. But don’t put vegetables in my dessert. It just ain’t right.

So I can’t say I was ecstatic to see Amanda’s choice for this week’s TWD recipe. Plus, while I usually enjoy the creativity that comes from having someone else choose a recipe for me, it’s a problem when I already have a similar recipe picked out to try. I’ve had my eye on Cooks Illustrated’s carrot cake recipe for years, I guess with the idea that if anyone could make me love carrot cake, it would be CI.

I thought I could kill two birds with one stone – I’d make Dorie’s recipe and CI’s, and that way I could compare them. My mom has a recipe she loves, so I threw that into the mix as well. They each call for four eggs, so it would be easy to quarter each recipe. Then I decided that that would still be too much carrot cake, so I got all OCD and decided to use one egg total, but still make all three recipes, so I made one twelfth of each recipe. It was a pain in the ass even with good math skills and a digital scale. I skipped all of the chunky ingredients (coconut, raisins, nuts) in Dorie’s recipe so that the recipes would be more equivalent and comparable.

The three recipes weren’t drastically different in their ingredient lists, although the mixing method varied. After baking, Dorie’s and CI’s carrot cakes look very similar, but my mom’s recipe, which was the only one that didn’t call for baking powder, didn’t rise nearly as much. (CI’s is the bottom layer, then my mom’s recipe, then Dorie’s.)

Unfortunately, I can’t give a good comparison of the three cakes. I’ve only had one slice, and the cream cheese frosting pleasantly dominated the taste of the cake. I’ll try harder next time, scraping off the frosting and eating the cake plain. And then finishing dessert off with a spoonful of pure, unadulterated sugary cream cheese frosting.

Update/Comparison: I really didn’t eat much of this cake, so I can’t give a very good comparison.  That being said, I think Dorie’s recipe was my favorite.  My mom’s needs baking powder so it will rise higher.  Cooks Illustrated uses both brown and granulated sugar, and I think using all granulated sugar gave the cake more flavor.  I do like CI’s mixing method though.  Because most of the ingredients are similar, in the future, I’ll probably use CI’s recipe with all granulated sugar.

Bill’s Big Carrot Cake (from Dorie Greenspan’s Baking: From My Home to Yours)

10 servings

For the cake:
2 cups all purpose flour
2 teaspoons baking powder
2 teaspoons baking soda
2 teaspoons ground cinnamon
¾ teaspoon salt
3 cups grated carrots (about 9 carrots, you can grate them in food processor fitted w/ a shredding a blade or use a box grater)
1 cup coarsely chopped walnuts or pecans
1 cup shredded coconut (sweetened or unsweetened)
½ cup moist, plump raisins (dark or golden) or dried cranberries
2 cups sugar
1 cup canola oil
4 large eggs

For the frosting:
8 ounces cream cheese, room temperature
8 tablespoons (1 stick) unsalted butter, at room temperature
1 pound (16 ounces) confectioners’ sugar
1 tablespoon fresh lemon juice or ½ teaspoon pure lemon extract
½ cup shredded coconut (optional)

Finely chopped toasted nuts and/or toasted shredded coconut (optional)

Getting ready: Position the racks to divide the oven into thirds and preheat the oven to 325 degrees Fahrenheit. Butter three 9- by 2-inch round cake pans, flour the insides, and tap out the excess. Put the two pans on one baking sheet and one on another.

To make the cake:
Whisk the flour, baking powder, baking soda, cinnamon and salt. In another bowl, stir together the carrots, chopped nuts, coconut, and raisins.

Working with a stand mixer, preferably fitted with a paddle attachment, or with a hand mixer in a large bowl, beat the sugar and oil together on a medium speed until smooth. Add the eggs one by one and continue to beat until the batter is even smoother. Reduce the speed to low and add the flour mixture, mixing only until the dry ingredients disappear. Gently mix the chunky ingredients. Divide the batter among the baking pans.

Bake for 40-50 minutes, rotating the pans from top to bottom and front to back at the midway point, until a thin knife inserted into the centers comes out clean. The cakes will have just started to come away from the sides of the pans. Transfer the cakes to cooling racks and cool for about 5 minutes, then run a knife around the sides of the cakes and unmold them. Invert and cool to room temperature right side up.

The cakes can be wrapped airtight and kept at room temperature overnight or frozen for up to 2 months.

To make the frosting:
Working with a stand mixer, preferably fitted with a paddle attachment or with a hand mixer in a large bowl, beat the cream cheese and butter together until smooth and creamy. Gradually add the sugar and continue to beat until the frosting is velvety smooth. Beat in the lemon juice or extract.

If you’d like coconut in the filling, scoop about half of the frosting and stir the coconut into this position.

To assemble the cake:
Put one layer top side up on a cardboard cake round or a cake plate protected by strips of wax or parchment paper. If you added the coconut to the frosting, use half of the coconut frosting to generously cover the first layer (or generously cover with plain frosting). Use an offset spatula or a spoon to smooth the frosting all the way to the edges of the layer. Top with the second layer, this time placing the cake stop side down, and frost with the remainder of the coconut frosting or plain frosting. Top with the last layer, right side up, and frost the top- and the sides- of the cake. Finish the top with swirls of frosting. If you want to top the cake with toasted nuts or coconut, sprinkle them on now while the frosting is soft.

Refrigerate the cake for 30 minutes, just to set the frosting before serving.

Serving: This cake can be served as soon as the frosting is set. It can also wait, at room temperature and covered with a cake keeper overnight. The cake is best served in thick slices at room temperature and while it’s good plain, it’s even better with vanilla ice cream or some lemon curd.

Storing: The cake will keep at room temperature for 2 to 3 days. It can also be frozen. Freeze it uncovered, then when it’s firm, wrap airtight and freeze for up to 2 months. Defrost, still wrapped, overnight in the refrigerator.

Simple Carrot Cake with Cream Cheese Frosting (from Cooks Illustrated’s The New Best Recipe)

2½ cups unbleached all-purpose flour
1¼ teaspoons baking powder
1 teaspoon baking soda
1¼ teaspoons ground cinnamon
½ teaspoon ground nutmeg
1/8 teaspoon gound cloves
½ teaspoon salt
1 pound (6-7 medium) carrots, peeled
1½ cups granulated sugar
½ cup packed light brown sugar
4 large eggs
1½ cups safflower, canola or vegetable oil

Cream cheese frosting

8 ounces cream cheese, softened but still cool
5 tablespoons unsalted butter, softened but still cool
1 tablespoon sour cream
½ teaspoon vanilla extract
1¼ cups confectioners’ sugar

For the cake:

1. Adjust an oven rack to the middle position and heat the oven to 350 degrees. Spray a 13 by 9-inch baking pan with nonstick cooking spray. Line the bottom of the pan with parchment and spray the parchment.

2. Whisk together the flour, baking powder, baking soda, cinnamon, nutmeg, cloves and salt in a large bowl; set aside.

3. In a food processor fitted with a large shredding disk, shred the carrots (you should have about 3 cups); transfer the carrots to a bowl and set aside. Wipe out the food processor workbowl and fit with the metal blade. Process the granulated and brown sugars and eggs until frothy and thoroughly combined, about 20 seconds. With the machine running, add the oil through the feed tube in a steady stream. Process until the mixture is light in color and well emulsified, about 20 seconds longer. Scrape the mixture into a medium bowl. Stir in the carrots and the dry ingredients until incorporated and no streaks of flour remain. If you like nuts in your cake, stir 1½ cups toasted chopped pecans or walnuts into the batter along with the carrots. Raisins are also a good addition; 1 cup can be added along with the carrots. If you add both nuts and raisins, the cake will need and additional 10 to 12 minutes in the oven. Pour into the prepared pan and bake until a toothpick or skewer inserted into the center of the cake comes out clean, 35 to 40 minutes, rotating the pan halfway through the baking time. cool the cake to room temperature in the pan on a wire rack, about 2 hours.

For the frosting
1. When the cake is cool, process the cream cheese, butter, sour cream, and vanilla in a clean food processor workbowl until combined, about 5 seconds, scraping down the bowl with a rubber spatula as needed. Add the confectioners’ sugar and process until smooth, about 10 seconds.

2. Run a paring knife around the edge of the cake to loosen from the pan. Invert the cake onto a wire rack, peel off the parchment, then invert again onto a serving platter. Using an icing spatula, spread the frosting evenly over the surface of the cake. Cut into squares and serve.

Carrot Cake (from my mom, and I don’t know where she got the recipe)

1½ (10.5 ounces) cup sugar
2 cups (10 ounces) flour
2 teaspoons baking soda
1 teaspoon salt (scant)
2 teaspoons cinnamon
1 cup cooking oil
3 cups (16 ounces) finely grated carrots (raw)
4 whole eggs

Sift dry ingredients into a large mixing bowl making sure they are thoroughly mixed. Add cooking oil and blend. Add eggs ONE at a time and mix (by hand). Stir in carrots. Bake in two deep cake pans sprayed with Pam. Bake at 350 for 30 to 40 minutes until cakes spring back in center or toothpick comes clean. Cool 10-15 minutes. Remove from pans and frost while warm.

Cream cheese frosting:
1 8 ounce package cream cheese (regular, not low or non-fat)
8 tablespoons (1 stick) butter
4½ cups (16 ounces) powdered sugar
1 teaspoons vanilla
1 cup chopped pecans (optional)

Let cheese and butter sit at room temperature for half an hour, then mix thoroughly. Add powdered sugar slowly, alternating with vanilla. Stir in nuts last. Frost and enjoy.