blueberry poppy seed brunch cake

11.jpg

Because what better to serve with sausage-wrapped deep-fried hard-boiled eggs than cake, I made this blueberry poppy seed brunch cake last weekend. It has “brunch” in the title, so clearly it’s breakfast food. Disregard the stick of butter and half cup of sour cream. And the cup of sugar. Not including the glaze. It’s breakfast food, I tell you.

21.jpg

My sister gave me the Pillsbury Complete Cookbook when I left for college. It was my first cookbook, and it’s been really handy. It has a lot of basic recipes which were good to have when I was cooking on my own for the first time, but where it really shines is in its original recipes, like this cake and the salmon pesto pasta. A bunch of my favorite recipes are rooted in this book.

31.jpg

This cake is the best brunch cake I’ve made. The cake itself is tender and flavorful – the lemon zest adds brightness without making the cake taste lemony. The blueberry filling, which is spooned over the cake rather than mixed in, is the perfect compliment to the cake.

One warning though – the recipe specifies that if you’re using frozen berries, they should be thawed and drained on paper towels. Don’t skip this step! I recommend adding an extra teaspoon of flour to the filling if you use frozen blueberries as well. Otherwise, you might end up with this:

41.jpg

Oops.

Blueberry-Poppy Seed Brunch Cake (adapted from the Pillsbury Complete Cookbook)

8 servings

Cake:
2/3 cup (4.67 ounces) granulated sugar
8 tablespoons (1 stick) butter, softened
2 teaspoons lemon zest
1 egg
1½ cups (7.5 ounces) unbleached flour
2 tablespoons poppy seed
½ teaspoon baking soda
¼ teaspoon salt
½ cup sour cream

Filling:
2 cups fresh or frozen blueberries, thawed, drained on paper towels
1/3 cup (2.33 ounces) granulated sugar
2 teaspoons all-purpose flour
¼ teaspoon nutmeg

Glaze:
1/3 cup powdered sugar
1 to 2 teaspoons milk

1. Heat oven to 350 degrees. Grease and flour bottom and sides of 9 or 10-inch springform pan. In medium bowl, combine 1½ cups flour, poppy seed, baking soda and salt; set aside.

2. Beat butter and sugar with electric mixer on medium-high speed until light and fluffy, about 2 minutes. Add lemon zest and egg to butter-sugar mixture and beat well. Beat in one-half of dry ingredients. Beat in one-third of sour cream. Beat in remaining dry ingredients in two batches, alternating with sour cream, until incorporated. Transfer batter to prepared pan and spread evenly.

3. In another medium bowl, combine all filling ingredients; mix well. Spoon over center of batter.

4. Bake at 350 degrees for 45 to 55 minutes or until crust is golden brown. Cool 10 minutes; remove sides of pan.

5. In small bowl, blend powdered sugar and enough milk for desired drizzling consistency. Drizzle over warm cake. Serve warm or cool.

51.jpg

gooey chocolate cakes (twd)

copy-of-dscn5019.jpg

The popularity of Dorie Greenspan’s Baking: From My Home to Yours is infectious. I’ve been following the baking of the Tuesdays with Dorie group since it was formed in the beginning of this year, but I had no intention of joining, or even buying the book. I once fancied myself a collector of cookbooks, but now I feel silly for having a shelf of books when I only use a few of them. The last thing I needed was another cookbook, especially a baking book.

But after months of overwhelmingly good reviews of the book, plus flipping through it several times in bookstores, plus the fantastic Perfect Party Cake I made for the Daring Bakers, I broke down and bought the book. And TWD is a great way to make sure it doesn’t languish on my bookshelf unused, like so many other cookbooks. Furthermore, it’s actually nice to have someone else pick a recipe for me each week, because it insures that my baking stays creative and I don’t limit myself to my favorite types of recipes.

Leigh of Lemon Tartlet chose Gooey Chocolate Cakes as this week’s recipe, which is Dorie’s take on molten chocolate cakes. It’s a relatively simple dessert to put together, although my first attempt was moist, but certainly not gooey. I made them again and cooked them for one minute less, and they were gooey, but not runny. I made them again and cooked them for another half minute less, and they were exactly what I wanted in the beginning. Maybe it’s because I was using ramekins and not the muffin pan Dorie calls for, maybe my oven’s temperature cycles widely. They were good each time, but the more liquidy, the better, I think.

copy-of-dscn5025.jpg

(Please note that I did not make 18 molten chocolate cakes over the course of a week. That would be insane. I halved the recipe twice, and the second time I baked one in the afternoon to take pictures and stashed the other two in the fridge until I was ready for dessert that evening.)

You really can’t go wrong with molten chocolate cakes. I served mine with ice cream, as per Dorie’s insistence, plus made up a strawberry coulis. This dessert was a great introduction into this group!

Gooey Chocolate Cakes (from Dorie Greenspan’s Baking: From My Home to Yours)

6 servings

It’s been more than ten years since the molten chocolate cake won the hearts of just about every pastry chef here and in France. There doesn’t seem to be a chocolate lover on either side of the ocean who hasn’t savored this cake: small, dark and warm, with a lava-like runny center, sophisticated, easily dressupable and, best of all, truly easy to make. In fact, it’s one of few restaurant desserts that can be made at home with foolproof results, even if you’re not a star baker. The most important rule to remember in making these individual cakes is to use not only the best chocolate you can find, but the chocolate you most love to eat, since that’s the ingredient you will taste.

Usually these cakes are made in individual ramekins, but with all the ramekins stacked in my cupboard, I couldn’t come up with six that were the right size. Then I discovered that disposable aluminum foil muffin pans are ideal. I buy the kind that have six cups and come two pans to a package. I also wash them in the dishwasher and re-use them.

1/3 cup all-purpose flour
3 tablespoons unsweetened cocoa powder
¼ teaspoon salt
5 ounces bittersweet chocolate, 4 ounces coarsely chopped, 1 ounce very finely chopped
1 stick (8 tablespoons) unsalted butter, cut into 8 pieces
2 large eggs, at room temperature
1 large egg yolk, at room temperature
6 tablespoons sugar

Getting Ready: Center a rack in the oven and preheat the oven to 400 degrees. Butter (or spray – it’s easier) 6 cups of a regular-size muffin pan, preferably a disposable aluminum foil pan, dust the insides with flour and tap out the excess. Put the muffin pan on a baking sheet.

Sift the flour, cocoa and salt together.

Set a heat proof bowl over a saucepan of gently simmering water, put the coarsely chopped chocolate and the butter in the bowl and stir occasionally over the simmering water just until they are melted – you don’t want them to get so hot that the butter separates. Remove the bowl from the pan of water.

In a large bowl, whisk the eggs and yolk until homogenous. Add the sugar and whisk until well blended, about 2 minutes. Add the dry ingredients and, still using the whisk, stir (don’t beat) them into the eggs. Little by little, and using a light hand, stir in the melted chocolate and butter. Divide the batter evenly among the muffin cups and sprinkle the finely chopped chocolate over the batter.

Bake the cakes for 13 minutes. Transfer them, still on the baking sheet, to a rack to cool for 3 minutes. (There is no way to test that these cakes are properly baked, because the inside remains liquid.)

Line a cutting board with a silicone baking mat or parchment or wax paper, and, after the 3-minute rest, unmold the cakes onto the board. Use a wide metal spatula to lift the cakes onto dessert plates.

Serving: These should be served as soon as they are put on plates. The cakes are not meant to be served alone – they need something to play off their warm, gooey, soooooo chocolaty interior. Ice cream is the most obvious choice and, to my mind, the best in terms of texture and, of course, temperature. Any chocolate-friendly flavor will be good. Circling the cakes with crème anglaise is another good idea and, for those for whom too much is not enough, circling the cakes with crème anglaise and running a ring of bittersweet chocolate sauce through the custard is an even better idea.

Storing: Although the whole point of a warm, runny cake is to eat it when it is warm and runny, the cake is still delicious, but different, the following day. If you wrap the cooled cakes in plastic wrap and keep them at room temperature, the next day the texture of the center of the cake (the part that was once gooey) will remind you of ganache. Eating the cake will be like enjoying a bonbon: it will be firm on the outside and creamy within.

copy-of-dscn5016.jpg

perfect party cake (daring bakers march 2008)

copy-of-dscn4743.jpg

I was excited to see that Morven chose a recipe from Dorie Greenspan’s Baking: From My Home to Yours for this month’s Daring Baker challenge. This book is extremely popular among food bloggers, but I had never made anything from it. Oh, and also, I love cake. And I had too many egg whites in the freezer left over from the pound cake experiments.

The cake came together easily. We were allowed to change the flavoring from the original lemon if we chose, but I didn’t because I was interested in the subtly-lemon flavored cake. I’m a major batter eater, and this batter tasted great, which is always a good sign.

copy-of-dscn4720.jpg

Like a few of the Daring Bakers, my cakes didn’t rise as much as I expected. This may be a result of the previously-frozen state of my egg whites, but I suspect it’s because I used a bit too much flour. Apparently the copy of the recipe I used had a mistake (oops!) in the amount of flour called for. I was a little worried about cutting the thin layers in half and probably would have skipped that step if this hadn’t been a DB challenge. However, Dorie refers to this cake as “sturdy” and I imagine the extra flour makes it more so, so I had no problems whatsoever cutting my thin layers in half.

The buttercream is my favorite of the few meringue buttercreams I’ve made. The lemon juice gave it a flavor beyond lightly sweetened butter. It came together quickly and was easy to work with.

copy-of-dscn4771.jpg

I’m glad I was able to halve each layer, because the alternating stripes of raspberry jam and buttercream is so pretty. I was a little surprised that Dorie called for one quarter of the buttercream to be used in between each layer, leaving just one quarter for both the top and the sides. I tried to use less in between the layers, so that I’d have some more to work with on the outside. In the future, if I’m serving the cake immediately, I might make just ⅔ – ¾ of the buttercream recipe, and leave the sides of the cake bare. I think it would be really pretty. Plus it would cut down on the ridiculous amount of butter involved in this dessert.

Overall, I thought the cake was delicious. The lemon, the raspberry, and the sweet cake were great compliments. The cake was easy to work with, “sturdy”, as Dorie refers to it. I thought it was maybe just a bit dry, so I was relieved to hear that I used too much flour, because now I can say that the first recipe I made from Dorie Greenspan lived up to all the hype. And in fact, I bought the book a few days later!

copy-of-dscn4758.jpg

Perfect Party Cake (from Dorie Greenspan’s Baking: From My Home to Yours)

Dorie note: Stick a bright-coloured Post-it to this page, so you’ll always know where to turn for a just-right cake for any celebration. The original recipe was given to me by my great dear friend Nick Malgieri, of baking fame, and since getting it, I’ve found endless opportunities to make it – you will too. The cake is snow white, with an elegant tight crumb and an easygoing nature: it always bakes up perfectly; it is delicate on the tongue but sturdy in the kitchen – no fussing when it comes to slicing the layers in half or cutting tall, beautiful wedges for serving; and, it tastes just as you’d want a party cake to taste – special. The base recipe is for a cake flavoured with lemon, layered with a little raspberry jam and filled and frosted with a classic (and so simple) pure white lemony hot-meringue buttercream but, because the elements are so fundamental, they lend themselves to variation (see Playing Around), making the cake not just perfect, but also versatile.

For the Cake
2¼ cups (9 ounces) cake flour
1 tablespoon baking powder
½ teaspoon salt
1¼ cups whole milk or buttermilk (I prefer buttermilk with the lemon)
4 large egg whites
1½ cups (10½ ounces) sugar
2 teaspoons grated lemon zest
1 stick (8 tablespoons or 4 ounces) unsalted butter, at room temperature
½ teaspoon pure lemon extract

For the Buttercream
1 cup sugar
4 large egg whites
3 sticks (12 ounces) unsalted butter, at room temperature
¼ cup fresh lemon juice (from 2 large lemons)
1 teaspoon pure vanilla extract

For Finishing
2/3 cup seedless raspberry preserves stirred vigorously or warmed gently until spreadable
About 1½ cups sweetened shredded coconut

Getting Ready:
Center a rack in the oven and preheat the oven to 350 degrees F. Butter two 9 x 2 inch round cake pans and line the bottom of each pan with a round of buttered parchment or wax paper. Put the pans on a baking sheet.

To Make the Cake:
Sift together the flour, baking powder and salt.

Whisk together the milk and egg whites in a medium bowl.

Put the sugar and lemon zest in a mixer bowl or another large bowl and rub them together with your fingers until the sugar is moist and fragrant. Add the butter and working with the paddle or whisk attachment, or with a hand mixer, beat at medium speed for a full 3 minutes, until the butter and sugar are very light. Beat in the extract, then add one third of the flour mixture, still beating on medium speed. Beat in half of the milk-egg mixture, then beat in half of the remaining dry ingredients until incorporated. Add the rest of the milk and eggs beating until the batter is homogeneous, then add the last of the dry ingredients. Finally, give the batter a good 2- minute beating to ensure that it is thoroughly mixed and well aerated.

Divide the batter between the two pans and smooth the tops with a rubber spatula. Bake for 30-35 minutes, or until the cakes are well risen and springy to the touch – a thin knife inserted into the centers should come out clean. Transfer the cakes to cooling racks and cool for about 5 minutes, then run a knife around the sides of the cakes, unfold them and peel off the paper liners. Invert and cool to room temperature, right side up (the cooled cake layers can be wrapped airtight and stored at room temperature overnight or frozen for up to two months).

To Make the Buttercream:
Put the sugar and egg whites in a mixer bowl or another large heatproof bowl, fit the bowl over a plan of simmering water and whisk constantly, keeping the mixture over the heat, until it feels hot to the touch, about 3 minutes. The sugar should be dissolved, and the mixture will look like shiny marshmallow cream. Remove the bowl from the heat. Working with the whisk attachment or with a hand mixer, beat the meringue on medium speed until it is cool, about 5 minutes.

Switch to the paddle attachment if you have one, and add the butter a stick at a time, beating until smooth. Once all the butter is in, beat in the buttercream on medium-high speed until it is thick and very smooth, 6-10 minutes. During this time the buttercream may curdle or separate – just keep beating and it will come together again. On medium speed, gradually beat in the lemon juice, waiting until each addition is absorbed before adding more, and then the vanilla. You should have a shiny smooth, velvety, pristine white buttercream. Press a piece of plastic against the surface of the buttercream and set aside briefly.

To Assemble the Cake
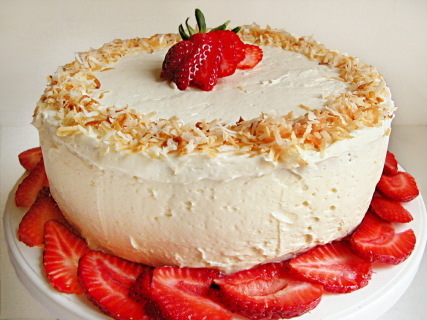
Using a sharp serrated knife and a gentle sawing motion, slice each layer horizontally in half. Put one layer cut side up on a cardboard cake round or a cake plate protected by strips of wax or parchment paper. Spread it with one third of the preserves. Cover the jam evenly with about one quarter of the buttercream. Top with another layer, spread with preserves and buttercream and then do the same with a third layer (you’ll have used all the jam and have buttercream leftover). Place the last layer cut side down on top of the cake and use the remaining buttercream to frost the sides and top. Press the coconut into the frosting, patting it gently all over the sides and top.

Serving
The cake is ready to serve as soon as it is assembled, but I think it’s best to let it sit and set for a couple of hours in a cool room – not the refrigerator. Whether you wait or slice and enjoy it immediately, the cake should be served at room temperature; it loses all its subtlety when it’s cold. Depending on your audience you can serve the cake with just about anything from milk to sweet or bubbly wine.

Storing
The cake is best the day it is made, but you can refrigerate it, well covered, for up to two days. Bring it to room temperature before serving. If you want to freeze the cake, slide it into the freezer to set, then wrap it really well – it will keep for up to 2 months in the freezer; defrost it, still wrapped overnight in the refrigerator.

Playing Around
Since lemon is such a friendly flavour, feel free to make changes in the preserves: other red preserves – cherry or strawberry – look especially nice, but you can even use plum or blueberry jam.

Fresh Berry Cake
If you will be serving the cake the day it is made, cover each layer of buttercream with fresh berries – use whole raspberries, sliced or halved strawberries or whole blackberries, and match the preserves to the fruit. You can replace the coconut on top of the cake with a crown of berries, or use both coconut and berries. You can also replace the buttercream between the layers with fairly firmly whipped sweetened cream and then either frost the cake with buttercream (the contrast between the lighter whipped cream and the firmer buttercream is nice) or finish it with more whipped cream. If you use whipped cream, you’ll have to store the cake the in the refrigerator – let it sit for about 20 minutes at room temperature before serving.

copy-of-dscn4729.jpg

cook’s illustrated classic pound cake

12.jpg

Over the course of this blog, I’ve made no secret that I love Cooks Illustrated. An embarrassing number of the recipes I’ve discussed come from their magazine and cookbooks. When I want to try a new dish, I check the CI recipe first. Why not? Even if it isn’t exactly what I’m looking for, they discuss the goals for each recipe so clearly that at least I’ll know that their recipe isn’t right for me. But often it is. I’ve made hundreds of their recipes, and about half of those have been the best version of that dish that I’ve ever eaten. Most of the rest have still been great. There’s a very few recipes that I haven’t cared for, but even most of those can be attributed to personal taste. Their Northern Cornbread wasn’t near sweet enough for me (or Dave), but they made up for it with their All-Purpose Cornbread, which is the best I’ve had.

41.jpg

But there’s no excuse for this pound cake. I made it the first time a couple of years ago, and it didn’t turn out quite right. I had such faith in CI and I was so used my oven overbrowning things that I was convinced the problem wasn’t with the recipe. I tried the same recipe (different oven) recently, but it didn’t rise much at all. I was exceedingly careful with the recipe – I tested the temperature of the butter before starting, and checked the temperature of the oven with an oven thermometer. Still, I decided that the error must have been mine, especially because the recipe was designed specifically to be foolproof. So I tried again. Same result.

21.jpg

See this picture from their website?

31.jpg

This flat (they call it “bad”) cake is exactly what mine looked like. CI states that a “flat and dense” pound cake will result if the butter is too warm and the batter is overbeaten. But I took the temperature of the butter before starting! And I followed the mixing times and cues in the recipe!

And, by the way, I’m a good baker. And I was careful. I’m blaming the recipe.

It’s missing an ingredient which is in most other pound cake recipes that I’ve seen – baking powder. However, I’ve seen a few blog entries with reviews for these pound cakes which have called the cakes dry. I did not want a dry pound cake. I wanted a rich and tender and buttery and moist pound cake.

And I already had a rich and buttery and dense pound cake. So I didn’t want to start with a whole new recipe. And there was another thing holding me to this recipe – the batter is possibly the best I’ve ever eaten. Ever. And this is from someone who makes chocolate chip cookies just for the dough. I think this batter may be better than cookie dough. I didn’t want to lose that.

5.jpg

So I tweaked the recipe I’d been using. I simply added ½ teaspoon of baking powder with the flour.

And, oh my gosh, if this isn’t now a completely fantastic dessert. Every bite I took of this adapted pound cake was delightful. It’s buttery, it’s tender, it’s not a bit dry, and it’s not a brick of cake. The best part was the top crust, which was all of those things plus caramelized. I’m considering adding an additional ¼ teaspoon baking powder next time, but it’s not really necessary. I’m perfectly happy with this cake as it is. Just don’t trust the original recipe.

6.jpg

Classic Pound Cake (from Cooks Illustrated January 2007)

Makes one 9 by 5-inch loaf

CI note: As directed in the recipe, the butter and eggs should be the first ingredients prepared so they have a chance to stand at room temperature and lose their chill while the oven heats, the loaf pan is greased and floured, and the other ingredients are measured. Leftover cake will keep reasonably well for up to 3 days if wrapped tightly in plastic wrap and stored at room temperature.

Bridget note: Add baking powder with the flour! ½ to ¾ teaspoon of it. I also added the seeds of one Tahitian vanilla bean with the eggs and vanilla extract.

16 tablespoons unsalted butter (2 sticks), cold, plus extra for greasing pan
3 large eggs
3 large egg yolks
2 teaspoons vanilla extract
1¾ cups cake flour (7 ounces), plus extra for dusting pan
½ teaspoon table salt
1¼ cups sugar (8 3/4 ounces)

1. Cut butter into 1-tablespoon pieces and place in bowl of standing mixer; let stand at room temperature 20 to 30 minutes to soften slightly (butter should reach no more than 60 degrees). Using dinner fork, beat eggs, egg yolks, and vanilla in liquid measuring cup until combined. Let egg mixture stand at room temperature until ready to use.

2. Adjust oven rack to middle position and heat oven to 325 degrees. Generously butter 9 by 5-inch loaf pan; dust pan liberally with flour and knock out excess.

3. In standing mixer fitted with flat beater, beat butter and salt at medium-high speed until shiny, smooth, and creamy, 2 to 3 minutes, scraping bottom and sides of bowl once with rubber spatula. Reduce speed to medium; with mixer running, gradually pour in sugar (this should take about 60 seconds). Once all sugar is added, increase speed to medium-high and beat until mixture is fluffy and almost white in color, 5 to 8 minutes, scraping bottom and sides of bowl once. With mixer running at medium speed, gradually add egg mixture in slow, steady stream; this should take 60 to 90 seconds. Scrape bottom and sides of bowl; beat mixture at medium-high speed until light and fluffy, 3 to 4 minutes (mixture may look slightly broken). Remove bowl from mixer; scrape bottom and sides.

4. In 3 additions, sift flour over butter/egg mixture; after each addition, fold gently with rubber spatula until combined. Scrape along bottom of bowl to ensure that batter is homogenous.

5. Transfer batter to prepared loaf pan and smooth surface with rubber spatula. Bake until golden brown and wooden skewer inserted into center of cake comes out clean, about 70 to 80 minutes. Cool cake in pan on wire rack for 15 minutes; invert cake onto wire rack, then turn cake right side up. Cool cake on rack to room temperature, about 2 hours. Slice and serve.

7.jpg

four vanilla frostings

opener.jpg

A week ago, I published a post on chocolate cupcakes and vanilla frosting. It’s already become my most popular post, because my site comes up when people search for vanilla frosting recipes. The problem is that I didn’t love the frosting I made to go with those cupcakes. I decided to do a more thorough test of frostings to help out the random internet searcher.

Oh, also, it’s my nephew’s 0th birthday. He was born on Monday. Isn’t he just the cutest little cuddly thing? I haven’t seen him in person yet, but when I do, he’d better be prepared to get some major squeezing. (And today is that cuddly little guy’s brother’s birthday, as well as my brother’s birthday.)

bryce.jpg 0th.jpg

Right, and I apparently need lots of justification to make some more cake.

A few notes on my methods. These frostings topped Cooks Illustrated’s Old-Fashioned Chocolate Layer Cake. CI has two recipes with this title – this is the one published in April 2006. It is, quite frankly, better than the one published in The New Best Recipe.

Also, I made the smallest practical amount of each frosting. This was ¼ of the recipe for everything except the Fluffy Icing, which I made half of.

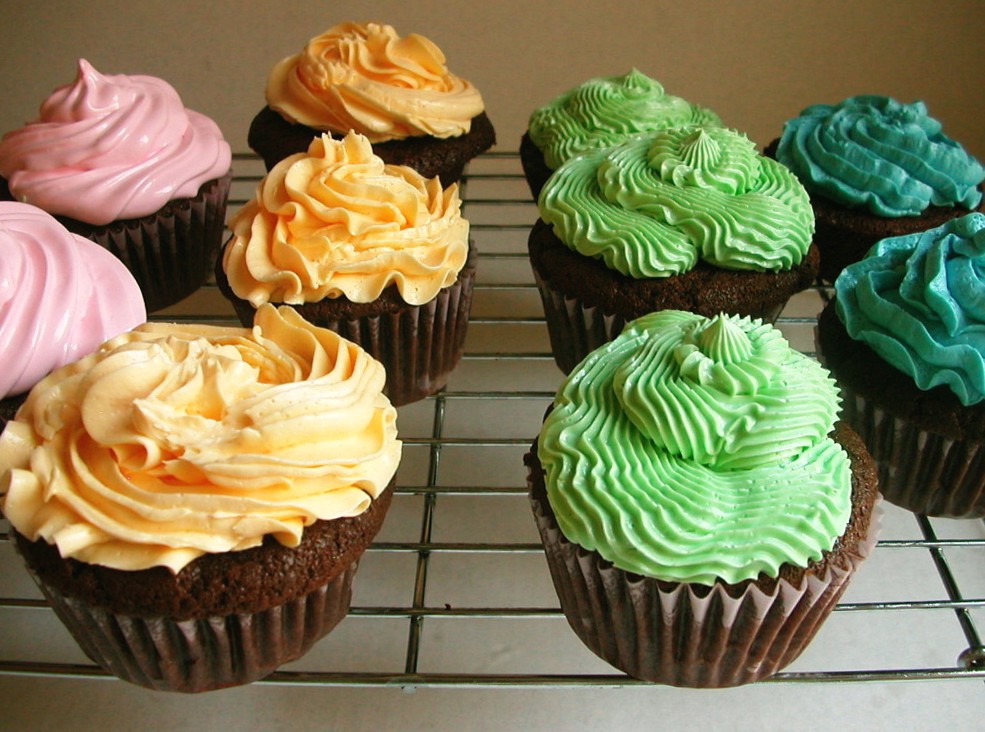
The first frosting (blue) is Easy Vanilla Buttercream. This appears to be the most common vanilla frosting. It’s also called decorator’s icing, and it’s what I ate as a kid, because my mom decorated fancy cakes for us on our birthdays. You simply mix powdered (confectioner’s) sugar and butter together, with a bit of vanilla extract for flavor and a little milk or cream (you could easily use soy milk if necessary) to achieve the right consistency. This was my favorite of these four frostings, even though I know that I pooh poohed as too simple last week. It was Dave’s second favorite.

The second frosting (yellow-orange) is a Vanilla Buttercream from epicurious. For this buttercream, egg whites are whipped in a bowl while sugar is heated on the stove. When the sugar is hot and the egg whites are frothy, the hot sugar is drizzled into the egg whites with the mixer beating continuously, and then butter is slowly added. I had a bit of stress with this recipe because it provides a temperature for the sugar to be heated to without giving any visual clues, and I don’t have a candy thermometer. A quick check on the internet gave me some useful information, so I waited until a drop of the liquid sugar formed a ball that could be squeezed before beginning to add the sugar into the egg whites. A few of the reviewers on epicurious recommended using only ¾ of the butter. I like this idea because I like a sweeter and less buttery frosting, but the buttercream looked curdled until I added just about all of the butter. In the end, though, it was pretty good. It was Dave’s favorite and my second favorite of these four recipes.

The next frosting (green) is Cooks Illustrated’s Classic Buttercream. In this recipe, whole eggs, sugar, and vanilla are heated in a double boiler, then whipped until airy, when softened butter is slowly added. It was my least favorite and Dave’s second to least favorite. It had significantly less flavor than the other three frostings, to the point where I wonder if I forgot to add the vanilla. (I’m almost positive I didn’t forget.)

The last frosting (pink) is Cooks Illustrated’s Fluffy Icing. This is a seven-minute frosting. Egg whites, sugar, water, vanilla extract and cornstarch are heated in a double boiler, then whipped to stiff peaks. Mine refused to form stiff peaks, even after whipping for well beyond the recipe’s suggested times. I thought it was okay, although I liked the Easy Buttercream and epicurious’s recipe better. It didn’t necessarily go with the chocolate cupcakes, but I think it would be great with the lemon cake that CI originally published it to accompany. Dave didn’t like it at all, but I’ve had my eye on that lemon cake for a while, so he’ll have to try it again when I make that. And hey – no fat in this recipe!

To conclude, my preference, from most to least favorite, is Easy, epicurious, Fluffy, Classic. Dave’s are epicurious, Easy, Classic, Fluffy. I think the secret to making the Easy Vanilla Buttercream great is to whip it – whip it good. It becomes lighter and fluffier and easier to work with if it’s beat at high speed for several minutes. It had the strongest flavor, tasting somewhat tangy, and didn’t feel as buttery as the other two buttercreams.

Like I said before, I do think that the Fluffy Icing has its place, but its place isn’t topping chocolate cake. The Cooks Illustrated Classic Buttercream was lacking flavor, and both Magnolia’s Bakery and epicurious’s buttercreams were buttery and sweet. I’d probably choose Magnolia’s recipe over this epicurious one because Magnolia’s seems a bit stabler, and there’s no messing around with raw egg.

Easy Vanilla Buttercream (from Cooks Illustrated April 2007)

The buttercream frosting can be made ahead and refrigerated; if refrigerated, however, it must stand at room temperature to soften before use. If using a hand-held mixer, increase mixing times significantly (at least 50 percent). This recipe can be doubled to make enough for a two-layer cake.

Makes 3 cups

20 tablespoons (2½ sticks) unsalted butter, softened
2½ cups Confectioners’ sugar (10 ounces)
1/8 tablespoons table salt
2 teaspoons vanilla extract
2 tablespoons heavy cream

In standing mixer fitted with whisk attachment, beat butter at medium-high speed until smooth, about 20 seconds. Add confectioners’ sugar and salt; beat at medium-low speed until most of the sugar is moistened, about 45 seconds. Scrape down bowl and beat at medium speed until mixture is fully combined, about 15 seconds; scrape bowl, add vanilla and heavy cream, and beat at medium speed until incorporated, about 10 seconds, then increase speed to medium-high and beat until light and fluffy, about 4 minutes, scraping down bowl once or twice.

Vanilla Buttercream (from epicurious.com and Gourmet January 2004)

Makes about 6 cups.

4 large egg whites at room temperature for 30 minutes
Rounded ¼ teaspoon salt
2/3 cup water
1 1/3 cups plus 2 tablespoons sugar
4 sticks (2 cups) unsalted butter, cut into tablespoon pieces and softened
2 teaspoons vanilla

Combine whites and salt in a very large bowl. Stir together water and 1 1/3 cups sugar in a 3- to 4-quart heavy saucepan until sugar is dissolved, then bring to a boil over moderate heat, without stirring, brushing any sugar crystals down side of pan with a pastry brush dipped in water.

When syrup reaches a boil, start beating egg whites with an electric mixer at medium-high speed until frothy, then gradually add remaining 2 tablespoons sugar and beat at medium speed until whites just hold soft peaks. (Do not beat again until sugar syrup is ready.)

Meanwhile, put thermometer into sugar syrup and continue boiling until syrup registers 238 to 242°F. Immediately remove from heat and, with mixer at high speed, slowly pour hot syrup in a thin stream down side of bowl into whites, beating constantly. Beat, scraping down side of bowl with a rubber spatula, until meringue is cool to the touch, about 10 minutes in a standing mixer or 15 with a handheld. (It is important that meringue is properly cooled before proceeding.)

With mixer at medium speed, gradually add butter 1 piece at a time, beating well after each addition until incorporated. (Buttercream will look soupy after some butter is added if meringue is still warm. If so, briefly chill bottom of bowl in a large bowl filled with ice water for a few seconds before continuing to beat in remaining butter.) Continue beating until buttercream is smooth. (Mixture may look curdled before all of butter is added but will come back together by the time beating is finished.) Add vanilla and beat 1 minute more.

Classic Vanilla Buttercream Frosting (from Cooks Illustrated March 2000)

The whole eggs, whipped until airy, give this buttercream a light, satiny-smooth texture that melts on the tongue.

Makes about 4 cups

4 large eggs
1 cup granulated sugar
2 teaspoons vanilla extract
pinch table salt
1 pound unsalted butter (4 sticks), softened, each stick cut into quarters

1. Combine eggs, sugar, vanilla, and salt in bowl of standing mixer; place bowl over pan of simmering water. Whisking gently but constantly, heat mixture until thin and foamy and registers 160 degrees on instant-read thermometer.

2. Beat egg mixture on medium-high speed with whisk attachment until light, airy, and cooled to room temperature, about 5 minutes. Reduce speed to medium and add butter, one piece at a time. (After adding half the butter, buttercream may look curdled; it will smooth with additional butter.) Once all butter is added, increase speed to high and beat 1 minute until light, fluffy, and thoroughly combined. (Can be covered and refrigerated up to 5 days.)

Fluffy Vanilla Icing (from Cooks Illustrated March 2007)

3 cups, enough to frost one 4-layer cake

2 large egg whites
1 cup granulated sugar (7 ounces)
¼ cup water plus 1 tablespoon
1 teaspoon vanilla extract
1 tablespoon corn syrup

Combine all ingredients in bowl of standing mixer or large heatproof bowl and set over medium saucepan filled with 1 inch of barely simmering water (do not let bottom of bowl touch water). Cook, stirring constantly, until sugar is dissolved and mixture registers 160 degrees on instant-read thermometer, 5 to 10 minutes. Remove bowl from heat and transfer mixture to standing mixer fitted with whisk attachment. Beat on medium speed until soft peaks form, about 5 minutes. Increase speed to medium-high and continue to beat until mixture has cooled to room temperature and stiff peaks form, 5 minutes longer.

closer.jpg

chocolate cupcakes and vanilla frosting

1.jpg

My all-time favorite dessert is chocolate cake with vanilla frosting. I know, how blasé. I love the tender, rich cake and the contrasting fresh taste of vanilla in the icing. And of course, everything tastes better in mini, hence the cupcakes.

And this cake recipe, it’s It. It’s the last chocolate cake recipe I’ll ever need. Well, right, I’m interested in this one as well. Out of thousands of recipes on epicurious, it’s the most popular, so I’d be silly not to check it out. But until then, when I want something that I’ve already checked out, that I already know is chocolate cake perfection, I’ll turn to this recipe.

2.jpg

I’m having more difficulty finding an icing that I love. I’ve used the simple powdered sugar-butter-vanilla-milk frosting for most of my life, and I like it, I do. But I think I want something more from a frosting. Something fluffier and tasting a little less of powdered sugar. I’ve tried a few swiss meringue buttercream recipes and haven’t had much luck. It’s very possible that I’m doing something wrong, but the mouthfeel of the swiss meringue buttercreams that I’ve tried is all off – too much like butter, not enough like icing.

I found the recipe I used this time from the famous Magnolia Bakery, and the method wasn’t something that I had experience with. It’s unusual (to me at least) in that flour and milk are first stirred over medium heat until the mixture thickens, and then once this cools, it’s mixed into a whipped butter-sugar mixture. It was…weird. Not very flavorful, although I did like the texture. I’m also put off by this step: “Cover and refrigerate for 15 minutes (no less and no longer – set a timer!).” I was only making about one fifth of the recipe, and without any information on what was actually supposed to happen at 15 minutes, I didn’t know when I was supposed to use the frosting. Also, the dictatorial “no less and no longer” seems silly – won’t the temperature of the refrigerator, as well as the temperature that the frosting was made at, affect the rate of cooling in the fridge?

It looks like I’m still on the search for my ideal vanilla frosting. But at least I have one excellent chocolate cake to use as a base, and another chocolate cake just waiting to be tested. If you have a favorite vanilla icing, please let me know!

Update: A week later, I tested four more vanilla icings. To see my evaluation and the recipes, click here.

3.jpg

Old-Fashioned Chocolate Layer Cake (from Cooks Illustrated)

Serves 10 to 12

To make cupcakes instead of a layer cake, divide batter between 24 muffin pan cups. Bake until skewer inserted into center of cupcakes comes out clean, 18-20 minutes. I only bake one pan at a time. (Because I only have one pan. Also, I only made half the recipe.)

12 tablespoons unsalted butter (1½ sticks), very soft, plus extra for greasing pans
1¾ cups unbleached all-purpose flour (8¾ ounces), plus extra for dusting pans
4 ounces unsweetened chocolate, coarsely chopped
¼ cup Dutch-processed cocoa (¾ ounce)
½ cup hot water
1¾ cups sugar (12¼ ounces)
1½ teaspoons baking soda
1 teaspoon table salt
1 cup buttermilk
2 teaspoons vanilla extract
4 large eggs
2 large egg yolks

1. FOR THE CAKE: Adjust oven rack to middle position; heat oven to 350 degrees. Grease two 9-inch-round by 2-inch-high cake pans with softened butter; dust pans with flour and knock out excess. Combine chocolate, cocoa powder, and hot water in medium heatproof bowl; set bowl over saucepan containing 1 inch of simmering water and stir with rubber spatula until chocolate is melted, about 2 minutes. Add ½ cup sugar to chocolate mixture and stir until thick and glossy, 1 to 2 minutes. Remove bowl from heat and set aside to cool.

2. Whisk flour, baking soda, and salt in medium bowl. Combine buttermilk and vanilla in small bowl. In bowl of standing mixer fitted with whisk attachment, whisk eggs and yolks on medium-low speed until combined, about 10 seconds. Add remaining 1¼ cups sugar, increase speed to high, and whisk until fluffy and lightened in color, 2 to 3 minutes. Replace whisk with paddle attachment. Add cooled chocolate mixture to egg/sugar mixture and mix on medium speed until thoroughly incorporated, 30 to 45 seconds, pausing to scrape down sides of bowl with rubber spatula as needed. Add softened butter one tablespoon at a time, mixing about 10 seconds after each addition. Add about one-third of flour mixture followed by half of buttermilk mixture, mixing until incorporated after each addition (about 15 seconds). Repeat using half of remaining flour mixture and all of remaining buttermilk mixture (batter may appear separated). Scrape down sides of bowl and add remaining flour mixture; mix at medium-low speed until batter is thoroughly combined, about 15 seconds. Remove bowl from mixer and fold batter once or twice with rubber spatula to incorporate any remaining flour. Divide batter evenly between prepared cake pans; smooth batter to edges of pan with spatula.

3. Bake cakes until toothpick inserted into center comes out with a few crumbs attached, 25 to 30 minutes. Cool cakes in pans 15 minutes, then invert onto wire rack. Cool cakes to room temperature before frosting, 45 to 60 minutes.

4. TO MAKE FROSTING: Melt chocolate in heatproof bowl set over saucepan containing 1 inch of barely simmering water, stirring occasionally until smooth. Remove from heat and set aside. Meanwhile, heat butter in small saucepan over medium-low heat until melted. Increase heat to medium; add sugar, corn syrup, vanilla, and salt and stir with heatproof rubber spatula until sugar is dissolved, 4 to 5 minutes. Add melted chocolate, butter mixture, and cream to clean bowl of standing mixer and stir to thoroughly combine.

5. Place mixer bowl over ice bath and stir mixture constantly with rubber spatula until frosting is thick and just beginning to harden against sides of bowl, 1 to 2 minutes (frosting should be 70 degrees). Place bowl on standing mixer fitted with paddle attachment and beat on medium-high speed until frosting is light and fluffy, 1 to 2 minutes. Stir with rubber spatula until completely smooth.

Creamy Vanilla Frosting (from epicurious, where it was reprinted with permission from More From Magnolia: Recipes From The World-Famous Bakery and Magnolia’s Home Kitchen, by Allysa Torey)

Makes enough for one 3-layer 9-inch cake

6 tablespoons all-purpose flour
2 cups milk
2 cups (4 sticks) unsalted butter, softened
2 cups sugar
2 teaspoons vanilla extract

In a medium-size saucepan, whisk the flour into the milk until smooth. Place over medium heat and, stirring constantly, cook until the mixture becomes very thick and begins to bubble, 10-15 minutes. Cover with waxed paper placed directly on the surface and cool to room temperature, about 30 minutes.

In a large bowl, on the medium high speed of an electric mixer, beat the butter for 3 minutes, until smooth and creamy. Gradually add the sugar, beating continuously for 3 minutes until fluffy. Add the vanilla and beat well.

Add the cooled milk mixture, and continue to beat on the medium high speed for 5 minutes, until very smooth and noticeably whiter in color. Cover and refrigerate for 15 minutes (no less and no longer – set a timer!). Use immediately.

4.jpg

martha martha martha (maple walnut cupcakes)

dscn2685.jpg

For someone who’s been very interested in food and cooking for a large part of her life, I was late catching onto Martha Stewart fanhood. I just didn’t know much about her, for whatever reason. I didn’t watch her show, I didn’t read her magazine, and I hadn’t made any of her recipes. But then last Christmas, my mother-in-law gave me Martha Stewart’s Baking Handbook.

This is a really great book. For one thing, every recipe has a beautiful picture accompanying it. Also, many of the recipes include garnishes. What a relief for someone like me, who is new to caring about garnishes! But more important, of course, are the recipes themselves. There’s a great mix of classics, like chocolate chip cookies and buttermilk biscuits, to more advanced but still familiar recipes, like a wedding cake and croissants, plus a good peppering of more original ideas, like grapefruit cookies and rum-raisin pie. I’m especially excited to make my way through some of the cookie recipes. Whoever heard of grapefruit in cookies? Yum!

I’ve been craving cupcakes for quite some time now, and I wanted something a little bit more…interesting that your standard old chocolate or vanilla. These were perfect! I’m especially happy with the maple buttercream frosting. I had my doubts going in, because I haven’t had the most successful history of working with buttercream. Also, I was only making a third of the recipe. I know buttercream is very temperature sensitive, and this much smaller amount was going to change temperatures a lot faster than the recipe indicates. And, I was worried about the method of combining the maple syrup and the egg yolk. The syrup is heated to 240 degrees (my probe thermometer tops out at 212 degrees, so I guessed and hoped for the best), then drizzled into the egg yolk. 240 degrees is…hot, especially for egg. But, it all seemed to work out! The buttercream did show signs of breaking, but I tried beating it more, and it actually came together very nicely!

The only change I would make to the recipe is to toast the walnuts before mixing them with the batter. Oh, and I wouldn’t spill a quarter of the dry ingredient mixture on the counter and then not notice until the cupcakes were in the oven. All in all, they were really good.  And cute!

dscn2680.jpg

Maple-Walnut Cupcakes (from Martha Stewart’s Baking Handbook)
Makes 2 dozen

2¾ cups (13.75 ounces) unbleached flour
1 tablespoon baking powder
¼ teaspoon salt
1 teaspoon ground cinnamon
16 tablespoons (2 sticks) unsalted butter, room temperature
1 ½ cups (10.5 ounces) granulated sugar
3 large eggs
1 teaspoon vanilla extract
1 cup milk
1½ cups (5.5 ounces) walnuts, toasted, chopped medium-fine
Maple Buttercream

Preheat the oven to 350 degrees. Line two standard 12-up muffin pans with paper liners. Into a large bowl, sift together flour, baking powder, salt, and cinnamon; set aside.

In the bowl of an electric mixer fitted with the paddle attachment, beat the butter and sugar on medium speed until creamy, about 3 minutes. Add the eggs and vanilla, and beat until combined. With the mixer still on medium speed, add the flour mixture in two parts, alternating with the milk and beginning and ended with the flour. Fold in the walnuts.

Divide the batter evenly among he muffin cups, adding about 1/3 cup to each. Bake, rotating the pans halfway through, until cupcakes are golden and a cake tester inserted into the center of a cupcake comes out clean, 18-20 minutes. Transfer the pans to a wire rack to cool slightly. Invert the cupcakes onto the rack; then reinvert and let them cool completely, top sides up. Frost tops with Maple Buttercream. Cupcakes can be refrigerated in an airtight container for up to 3 days.

Maple Buttercream
Makes enough for 2 dozen cupcakes (about 2 cups)

This frosting can be refrigerated in an airtight container for up to three days. Bring to room temperature before using.

3 large eggs yolks
1 cup pure maple syrup
16 tablespoons (2 sticks) unsalted butter, cold, cut into small pieces

In the bowl of an electric mixer fitting with the whisk attachment, beat the egg yolks on high speed until light and fluffy, about 5 minutes; set aside. In a small saucepan set over medium-high heat, bring the maple syrup to a boil, and cook until it registers 240 degrees on a candy thermometer, about 15 minutes. Remove from heat.

With the mixer running, slowly pour syrup down the side of the bowl in a slow, steady stream, until completely incorporated, about 1 minute. Continue beating until bowl is just slightly warm to the touch, 4 to 5 minutes. Add butter, one piece at a time, until thoroughly incorporated and the frosting is fluffy, about 4 minutes more.

dscn2688.jpg

daring bakers dec 2007: yule log

dscn1992.jpg

2007 was probably the busiest year of my life. I got engaged, then married, I moved to a new city, I finished my PhD, and I started a new, very time-consuming job. December was an appropriate finish to such a year – on top of all the holiday craziness and a visit from my parents, Dave and I are moving from Syracuse to Philadelphia at the end of the month. It’ll be a great adventure for both of us, but it means we have to pack up all of our stuff – for the second time this year for me, and the third time for Dave.

I knew all this was coming when I joined the Daring Bakers at the end of November. But I was too impatient and excited to be part of such a great group that I didn’t want to wait another month! I have to admit that I was hoping for a relatively simple first challenge. November’s Tender Potato Bread would have been perfect – one item and not hugely work-intensive.

So you can possibly imagine my trepidation when I saw the December challenge – a Yule Log, or Buche de Noel. Fancy cake, buttercream, meringue (or marzipan) mushrooms, plus the intimidating job of combining all of those components. Oh geez.

Wisely, I divided the baking up over two days. I was bushed at the end of each.

The Filling:
I didn’t want to use the coffee buttercream as the filling. It seemed like it might be, well, too much coffee buttercream. I pondered other filling ideas that would go with coffee and chocolate and decided on this recipe from epicurious.com. I had never worked with marzipan before and it’s always fun to try new ingredients.

This is the weirdest custard thing I have ever made, and I’m no stranger to custards. The heating of the milk and tempering of the egg mixture is standard, but what’s with using flour as the thickener? Also, maybe I’m not a big marzipan fan. Eaten plain, it was somehow too sweet and too bland at the same time. Mixing into the custard unfortunately didn’t help much. Uh-oh. The Yule Log wasn’t off to a great start.

The Buttercream:
Cake is possibly my favorite dessert. I love them all, but if someone cruelly forced me to choose just one, I’d go with cake. Yet I’m not experienced in buttercream. I do remember trying out a Cooks Illustrated buttercream recipe maybe a year ago. It’s hard to mess up a CI recipe, because they give such detailed instructions, but my buttercream curdled, and I threw it out and made my standard powdered sugar-butter-milk-vanilla frosting that I love.

This one didn’t go much better. I only made half the recipe since I wasn’t going to be using it as filling. I’m so spoiled by the precision of Cooks Illustrated recipes that I’m always frustrated when I see something like “whisk until the egg whites are hot.” How hot? “Whip until cooled.” How cooled are we talking about here? Room temperature? Make me use my thermometer!

The real trouble came at “beat in the softened butter.” (How soft?) It doesn’t say anything about gradually, but I figured better safe than sorry and added the butter one tablespoon at a time. It was clear early on in the butter-adding process that things weren’t going well. I tried to convince myself that my butter was just too hard and wasn’t getting beaten into the egg whites, but eventually I had to admit that the buttercream had curdled.

I was not to be discouraged. Apparently I wasn’t the first DBer to have this problem, and I’d heard that there was hope for saving a curdled buttercream. My good friend Google directed me to baking911.com, which had some great advice. Simply melt a portion of the curdled buttercream and beat that back into the mixture. No way! How wonderfully simple!

Apparently I didn’t melt enough of the buttercream the first time, because it didn’t solve the problem. So I tried melting some more, probably half the mixture, and voila! Perfectly smooth buttercream! I packed that away in the fridge until the next day.

Meringue mushrooms:
The mushrooms just seemed impossibly fussy to me at first. But at least I got to make a meringue. I love using the whisk attachment on my mixer. It’s like magic.

But wow, meringue is some sticky stuff. I scooped it into a pastry bag as best I could, but of course it was totally messy. I started piping mushroom stems and caps. Super fun actually, although it took me a bit of time to figure out the technique. “Pipe 48 mushrooms stems and tops.” Forty-eight?! Why do I need forty-eight mushrooms?! Plus, I must have made my mushrooms too big, because I only ended up with 35 or so.

“Reserve remaining meringue.” Uh…remaining meringue? I scraped up some mushrooms from the baking sheet and squished it back into the pastry bag. I put the mushrooms in the oven. “Dust with cocoa.” Doh! I took the mushrooms back out of the oven and dusted with the cocoa. I put them back in the oven.

dscn1964.jpg

Oh my gosh, an hour later, I had the cutest little mushrooms! I love them! Definitely my favorite part of the recipe. Look how much they look like real mushrooms!

dscn2029.jpg

The Cake:
What the hell is genoise? Thank god for wikipedia. And the various dictionary websites that told me how to pronounce it. (Except for this one, which got it totally wrong.) Do I pronounce the “s”? If it’s named after an Italian city, why does it have a French pronunciation? I love the internet.

Anyway, I had my doubts about the cake from the beginning because of the cornstarch. Why not just use all cake flour? I also thought that a chocolate cake would go better with the coffee buttercream, so I looked up Malgieri’s chocolate genoise variation. I also had to increase the recipe proportions because I apparently have only half-sheet pans, not a jelly roll pan. Who knew? (And if that’s the case, then why is my Silpat too big for my baking pans?)

Ah, more of the whisk attachment. So fun. I also enjoy folding, so this was all going well.

Oh, here’s a step I should have paid more attention to. “Scrape the bottom of the bowl to prevent the flour mixture from accumulating there.” I did see that I was supposed to be careful about scraping to the bottom, but I apparently didn’t finish reading the sentence. I assumed that I’d be worried about the egg mixture accumulating. I didn’t see any evidence of that, so I moved onto pouring the batter into the prepared pan.

And…wait for it…yes, a huge accumulation of flour at the bottom of the bowl! Most of the batter was already in the pan, so I desperately tried to mix the clump of dry ingredients into the little amount of available batter and then I just poured that on top of the batter already in the pan and hoped for the best.

I hate when recipes include a DO NOT OVER____ step. Overmix and you’ll end up with tough muffins, overbeat and your whipped cream turns to butter, and now overbake and your genoise will crack when you try to roll it. The genoise was supposed to bake at least 10 minutes, but I anxiously tested it after 8½ and the toothpick came out clean. Oh no. It felt too early to take it out of the oven, so I put it back in until 9 minutes and 15 seconds, all the while worrying about cracked Yule Logs.

The Assembly:
I love how the recipe keeps specifying that the cake be transferred around without any consideration for its completely unwieldy dimensions. I made one transfer – from baking pan to my biggest cutting board. It was pretty clear that something was wrong with my cake. I’m sure the little balls of cooked flour and cocoa weren’t part of Malgieri’s plan when he developed this recipe.

I spread my subpar filling over my subpar cake and followed Malgieri’s unclear instructions on “using the parchment paper to help roll the cake into a tight cylinder.” (Uh…how exactly? Also, from the long or short side?) Of course it cracked. Bake 10-12 minutes, my ass.

Then I took my nice buttercream from the day before and left it out to soften. It wasn’t softened enough when I was ready to use it, so I figured I’d soften it with the paddle attachment of my mixture. And…more broken buttercream. Geez, buttercream is the wussiest emulsion ever. Melt, remix, not enough to solve the problem, melt, remix. (For those interested, I melted the buttercream in the microwave on 30% power for just 30 seconds or so. I was paranoid about accidently cooking the egg whites in it.)

I think it’s funny that the recipe makes sure to remind us to “curve around the protruding stump” when we’re frosting the cake. Like the big stump on top of the cake wasn’t reminder enough.

So, after all of my trials and tribulations, I came out with quite the nice-looking Yule Log, if I do say so myself.

dscn1980.jpg

And how many mushrooms did I use out of the 48 the recipe plans for? Five.

Please check out more of the Daring Bakers Yule Logs here!

Yule Log (from Nick Malgieri, epicurious.com and The Williams-Sonoma Collection – Dessert)
Make 12 servings

Filling: (from epicurious.com)
2/3 cup whole milk
2 large egg yolks
2 tablespoons sugar
3 tablespoons all purpose flour
1/2 cup marzipan, cut into 1/4-inch pieces
6 tablespoons unsalted butter, cut into 6 pieces, room temperature
1 teaspoon vanilla extract
1/4 teaspoon almond extract

Bring milk to boil in medium saucepan over medium heat. Whisk yolks and sugar in small bowl until well blended; whisk in flour. Whisk hot milk into egg mixture. Return to same saucepan. Whisk over medium heat until custard thickens and boils, about 1 1/2 minutes. Transfer to processor; cool to room temperature, about 1 hour. Add marzipan; process until smooth, about 1 minute. Blend in butter 1 piece at a time, then both extracts. Cover and refrigerate filling at least 4 hours or up to 2 days.

Cake:
3 large eggs
3 large egg yolks
Pinch salt
3/4 cup sugar
1/3 cup cake flour
1/3 cup cornstarch
1/4 cup alkalized (Dutch process) cocoa

1 10-by-15-inch to 12-by-18-inch jellyroll pan

1. Set a rack in the middle level of the oven and preheat to 350 degrees.

2. Fill a medium saucepan halfway with water and bring it to a boil over medium heat. Lower the water to a simmer.

3. Whisk the eggs, yolks, salt and sugar in the bowl of a heavy-duty mixer. Place over the pan of simmering water and whisk gently until the mixture is just lukewarm, about 100 degrees. (Use your finger to test it.)

4. Place on mixer with whisk attachment and whip on high, but not highest, speed until the egg mixture is cool (touch the outside of the bowl to tell) and has increased greatly in volume.

5. While the eggs are whipping stir together the flour, cornstarch and cocoa.

6. Take the bowl off the mixer and sift 1/3 of the flour mixture over the beaten eggs. Use a rubber spatula to fold in the flour mixture, making sure to scrape all the way to the bottom of the bowl on every pass through the batter to prevent the flour mixture from accumulating there. Repeat with the next 1/3 of the flour mixture and finally with the remaining flour mixture.

7. Scrape the batter into the prepared pan and smooth the top.

8. Bake the genoise in the preheated oven for 10 to 12 minutes, or until well risen and firm. Do not let the cake bake dry.

9. Use a small paring knife to loosen the cake from the side of the pan. Invert the cake to a rack, then immediately re-invert to another rack so that the cake cools on the paper.

Coffee buttercream (half recipe)
2 egg whites
½ cup (3½ ounces) sugar
12 tablespoons (1½ sticks) unsalted butter, softened
2 tablespoons instant espresso
2 tablespoons rum or brandy

Combine the egg whites and sugar in the bowl of an electric mixer and whisk gently over simmering water until the sugar is dissolved and the egg whites are hot. Whip on medium speed until cold. Beat in softened butter and continue beating until the buttercream is smooth. Combine the instant coffee and liquor and beat into the buttercream.

Meringue mushrooms:
3 large egg whites, at room temperature
¼ teaspoon cream of tartar
½ cup (3½ ounces/105 g) granulated sugar
1/3 cup (1 1/3 ounces/40 g) powdered sugar
Unsweetened cocoa powder for dusting

1. Preheat the oven to 225 degrees F. Line 2 baking sheets with parchment. Have ready a pastry bag fitted with a small (no. 6) plain tip. In a bowl, using a mixer on medium-low speed, beat together the egg whites and cream of tartar until very foamy. Slowly add the granulated sugar while beating. Increase the speed to high and beat until soft peaks form when the beaters are lifted. Continue until the whites hold stiff, shiny peaks. Sift the icing sugar over the whites and, using a rubber spatula, fold in until well blended.

2. Scoop the mixture into the bag. On one baking sheet, pipe 48 stems, each ½ inch (12 mm.) wide at the base and tapering off to a point at the top, ¾ inch (2 cm.) tall, and spaced about ½ inch (12 mm.) apart. On the other sheet, pipe 48 mounds for the tops, each about 1-1/4 inches (3 cm.) wide and ¾ inch (2 cm.) high, also spaced ½ inch (12 mm.) apart. With a damp fingertip, gently smooth any pointy tips. Dust with cocoa. Reserve the remaining meringue.

3. Bake until dry and firm enough to lift off the paper, 50-55 minutes. Set the pans on the counter and turn the mounds flat side up. With the tip of a knife, carefully make a small hole in the flat side of each mound. Pipe small dabs of the remaining meringue into the holes and insert the stems tip first. Return to the oven until completely dry, about 15 minutes longer. Let cool completely on the sheets.

To assemble:
1. Run a sharp knife around the edges of the genoise to loosen it from the pan.

2. Turn the genoise layer over (unmolding it from the sheet pan onto a flat surface) and peel away the paper.

3. Carefully invert your genoise onto a fresh piece of parchment paper.

4. Spread with the filling.

5. Use the parchment paper to help you roll the cake into a tight cylinder.

6. Transfer back to the baking sheet and refrigerate for several hours.

7. Unwrap the cake. Trim the ends on the diagonal, starting the cuts about 2 inches away from each end.

8. Position the larger cut piece on each log about 2/3 across the top.

9. Cover the log with the reserved buttercream, making sure to curve around the protruding stump.

10. Streak the buttercream with a fork or decorating comb to resemble bark.

11. Transfer the log to a platter and decorate with your mushrooms and any other decorations.

dscn1974.jpg