fried egg and sausage ciabbata breakfast pizzas

By now it must be obvious that I like eggs on top of stuff. Poached are my favorite, but fried is fine too. With some potatoes or bread to soak up the creamy yolk and any number of other additions, a lot of my favorite breakfasts are based around eggs on stuff.

I’m not completely sure that this particular breakfast deserves its own recipe, although I apparently needed one to give me the idea. All it really is some crusty bread, halved horizontally, brushed with oil and topped with green onions, cheese, and cooked sausage. The pizzas are cooked until the cheese melts, then topped with a fried egg and more green onions.

I kept the basic structure of the recipe the same, but varied the details. I used some extra pain a l’ancienne that I had in the freezer, plus cheddar instead of pepper jack and breakfast sausage instead of Italian. The recipe instructs that chopped green onions should be mixed with a half cup of olive oil, which is rubbed on the bread and then drizzled over the egg at the end. I’m sure I don’t have to tell you that is a heck of a lot of oil (even for eight servings). I used just enough to coat the bread before adding the other toppings, and I (meant to but forgot to) sprinkled more chopped green onions over the egg, leaving the oil behind.

Dave and I couldn’t quite figure out if we should eat these with silverware or hands. Dave tried using silverware, and it seemed like sort of a disaster. I ended up picking mine up to eat it with my hands, and it worked pretty well. I was thinking that the yolk might be a drippy mess, but it mostly soaked into the bread below. So disregard the silverware in the pictures – I’m pretty sure silverware is not the way to go here. It is pizza, after all.

You can vary the ingredients to use whatever seems good to you. Any crusty chewy bread will work, and any cheese or cooked meat. Any way you go about it, this should be an easy and fun breakfast to put together and eat.

Fried Egg and Sausage Ciabatta Breakfast Pizzas (from Bon Appétit January 2008, but really epicurious.com)

BA note: Make this recipe your own by using different sausages and cheeses. For a Middle Eastern spin, sub in lamb sausage and feta. Serve pizzas with hot sauce.

Bridget note: I used breakfast sausage, cheddar cheese, pane a l’ancienne, and far less oil.

Makes 8 servings

1 loaf ciabatta bread (about 1 pound)
1 cup chopped green onions
8 tablespoons olive oil, divided
8 ounces sliced hot pepper Monterey Jack cheese
1 pound spicy or sweet Italian sausages, casings removed
8 large eggs

Preheat oven to 450°F. Cut bread horizontally in half. Place bread halves, cut side up, on separate baking sheets. Mix onions and 6 tablespoons oil in small bowl. Season with salt and pepper. Reserve 2 tablespoons onion oil and spread remaining onion oil over bread. Top with cheese.

Sauté Italian sausages in large nonstick skillet over medium-high heat until cooked through, breaking up with spoon, about 7 minutes. Divide sausage among bread halves. Bake pizzas until cheese melts and bread begins to crisp, about 10 minutes.

Meanwhile, heat 1 tablespoon oil in each of 2 large skillets over medium-high heat. Crack 4 eggs into each skillet. Sprinkle with salt and pepper. Cook 2 minutes. Remove from heat and let eggs stand in skillets while pizzas bake.

Arrange 4 eggs atop each pizza. Spoon reserved onion oil over eggs. Cut each pizza between eggs into 4 pieces.

soba salad with feta and peas

Apparently I can’t always predict when a dish is going to be good. The only reason I made this was to use up some soba noodles and scallions. Then I found two opened bags of peas in the freezer and half a lemon in the refrigerator, so the meal seemed worth making even if it ended up being no better than edible.

There are some unusual ingredient combinations in this recipe. Soba noodles and feta? Soy sauce and lemon juice? This is why I had my doubts.

I was really surprised when the meal wasn’t just edible, but I loved it. Between the lemon juice and the feta, I was expecting it to be too sour, but the tartness was nicely balanced by the soy sauce and sugar.

Not only was this delicious, it’s one of the easiest meals I’ve made recently. Only one ingredient needs to be chopped, which is a such a welcome change from the meals I normally cook. It’s nutritionally balanced on its own, requiring no side dishes to be a full meal. It can be served warm or cold. I had it ready as soon as Dave got home from work, but when he decided to work out and shower before eating, it was no problem to set the salad aside until we were ready.

Really, this might be the perfect dish – tasty, healthy and easy. I’m already looking for the next opportunity to make it.

Soba Salad with Feta and Peas (adapted from Gourmet July 2006)

Makes 4 servings

1 (10- to 12-ounce) package soba noodles*
1 (10-ounce) package frozen baby peas
3 tablespoons olive oil
2 tablespoons fresh lemon juice
2 teaspoons soy sauce
1 teaspoon sugar
¾ teaspoon salt
¾ teaspoon black pepper
6 oz feta, crumbled (¾ cup)
4 scallions, finely chopped

1. Cook noodles and peas together in a 6- to 8-quart pot of lightly salted boiling water until noodles are tender, 4 to 6 minutes.

2. While noodles cook, whisk together olive oil, lemon juice, soy sauce, sugar, salt, and pepper in a large bowl.

3. Drain noodles and peas well in a colander, then rinse under cold running water to stop cooking. Drain well again, then add to dressing along with feta and scallions. Grind more black pepper to taste over salad.

salad with herbed baked goat cheese

I’m trying to cut down on the number of Cooks Illustrated recipes that I put in my blog. For one thing, I don’t want Chris Kimball to come over here and kick my ass. Plus, I feel like most Cooks Illustrated recipes are a no-brainer – they’re so dependable that it’s no surprise to hear another recommendation. On the other hand, I cooked almost exclusively from Cooks Illustrated for several years, so there are some recipes that I love so much that I can’t resist sharing.

In fact, I have entire dinner party menus of CI recipes to discuss. I’m going to spend the next few entries putting forth the recipes for one of my favorite meals. I’ve made this for a group of friends and for my parents, and it received great reviews both times. My parents had arrived at my house pretty pissed off after having their car broken into and getting stuck for hours trying to cross into the US from Canada, and after this meal (plus two bottles of wine and some beer), they were in much better spirits.

This salad is a great first course. It’s nice and light, but the goat cheese makes it interesting. The cheese rounds can be prepared up to a week in advance, which is always an advantage when you’re having company. I would also make the vinaigrette early in the day I plan to serve it and keep it in a jar with a tight-fitting lid. That way, when it’s time to serve the salad, I can just shake up the dressing and mix it with the greens. I almost always use bagged greens, because I hate to wash lettuce. With pre-cleaned lettuce, cheese rounds that can be formed days before you plan to serve them, and a simple vinaigrette that can be made in advance, this salad makes for the perfect opening course to an elegant dinner.

Salad with Herbed Baked Goat Cheese and Vinaigrette (from Cooks Illustrated)

Bridget note: I’ve used different herbs based on what I had available, and it was fine. I also usually forget to brush the rounds with olive oil before baking them, so if you’re stressed for time (like I always am when I have company), don’t worry too much about that step.

Serves 6

Herbed Baked Goat Cheese
3 ounces Melba toasts, white (about 2 cups)
1 teaspoon ground black pepper
3 large eggs
2 tablespoons Dijon mustard
1 tablespoon minced fresh thyme leaves
1 tablespoon chopped fresh chives
12 ounces goat cheese, firm
extra-virgin olive oil

Vinaigrette and Salad
2 tablespoons red wine vinegar
1 tablespoon Dijon mustard
1 teaspoon minced shallot
¼ teaspoon table salt
6 tablespoons extra-virgin olive oil
1 tablespoon fresh chives
Ground black pepper
14 cups hearty greens (mixed), washed and dried

1. For Goat Cheese: In food processor, process Melba toasts to fine even crumbs, about 1½ minutes; transfer crumbs to medium bowl and stir in pepper. Whisk eggs and mustard in medium bowl until combined. Combine thyme and chives in small bowl.

2. Using kitchen twine or dental floss, divide cheese into 12 evenly sized pieces. Roll each piece into a ball; roll each ball in herbs to coat lightly. Transfer 6 pieces to egg mixture, turn each piece to coat; transfer to Melba crumbs and turn each piece to coat, pressing crumbs into cheese. Flatten each ball into disk about 1½ inches wide and 1 inch thick and set on baking sheet. Repeat process with remaining 6 pieces cheese. Freeze cheese until firm, about 30 minutes. (Cheese may be wrapped tightly in plastic wrap and frozen up to 1 week.) Adjust oven rack to uppermost position; heat to 475 degrees.

3. Remove cheese from freezer and brush tops and sides evenly with olive oil. Bake until crumbs are golden brown and cheese is slightly soft, 7 to 9 minutes (or 9 to 12 minutes if cheese is completely frozen). Using thin metal spatula, transfer cheese to paper towel-lined plate and cool 3 minutes.

4. For Salad: While goat cheese is baking, combine vinegar, mustard, shallot, and salt in small bowl. Whisking constantly, drizzle in olive oil; season to taste with pepper.

5. Place greens in large bowl, drizzle vinaigrette over, and toss to coat. Divide greens among individual plates; place 2 rounds goat cheese on each salad. Serve immediately.

Other recipes part of this recommended dinner party menu:
Chicken with Forty Cloves of Garlic
Sauteed Shredded Zucchini
Pain a l’Ancienne (baguettes)

Just about any dessert works well with this meal.
Many wines work well with this meal, but I especially like full-flavored whites such as Chardonnay, and medium-bodied reds such as Pinot Noir.

apple cheddar scones (twd)

Apple and cheddar is a combination of flavors that I’ve heard about often but had never tried, so I was happy that Karina’s choice of Apple-Cheddar Scones for this week’s TWD recipe would give me that chance. Also, while I’m not sure if this is supposed to be a sweet or savory recipe, I served it with soup for dinner, which means I actually got to choose my own dessert to make last week! How exciting.

I made the full recipe, a rarity for me, and froze most of the shaped scones. The recipe came together with no hitches, although the dough was a bit stickier than I was expecting.

Although we ate these for dinner twice last week, situations beyond my control prevented me from enjoying one fresh from the oven. However, they were great even at room temperature. They were very light and tender.

That being said, I’ll tweak the recipe a bit for the next time I make it. Most importantly, I double the salt, because I kept hoping for just a bit more flavor from each bite, and this recipe calls for significantly less salt than most other biscuit recipes. I’d also cut the cheese into tiny squares instead of grating it, because I think the flavor almost gets lost when it’s evenly mixed in with the flour. I want little bursts of cheddar flavor. And I might increase the apples a bit, because I didn’t get as much apple flavor as I wanted either.

But they were still really good. I’m glad I have four more in the freezer. I’m also more interested in other apple-cheddar recipes now.

Karina has posted the recipe.

croque-madame


If you’re looking for the best decadent breakfast ever, here it is. Even better than Eggs Benedict. I think. It’s basically Eggs Benedict with cheese.

The first time I made this, I thought I was making something complicated. But as I slowly worked my way through the recipe, I realized that it’s really a fancy ham and cheese sandwich. One slice of bread is slathered with swiss cheese sauce and the other slice with mustard. The sandwich is “grilled” the same way grilled cheese sandwiches are – browned on the stove with butter, and then it’s smeared with more cheese sauce and broiled until the sauce is spottily browned. The sandwich is topped with a fried egg. (Without the egg, it’s a Croque-Monsieur.)

The first time I had this, I got that heavy feeling afterwards that’s clearly a result of a meal full of fatty proteins and refined carbs. The next time, I made some efforts to lighten up the recipe. Mostly I eliminated some of the nice-but-not-necessary butter and reduced the cheese sauce. I have to admit that the most influential adjustment had to be my portion size.

It’s worth the indulgence. While it’s nigh on impossible to pick favorites, the combination of crispy bread, salty ham, spicy mustard, creamy cheese sauce and smooth yolk certainly makes this a contender for the best breakfast out there. Especially if you have plans to get in some activity later to work off some of that guilt…

Croque-madame (adapted from Gourmet March 2007, as found on epicurious)

Makes 4 servings

Bridget note: You can of course use all shredded cheese. I found it easier to only shred what was going into the sauce and to slice the rest. I’ve used both Country Crust Bread and storebought Italian bread for this recipe and enjoyed both.

3 tablespoons unsalted butter
2 tablespoons all-purpose flour
1½ cups whole milk
⅛ teaspoon salt
pinch teaspoon black pepper
pinch teaspoon freshly grated nutmeg
¼ cup (1 ounce) shredded swiss cheese
4 slices (1.5 ounces) sliced swiss cheese
8 slices firm white sandwich bread
4 teaspoons Dijon mustard
½ pound thinly sliced cooked ham (preferably Black Forest)
4 large eggs

1. Melt 2 tablespoons butter in a 1- to 1½-quart heavy saucepan over moderately low heat, then whisk in flour and cook roux, whisking, for 1 minute. Whisk in milk and bring to a boil over medium-high heat, whisking constantly. Reduce heat to low and simmer, whisking occasionally, for 5 minutes. Whisk in salt, pepper, nutmeg, and shredded cheese until cheese is melted. Remove from heat. Stir occasionally while preparing sandwiches to keep hard surface from forming on top of sauce. (Alternatively, place plastic wrap directly on surface of sauce.)

2. Adjust an oven rack to the top position and heat the broiler. Spray a baking sheet with nonstick spray.

3. Spread 1 tablespoons sauce evenly over each of 4 slices of bread, then cover evenly with remaining cheese. Spread mustard evenly on remaining 4 bread slices and top with ham, dividing it evenly, then invert onto cheese-topped bread to form sandwiches.

4. Melt ½ tablespoon butter in a 12-inch nonstick skillet over medium heat. Once melted, add the sandwiches and cook until golden, 3-4 minutes. Remove sandwiches from pan, add remaining ½ tablespoon butter, and return sandwiches, unbrowned side down, to pan. Cook until golden on second side. Transfer sandwiches to prepared baking pan. Do not wash skillet.

5. Top sandwiches with remaining sauce, spreading evenly. Broil sandwiches until sauce is bubbling and golden in spots, 2 to 4 minutes.

6. While sandwiches are broiling, heat the same nonstick pan over medium heat. Spray the pan with nonstick spray if there’s not butter leftover from browning the sandwiches. Crack eggs into skillet and season with salt and pepper. Fry eggs, covered, until whites are just set and yolks are still runny, about 3 minutes. Top each sandwich with a fried egg and serve immediately.

ricotta spinach (and tofu) ravioli

A while ago, I wrote a comment on someone else’s blog about how tofu’s bad reputation comes from people trying to substitute tofu for tastier but fattier ingredients, like cheese and meat. And it’s true – I love tofu in recipes where it belongs – hot and sour soup, moo shu, peanut sesame noodles, stir fry. But, it turns out that I’m a hypocrite, because just a few days before I wrote that comment, I had made ravioli filling with ricotta, spinach, parmesan, and, yes, tofu.

This filling is a holdover from my brief stint as a brown rice-eating, refined sugar-avoiding health nut. The lifestyle wasn’t a keeper, but this recipe is. The trick is to process the tofu in a food processor before adding the other ingredients to ensure that the tofu is absolutely smooth. I also like the spinach processed, or at least very finely chopped, because the texture of cooked spinach is potentially stringy unless chopped finely.

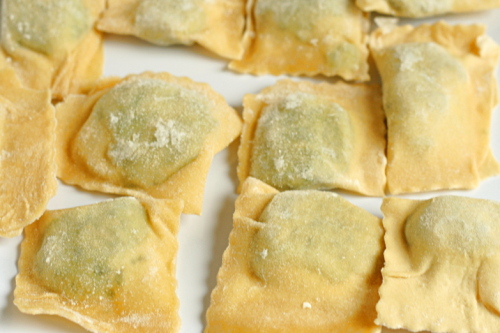
This is my most successful attempt at making homemade ravioli. (And it was all done between 9pm and midnight on a Friday, because I’m a nut.) I made the dough by hand instead of using the food processor, since I’ve been more successful with hand-kneaded dough in the past. The picture is all out of whack – I was supposed to use 3 eggs and 2 cups of flour, this is 3 cups of flour and 2 eggs. I figured out the screw-up just in time.

In the past, I’ve always rolled out pasta dough for ravioli to the thinnest setting, but then they’re impossibly delicate. I kept the pasta just a bit thicker this time. I was also careful to form wider sheets of pasta, which meant I could form square raviolis instead of rectangles. It’s a small issue, but I was excited about the squares. For nice square ravioli, make sure you start rolling the dough by feeding the widest edge through first. Not only does this make for prettier ravioli, but the pasta sheets don’t become as long and difficult to handle.

The thicker dough made far better ravioli than I’ve made before! This is the first time I’ve been able to boil ravioli without it immediately tasting watery. The dough remained firm, and the ravioli, both the filling and the pasta, were delicious. The tofu doesn’t detract from the filling at all, and while I can’t say that it’s adding any flavor of its own, it sure is a healthy filler ingredient.

Spinach Ricotta Tofu Ravioli (dough ingredients and ravioli forming instructions from Cooks Illustrated; dough mixing and rolling method from Marcella Hazan; filling recipe is my own creation)

The instructions look long, but that’s only because I copied and pasted Marcella Hazan’s very detailed pasta instructions from her lasagna recipe. It’s not nearly as complicated as it looks.

I’m not providing you with a sauce recipe. I’ve been using a simple tomato sauce with these.

Ravioli take well to freezing. I didn’t eat any of these the day I formed them. I immediately flash froze them, and they’ve made for some handy easy meals in the weeks since.

For the dough:
2 cups (10 ounces) unbleached flour
3 large eggs

For the filling:
10 ounces fresh spinach
12 ounces firm tofu
15 ounces ricotta cheese
¾ cup (1.5 ounces) grated parmesan cheese
1 teaspoon salt
ground black pepper

For the pasta:

Pour the flour onto a work surface, shape it into a mound, and scoop out a deep hollow in its center. Break the eggs into the hollow.

Beat the eggs lightly with a fork for about 2 minutes as though you were making an omelet. Draw some of the flour over the eggs, mixing it in with the fork a little at a time, until the eggs are no longer runny. Draw the sides of the mound together with your hands, but push some of the flour to one side, keeping it out of the way until you find you absolutely need it. Work the eggs and flour together, using your fingers and the palms of your hands, until you have a smoothly integrated mixture. If it is still moist, work in more flour.

When the mass feels good to you and you think it does not require any more flour, wash your hands, dry them, and run a simple test: Press you thumb deep into center of the mass; if it comes out clean, without any sticky matter on it, no more flour is needed. Put the egg and flour mass to one side, scrape the work surface absolutely clear of any loose or caked bits of flour and of any crumbs, and get ready to knead.

Return to the mass of flour and eggs. Push forward against it using the heel of your palm, keeping your fingers bent. Fold the mass in half, give it a half turn, press hard against it with the heel of your palm again, and repeat the operation. Make sure that you keep turning the ball of dough always in the same direction, either clockwise or counterclockwise, as you prefer. When you have kneaded it thus for 8 full minutes and the dough is as smooth as baby skin, it is ready for the machine.

Cut the ball of dough into 6 equal parts.

Spread clean, dry, cloth dish towels over a work counter near where you’ll be using the machine.

Set the pair of smooth cylinders, the thinning rollers, at the widest opening. Flatten one of the pieces of dough by pummeling it with your palm, and run it through the machine. Fold the dough twice into a third of its length, and feed it by its narrow end through the machine once again. Repeat the operation 2 or 3 times, then lay the flattened strip of pasta over a towel on the counter. Since you are going to have a lot of strips, start at one end of the counter, leaving room for the others.

Take another piece of dough, flatten it with your hand, and turn it through the machine exactly as described above. Lay the strip next to the previously thinned one on the towel, but do not allow them to touch or overlap, because they are still moist enough to stick to each other. Proceed to flatten all the remaining pieces in the same manner.

Close down the opening between the machine’s rollers by one notch. Take the first pasta strip you had flattened and run it once through the rollers, feeding it by its wider end. Do not fold it, but spread it flat on the cloth towel, and move on to the next pasta strip in the sequence.

When all the pasta strips have gone through the narrower opening once, bring the rollers closer together by another notch, and run the strips of pasta through them once again, following the procedure described above. You will find the strips becoming longer, as they get thinner, and if there is not enough room to spread them out on the counter, you can let them hand over the edge. Continue thinning the strips in sequence, progressively closing down the opening between the rollers one notch at a time. This step-by-step thinning procedure, which commercial makers of fresh pasta greatly abbreviate or skip altogether, is responsible, along with proper kneading, for giving good pasta its body and structure. Continue thinning the pasta until the second-to-last setting.

For the filling:

Place cleaned spinach leaves and any water that clings to them in a nonreactive soup kettle. (If you’re using pre-washed bagged spinach, add 2 tablespoons water to the pot). Cover and cook over medium heat until spinach wilts, about 5 minutes. Cool spinach slightly and squeeze out the excess liquid; set aside.

Process the tofu in a food processor until smooth. Add the spinach and pulse to combine and finely chop. Add the remaining filling ingredients and pulse to combine.

To form ravioli:

Your sheets should be approximately 4 inches across. Place small balls of filling (about one rounded teaspoon each) in a line one inch from the bottom of the pasta sheet. Leave one and one-quarter inches between each ball of filling. Fold over the top of the pasta and line it up with the bottom edge. Seal bottom and the two open sides with your finger. Use fluted pastry wheel to cut along the two sides and bottom of the sealed pasta sheet. Run pastry wheel between balls of filling to cut out the ravioli.

To cook ravioli:

Bring 4 quarts water to boil in a large stockpot. Add salt and half the pasta. Cook until doubled edges are al dente, 4-5 minutes. With a slotted spoon, transfer ravioli to warmed bowls or plates; add sauce of choice. Meanwhile, put remaining ravioli in boiling water and repeat cooking process. (Or bring two pots of water to boil and cook both batches simultaneously.) Serve immediately. (Alternatively, after draining the boiled ravioli, layer them in a baking dish with sauce and put them in a warmed oven until ready to serve.)

caesar salad

I almost never make salads. Not because I don’t like them, but because I don’t like them as a side dish. To me, salad doesn’t coordinate well with other dinner items. I do like when it’s served before a meal, or as a meal.

I went the route of serving Caesar salad as a meal the day that I made the peanut butter torte. I figured that if I was going to eat peanut butter and cream cheese and oreos and chocolate and whipped cream for dessert, something was going to have to give.

In one of Alton Brown’s first Good Eats episodes (um, before the show was very good), he discussed the original Caesar salad recipe, which was built tableside at a restaurant by chef Cesar Cardini. The recipe starts with a thin coating of oil on the lettuce, then salt, pepper, more oil, lemon juice, and a coddled egg. I’m not all about this method. I like to at least attempt to emulsify my salad dressing ingredients, and I also think that putting oil directly on the leaves keeps the other ingredients from flavoring the lettuce. Instead, I whisked the dressing ingredients thoroughly, then dressed the leaves with the mixture.

The only ingredient in this recipe that struck me as unusual was the coddled egg. Coddled eggs are cooked in boiling water for about one minute, so, yeah, they’re still mostly raw. I didn’t tell Dave about the raw-ish egg in the salad, and I tried not to think about it myself. I’m not worried about salmonella, I’m just grossed out by eating raw egg white. But I really don’t think the salad would have been as good without it. The egg gives the dressing not only smoothness and body, but a pleasant rich, but not overwhelmingly eggy, flavor.

Alton’s croutons are really exceptional. I had my doubts that grinding the garlic into the oil and then straining the oil to toast the bread in would add enough garlic flavor, but they were extremely garlicky and delicious.

Because I’m a flake, and I forgot while planning this meal that one of the key parts of Caesar salad is the croutons, I made Deb’s pizza bianca to go with the salad. I used my pizza dough recipe instead of the one she gives (although they’re very similar) and followed the directions in the recipe for forming the dough. (Keep in mind that Deb rolled her dough out much thinner.) Also, because Peter Reinhart’s constant reminders that a slow rise is better for artisan breads has stuck with me, I made the dough the day before (with less yeast) and let it rise in the refrigerator overnight. The next day I took it out and let it come to room temperature, then shaped it and put it back in the fridge until I wanted to bake it. It was very good. The only thing I’ll change next time is to use less olive oil on the top, because “Oh my god, there’s a fire in the oven!” aren’t words Dave likes to hear from me when I’m cooking.

Hail Caesar Salad (from Alton Brown’s Good Eats)

Bridget note: I made a few changes to the recipe. I dried the bread as slices instead of cut up into bite-size pieces, because they were easier to cut once they were dried. I didn’t use kosher salt. I found 2 cups of water to be far too little to be able to cover the eggs. I probably used a bit more Worcestershire sauce and Parmesan cheese.

1 loaf day old Italian bread
3 garlic cloves, mashed
9 tablespoons extra virgin olive oil
¼ teaspoon plus 1 pinch kosher salt
2 eggs
2 heads romaine lettuce, inner leaves only
7 grinds black pepper
1 lemon, juiced
6 drops Worcestershire sauce
¼ cup grated Parmesan cheese

Heat oven to 350 degrees.

Cut ½ to ¾-inch croutons from the loaf of bread and place on a baking sheet and put into the oven until dry but not browned.

Use a mortar and pestle to mash the garlic with 4 tablespoons of oil and 1/4 teaspoon kosher salt. Strain the oil into a skillet over medium heat. Add the dried croutons and fry, tossing constantly until all of the oil is absorbed and the croutons turn gold. Set aside.

Bring 2 cups water to a boil in a small saucepan. Add the eggs and cook for 1 minute. Chill in ice water to halt cooking. Set aside.

In a very large bowl, tear lettuce and toss with 3 tablespoons of olive oil. Sprinkle with the remaining kosher salt and the black pepper. Add the remaining olive oil. Toss well. Add the lemon juice and Worcestershire sauce. Break in the eggs. Toss until a creamy dressing forms. Toss in Parmesan cheese and serve with croutons.

cheesecake pops (daring bakers april 2008)

My first impression when I saw Elle and Deborah’s choice for this month’s Daring Bakers challenge was that it was going to be a pain in the ass. Then I convinced myself that it wouldn’t be so bad. I figured it would be a valuable recipe to have in my arsenal. It’s transportable, perfectly portioned, visually impressive, okay to sit at room temperature for a few hours, and well-liked. And how hard could it be? Scoop out some cheesecake, poke a stick in it, dunk it in melted chocolate. Easy cheesy.

Uh-huh.

Mixing up the cheesecake batter was as easy as I expected. The flour is an unusual ingredient in cheesecake which I’m assuming is there to stabilize the cake enough to form balls. I ate a lot of batter during this part. I like batter.

But after the batter-eating, things got dicey. I made half the recipe in a pan exactly half the area of the pan the recipe called for. I baked it far longer than the recipe stated and took it out when a normal cheesecake would be done – when an instant read thermometer read 150 degrees and it was a bit jiggly in the center. I let it chill overnight.

The next day, the center was far too liquidy to be formed into balls, although the outer half of the pan was more solid. I found out later that others had this problem as well. They came up with creative solutions such as piping the batter instead of rolling it and keeping the batter frozen. I just ate the too-soft middle portion with a spoon. Yum.

The rolling process was still a mess. It seemed like there was cheesecake everywhere. The dipping went similarly. Far messier than I had planned for.

But the real problem was that the balls weren’t stable outside of the freezer. Because the cake was so soft, the balls would fall right off the stick. Not good.

Tasty though. It’s hard to go wrong with cheesecake.

Cheesecake Pops

Makes 30-40 pops

5 8-oz. packages cream cheese at room temperature
2 cups (14 ounces) sugar
¼ cup (1.25 ounces) all-purpose flour
¼ teaspoon salt
5 large eggs
2 egg yolks
2 teaspoons pure vanilla extract
¼ cup heavy cream

Boiling water as needed

Thirty to forty 8-inch lollipop sticks

1 pound chocolate, finely chopped – you can use all one kind or half and half of dark,
milk, or white (Alternately, you can use 1 pound of flavored coatings, also known
as summer coating, confectionary coating or wafer chocolate – candy supply
stores carry colors, as well as the three kinds of chocolate.)
2 tablespoons vegetable shortening

(Note: White chocolate is harder to use this way, but not impossible)

Assorted decorations such as chopped nuts, colored jimmies, crushed peppermints, mini chocolate chips, sanding sugars, dragees) – Optional

Position oven rack in the middle of the oven and preheat to 325 degrees F. Set some water to boil.

In a large bowl, beat together the cream cheese, sugar, flour, and salt until smooth. If using a mixer, mix on low speed. Add the whole eggs and the egg yolks, one at a time, beating well (but still at low speed) after each addition. Beat in the vanilla and cream.

Grease a 10-inch cake pan (not a springform pan), and pour the batter into the cake pan. Place the pan in a larger roasting pan. Fill the roasting pan with the boiling water until it reaches halfway up the sides of the cake pan. Bake until the cheesecake is firm and slightly golden on top, 35 to 45 minutes.

Remove the cheesecake from the water bath and cool to room temperature. Cover the cheesecake with plastic wrap and refrigerate until very cold, at least 3 hours or up to overnight.

When the cheesecake is cold and very firm, scoop the cheesecake into 2-ounce balls and place on a parchment paper-lined baking sheet. Carefully insert a lollipop stick into each cheesecake ball. Freeze the cheesecake pops, uncovered, until very hard, at least 1 – 2 hours.

When the cheesecake pops are frozen and ready for dipping, prepare the chocolate. In the top of a double boiler, set over simmering water, or in a heatproof bowl set over a pot of simmering water, heat half the chocolate and half the shortening, stirring often, until chocolate is melted and chocolate and shortening are combined. Stir until completely smooth. Do not heat the chocolate too much or your chocolate will lose it’s shine after it has dried. Save the rest of the chocolate and shortening for later dipping, or use another type of chocolate for variety.

Alternately, you can microwave the same amount of chocolate coating pieces on high at 30 second intervals, stirring until smooth.

Quickly dip a frozen cheesecake pop in the melted chocolate, swirling quickly to coat it completely. Shake off any excess into the melted chocolate. If you like, you can now roll the pops quickly in optional decorations. You can also drizzle them with a contrasting color of melted chocolate (dark chocolate drizzled over milk chocolate or white chocolate over dark chocolate, etc.) Place the pop on a clean parchment paper-lined baking sheet to set. Repeat with remaining pops, melting more chocolate and shortening (or confectionary chocolate pieces) as needed.

Refrigerate the pops for up to 24 hours, until ready to serve.

breakfast strata with sausage, mushrooms, and monterey jack

I hear a lot of requests for breakfast casserole recipes. They’re popular for good reason. Waking up to a tasty and filling breakfast that needs nothing more than to be thrown into a hot oven is a great way to start the weekend. I’ve made and loved Deb’s Boozy Baked French Toast, but it’s missing some sort of fruit to round out the nutrition. This sausage and mushroom strata has it all – protein, starch, and vegetables.

I’ve eaten a lot of different breakfast casseroles, and I’ve found that there are some tricks to making a good one. One is to use hearty bread and to dry it out so you don’t have a soggy casserole. You want to replace the moisture that’s naturally in the bread with your own flavored liquids. Also, don’t use so many eggs that they can’t be evenly mixed in and absorbed. I have a recipe for a breakfast casserole that I love the flavors of, but the original recipe calls for so many eggs that I once got a bite of nothing but unmixed egg white while eating it. Finally, of course you need to use a combination of flavors that you love, and adding lots of cheese never hurts.

Casseroles like this are perfect when you have a long day ahead of you and don’t have time to prepare a good breakfast in the morning. I’ve eaten them before skiing, hiking, and moving. They also make a great addition to a brunch menu.

Breakfast Strata with Sausage, Mushrooms, and Monterey Jack (from Cooks Illustrated November 2001)

Makes one 8 by 8-inch strata, serving 6

CI note: To weigh down the assembled strata, we found that two 1-pound boxes of brown or powdered sugar, laid side by side over the plastic-covered surface, make ideal weights. A gallon-sized zipper-lock bag filled with about 2 pounds of sugar or rice also works. This recipe doubles easily; use a 9 by 13-inch baking dish greased with only 1½ tablespoons butter and increase the baking time as directed in step 4. Feel free to substitute any good melting cheese, such as Havarti, sharp cheddar, or colby.

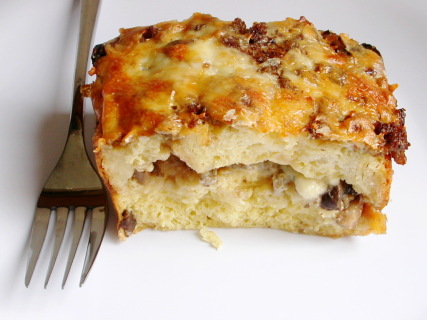
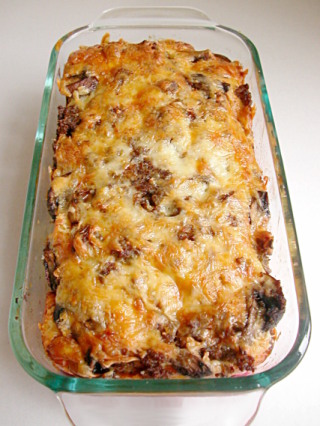
Bridget note: This time when I made this recipe, it ended up a bit too salty. I’m guessing the necessary salt will vary based on the sausage, so start low and add more if necessary. Pictures show a half recipe made in a loaf pan.

8-10 slices supermarket French bread (½-inch thick) or Italian bread (6 – 7 ounces)
3 tablespoons unsalted butter, softened
8 ounces bulk breakfast sausage, crumbled
3 medium shallots, minced (about 1/3 cup)
8 ounces white button mushrooms, cleaned and quartered
Table salt and ground black pepper
½ cup medium-dry white wine, such as Sauvignon Blanc
6 ounces Monterey Jack cheese, grated (about 1½ cups)
6 large eggs
1¾ cups half-and-half
2 tablespoons minced fresh parsley leaves
1. Adjust oven rack to middle position and heat oven to 225 degrees. Arrange bread in single layer on large baking sheet and bake until dry and crisp, about 40 minutes, turning slices over halfway through drying time. (Alternatively, leave slices out overnight to dry.) When cooled, butter slices on one side with 2 tablespoons butter; set aside.

2. Fry sausage in medium nonstick skillet over medium heat, breaking sausage apart with wooden spoon, until sausage has lost raw color and begins to brown, about 4 minutes; add shallots and cook, stirring frequently, until softened and translucent, about 1 minute longer. Add mushrooms to skillet, and cook until mushrooms no longer release liquid, about 6 minutes; transfer mixture to medium bowl and season to taste with salt and pepper. Add wine to skillet, increase heat to medium-high, and simmer until reduced to ¼ cup, 2 to 3 minutes; set aside.

3. Butter 8-inch square baking dish with remaining 1 tablespoon butter; arrange half the buttered bread slices, buttered-side up, in single layer in dish. Sprinkle half of sausage mixture, then ½ cup grated cheese evenly over bread slices. Arrange remaining bread slices in single layer over cheese; sprinkle remaining sausage mixture and another ½ cup cheese evenly over bread. Whisk eggs and parsley in medium bowl until combined; whisk in reduced wine, half-and-half, 1 teaspoon salt, and pepper to taste. Pour egg mixture evenly over bread layers; cover surface flush with plastic wrap, weigh down (see note, above), and refrigerate at least 1 hour or up to overnight.

4. Remove dish from refrigerator and let stand at room temperature 20 minutes. Meanwhile, adjust oven rack to middle position and heat oven to 325 degrees. Uncover strata and sprinkle remaining ½ cup cheese evenly over surface; bake until both edges and center are puffed and edges have pulled away slightly from sides of dish, 50 to 55 minutes (or about 80 minutes for doubled recipe). Cool on wire rack 5 minutes; serve.

spinach feta pine nut tart

copy-of-dscn4941.jpg

Dave is not so interested in food. Before we moved in together, his dinners varied between frozen pizza, microwave popcorn, and whatever leftovers I forced on him. I can’t get it through my head that he just doesn’t care, so I keep asking him for ideas when I plan our meals. When he can think of anything at all to suggest, it’s salmon pesto pasta. But this week he requested an ingredient instead of a dish, which is perfect, because he gets food he’ll enjoy, and I get to be creative with our meal planning.

The ingredient he suggested was pine nuts. (If he can’t have salmon pesto pasta, he’ll just request the ingredients in salmon pesto pasta.) I found a recipe for a Spinach Feta Pine Nut Tart on epicurious that sounded really interesting.

Wow, it was better than interesting. It was fantastic. The flavors melded together perfectly, with none bullying the others to be the star. The phyllo was flaky, the pine nuts were crunchy, and the eggs and spinach were creamy.

copy-of-dscn4950.jpg

Although I only slightly strayed from the original recipe’s ingredients, I adjusted the cooking method substantially. It called for one onion to be sautéed in 1/3 cup of olive oil. I couldn’t see any reason for that much oil, so I used about a tablespoon. I cooked my own fresh spinach, because frozen spinach is always so stemmy. And I made the whole thing on a baking sheet instead of the rectangular tart pan that the original recipe called for.

Making the tart was far easier than I was expecting. The filling was relatively simple to prepare, even with cooking my own spinach. This was my first time working with phyllo, and I found it a bit of a hassle, with the dampened towels and the brushing melted butter, but not exceptionally so.

Overall, I was very pleased with this meal. The only problem I had with it is that I wanted more.  Don’t let the original recipe fool you into thinking this is six servings – four is a more reasonable estimation.

copy-of-dscn4966.jpg

Spinach Feta Pine Nut Tart (adapted from epicurious)

Serves 4 as a main course

Filling may be made 1 day ahead and chilled, covered. Bring filling to room temperature before proceeding.

½ cup pine nuts (about 3 ounces)
1 medium onion, finely chopped
1 tablespoon olive oil
2 10-ounce packages frozen chopped spinach, thawed
2 large eggs
½ teaspoon salt
½ cup crumbled feta (about 3 ounces)
seven 17- by 12-inch phyllo sheets
5 tablespoons unsalted butter
6 tablespoons plus ¼ cup (1¼ ounce) freshly grated Parmesan

Preheat oven to 375°F.

Wet spinach leaves and place in a 12-inch nonstick skillet over medium-high heat. Cover and cook until spinach wilts, 2-3 minutes. Wring dry and roughly chop.

Toast pine nuts in small skillet over medium heat.

In the same 12-inch skillet used for the spinach, heat 1 tablespoon olive oil over medium-low heat. Add onion and cook, stirring occasionally, until softened.

In a large bowl, whisk eggs until combined and stir in spinach, onions, pine nuts, salt and feta until combined well.

Stack phyllo sheets and cover with 2 overlapping sheets plastic wrap and then a dampened kitchen towel. In a small saucepan melt butter and cool slightly. Spray a baking sheet with nonstick spray.

On a work surface lightly brush 1 phyllo sheet with butter. Sprinkle 1 tablespoon Parmesan evenly over buttered phyllo and repeat layering with 5 more phyllo sheets, butter, and 5 tablespoons Parmesan. Arrange last phyllo sheet on stack and lightly brush with butter. Spoon filling onto phyllo, spreading evenly and leaving outer 1½ inches free of filling. Fold edges of pastry over filling, leaving center uncovered, and lightly brush top of phyllo with butter. Sprinkle remaining ¼ cup Parmesan over exposed filling and bake tart in middle of oven until golden, 25 to 30 minutes. Serve tart warm or at room temperature.

copy-of-dscn4960.jpg