deep dark chocolate cookies

I’m helpless in the face of recipes with names like Deep Dark Chocolate Cookies, even when I already have a deep, dark chocolate cookie recipe that I’m very happy with. I was intrigued by the lack of flour, butter, and egg yolks in this one. It seemed like that would produce a texture similar to a meringue cookie, but the recipe specifically refers to the cookies as dense and chewy.

Although the recipe was published in Bon Appetit’s fast and easy section, I’d say that the amount of work involved in on par with other cookie recipes. Chocolate is melted in one bowl, egg whites and sugar are beaten in another, and the dry ingredients – sugar and cocoa with just a bit of cornstarch and salt – are mixed in a third. The contents of the three bowls are blended together with an additional handful of chocolate chips. I considered it a good sign that the recipe contained chocolate in three forms.

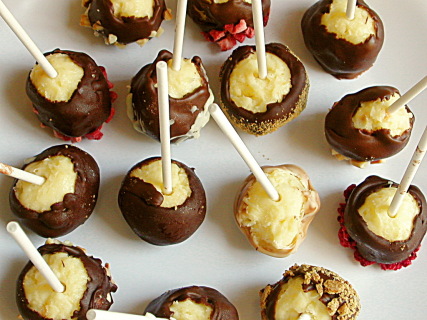
The recipe states that once all of the ingredients are mixed together, the dough will become very stiff, and should then be rolled into balls and coated in powdered sugar. My dough was not “roll into balls” consistency. It was more like a really fudgy chocolate frosting than cookie dough. I simply scooped out a spoonful of dough, dropped it in powdered sugar, and pushed it around until it was evenly(ish) coated.

While the cookies were nice and chocolately, and I suppose dense and chewy, I considered the texture a bit off from what I prefer. There was indeed a similarity to meringue cookies, especially around the edges. I also thought the cookies were too sweet, which would be easily remedied by reducing the powdered sugar.

I definitely prefer my other recipe for chocolate cookies. However, these are the best gluten-free cookie I’ve ever eaten, with none of the “off” flavors that can sometimes occur in cookies based on gluten-free flour mixes. The cookies are also a bit healthier than your average cookie. The only fat in the recipe is chocolate, and once the sugar is reduced a bit (I’d say to ¾ cup in both the egg white mixture and the cocoa mixture instead of 1 cup), there’s about 100 calories per cookie, about 25% less than my favorite chocolate chip cookies.

Deep Dark Chocolate Cookies (from Bon Appetit June 2008 )

BA note: Made without butter or flour, these dense, chewy cookies will satisfy even the most intense chocolate craving.

Bridge note: I’d reduce the powdered sugar to ¾ cup (3 ounces) each in the egg white mixture and in the cocoa mixture. I also baked the cookies for 8 minutes.

Servings: Makes about 24

Nonstick vegetable oil spray
1½ cups bittersweet chocolate chips (about 9 ounces), divided
3 large egg whites, room temperature
2½ cups (10 ounces) powdered sugar, divided
½ cup (1½ ounces) unsweetened cocoa powder
1 tablespoon cornstarch
¼ teaspoon salt

Preheat oven to 400°F. Spray 2 large baking sheets with nonstick spray. Melt 1 cup chocolate chips in glass bowl in microwave, stirring twice, about 2 minutes. Cool slightly.

Using electric mixer, beat whites in large bowl to soft peaks. Gradually beat in 1 cup (4 ounces) sugar. Continue beating until mixture resembles soft marshmallow creme. Whisk 1 cup sugar (4 ounces), cocoa, cornstarch, and salt in medium bowl to blend. On low speed, beat dry ingredients into meringue. Stir in lukewarm chocolate and ½ cup chocolate chips (dough will become very stiff).

Place ½ cup (2 ounces) sugar in bowl. Roll 1 rounded tablespoon dough into ball; roll in sugar, coating thickly. Place on prepared sheet. Repeat with remaining dough, spacing 2 inches apart. Bake until puffed and tops crack, about 10 minutes. Cool on sheets on rack 10 minutes. Transfer to rack; cool.

french chocolate brownies (twd)

One of my favorite aspects of Dorie Greenspan’s Baking is that she gives twelve brownie recipes. There’s so much discussion about the best brownie recipe that it seems like sometimes the variety between brownies gets overlooked. Not only are there different add-ins – turtle brownies, espresso brownies, creme de menthe brownies – but there are different textures, and one isn’t necessarily better than another. Di’s TWD choice of French Chocolate Brownies was the first of Dorie’s brownies recipes that I tried.

Dorie tells a story of how these brownies were intended to be a rich chocolate cake, but her guests mistook them for brownies, and she didn’t correct them. I can see the confusion. The ingredient list is classic brownie, but the mixing method and resulting texture bridge the line between brownie and cake. Beating the eggs and sugar together until they’re thick creates a light, airy confection that is at the same time tender and moist and far less dense than most brownies.

Dorie calls for the unusual addition of flambéed raisins to the brownies, which most members of TWD weren’t excited about. I considered leaving that step out altogether, but didn’t want to miss out on the fun of flambéing. One of my favorite dessert combinations is raspberries and chocolate, so I used fresh raspberries. It was perfect. I think I’ll always add the raspberries to this recipe.

My only disappointment with these brownies was that they weren’t as chocolately as I would prefer, but I don’t blame Dorie for that. She says she prefers bittersweet chocolate over semisweet, but of course those words don’t have any official meaning in the US. I usually bake with Ghirardelli, whose bittersweet chocolate is 60% cacao, but this time I used Sharffenberger, whose semisweet is 60%, so I bought the semisweet. I probably should have used their bittersweet. On top of that, I read a Cooks Illustrated’s review of dark chocolates, and their comments for Sharffenberger included “lacked choco-oomph.” So perhaps it wasn’t the best choice of chocolate for this recipe.

But regardless, I’m nitpicking (again). I savored every single bite I took of these brownies, and I was sad when I finished each serving. I love that they’re chocolately and rich, but also unique for a brownie in their cakelike tenderness. And, an added bonus for a middle-brownie lover? There’s really no difference between the edges and middle. Every single serving is moist and light.

French Chocolate Brownies (from Dorie Greenspan’s Baking: From My Home to Yours)

16 brownies

Bridget note: I substituted about ½ cup fresh raspberries, halved, for the raisins. Instead of boiling them in water as in step 2, I gently heated them in a small skillet before adding the rum and continuing with step 2.

Update: I made these again, this time using a Pyrex dish instead of the metal pan I used for the original entry.  I don’t know if things bake faster in glass or what, but I must have overbaked them, because the brownies were too dry.   So check for doneness early!

½ cup all-purpose flour
⅛ teaspoon salt
⅛ teaspoon cinnamon (optional)
⅓ cup raisins, dark or golden
1½ tablespoons water
1½ tablespoons dark rum
6 ounces bittersweet chocolate, finely chopped
1½ sticks (12 tablespoons; 6 ounces) unsalted butter, at room temperature and cut into 12 pieces
3 large eggs, at room temperature
1 cup sugar

Getting ready: Center a rack in the oven and preheat the oven to 300°F. Line an 8-inch square baking pan with foil, butter the foil, place the pan on a baking sheet, and set aside.

1. Whisk together the flour, salt and cinnamon, if you’re using it.

2. Put the raisins in a small saucepan with the water, bring to a boil over medium heat and cook until the water almost evaporates. Add the rum, let it warm for about 30 seconds, turn off the heat, stand back and ignite the rum. Allow the flames to die down, and set the raisins aside until needed.

3. Put the chocolate in a heatproof bowl and set the bowl over a saucepan of simmering water. Slowly and gently melt the chocolate, stirring occasionally. Remove the bowl from the saucepan and add the butter, stirring so that it melts. It’s important that the chocolate and butter not get very hot. However, if the butter is not melting, you can put the bowl back over the still-hot water for a minute. If you’ve got a couple of little bits of unmelted butter, leave them-it’s better to have a few bits than to overheat the whole. Set the chocolate aside for the moment.

4. Working with a stand mixer with the whisk attachment, or with a hand mixer in a large bowl, beat the eggs and sugar until they are thick and pale, about 2 minutes. Lower the mixer speed and pour in the chocolate-butter, mixing only until it is incorporated-you’ll have a thick, creamy batter. Add the dry ingredients and mix at low speed for about 30 seconds-the dry ingredients won’t be completely incorporated and that’s fine. Finish folding in the dry ingredients by hand with a rubber spatula, then fold in the raisins along with any liquid remaining in the pan.

5. Scrape the batter into the pan and bake 50 to 60 minutes, or until the top is dry and crackled and a knife inserted into the center of the cake comes out clean. Transfer the pan to a rack and allow the brownies to cool to warm or room temperature.

6. Carefully lift the brownies out of the pan, using the foil edges as handles, and transfer to a cutting board. With a long-bladed knife, cut the brownies into 16 squares, each roughly 2 inches on a side, taking care not to cut through the foil.

Serving: The brownies are good just warm or at room temperature; they’re even fine cold. I like these with a little something on top or alongside-good go-alongs are whipped crème fraiche or whipped cream, ice cream or chocolate sauce or even all three!

Storing: Wrapped well, these can be kept at room temperature for up to 3 days or frozen for up to 2 months.

I’m out of town this week, building sand castles and burying nephews in the sand. I’ll be back next week to catch up on comments and other blogs!

orange vanilla opera cake (db may 2008)

Lately I’ve become fixated with Bo Friberg’s The Professional Pastry Chef. I don’t want and have never wanted to be a professional pastry chef. But I flipped through this book and I was hooked. (Actually, in my arrogance, I grabbed The Advanced Pastry Chef first.) Page after page of beautifully plated desserts; this was more than food, this was art. Suddenly the fuss necessary to produce eye-catching desserts seemed worthwhile.

So I was elated when Ivonne, Lis, Fran, and Shea announced their choice of an opera cake for this month’s Daring Baker challenge. Layers of almond-based cake brushed with syrup, interspersed with buttercream, topped with mousse and glaze – this is exactly what I had in mind to try. I haven’t bought The Professional Pastry Chef yet, but at least I have a reason to get some practice.

The rules for the recipe were somewhat flexible in that we could flavor our cake any way we wanted – as long as it was light-colored. I would have enjoyed trying a traditional dark chocolate opera cake, but this was fun too. I’ve been loving creamsicle-like flavors lately, so I made my pastry orange and vanilla-flavored.

I hit a snag or two along the road, but nothing that couldn’t be overcome. A shortage of parchment paper meant I couldn’t adequately line my pan and the cake didn’t come out cleanly, but I was able to piece it together better than I expected. My first batch of white chocolate seized when I tried melting it, even though I used high-quality (Callebaut) chocolate and a double boiler. My orange glaze, which I adapted from a recipe Tyler Florence developed to top scones, wasn’t stable at room temperature, even though I added more powdered sugar than I’d expected to need.

No matter, everything came together in the end. The cake was good, although not as flavorful as I would have liked. I was warned before I made mine that it might be too sweet, so I added a pinch of salt to the jaconde to add some balance. I was also hoping that the orange would help balance the sweetness, but there wasn’t nearly enough orange or vanilla flavor. I didn’t end up using the zest of the orange anywhere, which certainly would have helped. And I’ve never been able to get a strong vanilla flavor in something baked. Maybe I should try rubbing the vanilla seeds into the sugar, like Dorie recommends with citrus zest?

Even if the flavor didn’t knock my socks off, I’m really glad I made this. I learned so much and used so many techniques that were new to me. I also think it’s great that we were given the freedom to develop our own flavors, which encouraged me to be creative. I’m eager to try the traditional dark chocolate version now, and this time I’ll make sure it’s rich and flavorful!

Orange-Vanilla Opera Cake

This is exactly the recipe I used, including my adaptations for orange and vanilla flavors. This recipe is half of what was given to us by the Daring Baker hosts this month. Double this amount of buttercream would probably provide the right amount to create layers of equal thickness to the cake; mine are a little thin.

Joconde: (adapted from Dorie Greenspan’s Paris Sweets)

The joconde can be made up to 1 day in advance and kept wrapped at room temperate

You can buy almond meal in bulk food stores or health food stores, or you can make it at home by grinding almonds in the food processor with two tablespoons of the flour that you would use in the cake.

2 tablespoons unsalted butter, melted and cooled
3 large egg whites, at room temperature
1 tablespoon granulated sugar
1 cup (112 grams) ground blanched almonds
1 cup (3.5 ounces) icing sugar, sifted
3 large eggs
1 vanilla bean, split and scraped
½ teaspoon vanilla
Pinch salt
¼ cup (1.25 ounces) all-purpose flour

1. Adjust an oven rack to the middle position. Preheat the oven to 425 degrees. Line a 12½ x 15½-inch jelly-roll pan with parchment paper and brush with ½ tablespoon of the melted butter.

2. In the bowl of a stand mixer fitted with the whisk attachment (or using a handheld mixer), whip the whites on low speed until they become foamy, then whip on medium-high speed until the whites reach soft peaks. Add the granulated sugar, and whip on high speed until the whites are stiff and glossy.

3. In a separate mixer bowl (or the same bowl, cleaned and dried) fitted with the paddle attachment, beat almond flour, icing sugar, eggs, salt and vanillas on medium speed until light and voluminous, about 3 minutes. Add flour and beat at low speed until it disappears.

4. Use a rubber spatula to gently fold the meringue into the almond mixture, then fold in the remaining melted butter until just combined. Spread the batter evenly in the prepared pan.

5. Bake the cake until it is lightly browned and just springy to the touch, 5-9 minutes.

6. Put the pan on a cooling rack and run a sharp knife along the edges of the cake to loosen it from the pan. Cover the pan with a sheet of parchment or wax paper, turn the pan over, and unmold. Carefully peel away the parchment, then turn the parchment over and use it to cover the cake. Let the cake cool to room temperature.

Syrup: (adapted from Dorie Greenspan’s Paris Sweets)

The syrup can be made up to 1 week in advance and kept covered in the refrigerator.

¼ cup water
1.2 ounces granulated sugar
1 tablespoon Grand Marnier

In a small saucepan, combine water and sugar. Bring to a boil, while stirring to dissolve ingredients. Stir in liqueur. Remove from heat and allow syrup to cool.

Buttercream: (adapted from Dorie Greenspan’s Baking: From My Home to Yours)

The buttercream, packed in an airtight container, can be frozen for 1 month or refrigerated for 4 days. Bring it to room temperature and beat it briefly to restore its consistency.

¼ cup (1.75 ounces) granulated sugar
1 large egg white
pinch salt
6 tablespoons unsalted butter, at room temperature
1 tablespoon fresh orange juice
¼ teaspoon pure vanilla extract

Put the sugar and egg whites in a mixer bowl or another large heatproof bowl, fit the bowl over a plan of simmering water and whisk constantly, keeping the mixture over the heat, until it feels hot to the touch (160 degrees on an instant-read thermometer), about 3 minutes. The sugar should be dissolved, and the mixture will look like shiny marshmallow cream. Remove the bowl from the heat. Working with the whisk attachment or with a hand mixer, beat the meringue on medium speed until it is cooledto room temperature, about 5 minutes.

Switch to the paddle attachment if you have one, and add the butter 2 tablespoons at a time. Once all the butter is in, beat the buttercream on medium-high speed until it is thick and very smooth, 6-10 minutes. During this time the buttercream may curdle or separate – just keep beating and it will come together again.

On medium speed, gradually beat in the orange juice, waiting until each addition is absorbed before adding more, and then the vanilla. You should have a shiny smooth, velvety, pristine white buttercream. Press a piece of plastic against the surface of the buttercream and set aside briefly.

White chocolate mousse: (from Tish Boyle and Timothy Moriarity’s Chocolate Passion)

The mousse can be made ahead and refrigerated until you’re ready to use it.

3.5 ounces white chocolate
½ cup plus 1½ tablespoons heavy cream
½ tablespoon Grand Marnier

1. Melt the chopped white chocolate and the 3 tablespoons of heavy cream. Whisk gently and let cool to room temperature.

2. Place the remaining heavy cream into a 4 1/2-quart bowl of a heavy-duty electric mixer fitted with the wire whisk attachment. Add the liqueur. Beat on high speed until soft peaks form.

3. Using a wire whisk, gently stir in about 1 cup of the whipped cream to the cooled white chocolate mixture. Using a rubber spatula, fold in the remaining cream. Do not over-mix or the mousse will become grainy. Cover and refrigerate until ready to use.

Orange glaze: (adapted from Tyler Florence)

2 tablespoons unsalted butter
2 cups (8 ounces) powdered sugar, sifted
2 oranges, juiced and zested

Combine butter, 2 cups (7 ounces) sugar, orange zest, and juice over a double boiler. Cook until butter and sugar are melted and mixture has thickened. Pour through fine mesh strainer, then beat until smooth and slightly cool, adding more sugar if necessary to reach desired consistency.

Assembly:

Line a baking sheet with parchment or wax paper. Cut and trim cake into three 10 x 5-inch rectangles. Place one section of cake on the baking sheet and moisten it gently with the 1/3 of the syrup. Spread half of the buttercream over this layer. Top with another piece of cake and moisten with 1/3 of the syrup. Spread the remaining buttercream on the cake and then top with the third section of cake. Use the remaining syrup to wet the cake and then refrigerate until very firm, at least half an hour.

Spread the mousse on the top of the last layer of cake. Refrigerate for 2-3 hours to give the mousse the opportunity to firm up.

Pour the cooled glaze over the top of the chilled cake, spreading to evenly coat the cake if necessary. Refrigerate the cake to set the glaze.

Serve the cake slightly chilled. This recipe will yield approximately 10 servings.

snickery squares

Sometimes when I cook, I want to make absolutely the best version of that dish possible. I want to coax the maximum potential from every single ingredient, and I’m willing to do whatever it takes to make it happen.

Other times, I just want to use up the container of dulce de leche in the fridge.

I only made a quarter of the Florida Pie recipe, which left me with leftover sweetened condensed milk. I made it into dulce de leche, thinking it would preserve better that way and that I’d have more options on how to use it. Half a Snickery Squares recipe called for almost exactly the amount of dulce de leche I needed to use up. (Um, I think. There was no measuring.)

I didn’t want to get out and then wash all of my food processor parts for half a recipe of shortbread crust, so I mixed that by hand. I didn’t want to bother with half an egg yolk, so I used heavy cream. I made the caramel peanuts as instructed, and that was fun. Caramel always fascinates me, and the peanuts sounded like plastic pieces once they cooled. Due to laziness and ingredient availability, I tweaked the chocolate topping ingredients just a bit. Everything seemed to come together nicely, even with the shortcuts.

I didn’t expect to love this dessert. I don’t dislike Snickers bars, but neither am I a fan. And I’ve heard a few reviews saying that these bars are really rich, so I was expecting another over-the-top Dorie creation.

Holy smokes, this is the best treat I’ve made in months. It’s certainly my favorite of the recipes I’ve made from Dorie’s Baking book. The shortbread crust is sturdy but tender, the dulce de leche adds complexity, the peanuts provide crunch, and the bittersweet chocolate ties everything together and keeps it from being too sweet.

There are a few tiny changes I would make to the recipe next time. I’d reduce the sugar in the crust. I was surprised by how sweet it was when I tasted it plain, and I think it would make a better contrast to the filling if it weren’t so sweet. I’ll probably use heavy cream in the crust in the future, like I did this time, because it seemed to work fine and it’s easier than dealing with an egg yolk. And I’d reduce the peanuts from 1½ cups to 1 cup, because I really couldn’t fit them all in the pan. I’d correspondingly reduce the sugar in the filling to ¼ cup (for a full recipe).

But really, this is nitpicking. The squares are amazing how they are, and after two days of them beckoning me from the kitchen, begging for nibbles to be taken and already-clean edges to be shaved off, I’m relieved but sad to have just sent the last square off to work with Dave.

Snickery Squares (from Dorie Greenspan’s Baking: From My Home to Yours)

Bridget notes: Next time I’ll reduce the granulated sugar in the crust to 3 tablespoons and the powdered sugar to 1 tablespoon. I’ll reduce the peanuts to 1 cup, the sugar in the filling to ¼ cup, and the water in the filling to 2½ tablespoons. However, these changes aren’t to say that the bars aren’t amazing how they are.

For the Crust:
1 cup (5 ounces) all-purpose flour
¼ (1.75 ounces) cup sugar
2 tablespoons (0.5 ounce) powdered sugar
¼ teaspoon salt
8 tablespoons (1 stick) unsalted butter, cut into small pieces and chilled
1 large egg yolk, lightly beaten

For the Filling:
⅓ cup (2.33 ounces) sugar
3 tablespoons water
1½ cups salted peanuts
About 1½ cups store-bought dulce de leche

For the Topping:
7 ounces bittersweet chocolate, coarsely chopped
4 tablespoons (½ stick) unsalted butter, cut into 8 pieces, at room temperature

Getting Ready: Preheat oven to 350F. Butter an 8-inch square pan and put it on a baking sheet.

To Make the Crust: Toss the flour, sugar, powdered sugar and salt into a food processor and pulse a few times to combine. Toss in the pieces of cold butter and pulse about 12 times, until the mixture looks like coarse meal. Pour the yolk over the ingredients and pulse until the dough forms clumps and curds – stop before the dough comes together in a ball.

Turn the dough into the buttered pan and gently press it evenly across the bottom of the pan. Prick the dough with a fork and slide the sheet into the oven. Bake the crust for 15-20 minutes, or until it takes on just a little color around the edges. Transfer the pan to a rack and cool to room temperature before filling.

To Make the Filling: Have a parchment or silicone mat-lined baking sheet at the ready, as well as a long-handled wooden spoon and a medium heavy bottomed saucepan.

Put the sugar and water in the saucepan and cook over medium-high heat, stirring, until the sugar dissolves. Keeping the heat fairly high, continue to cook the sugar, without stirring, until it just starts to color. Toss the peanuts and immediately start stirring. Keep stirring, to coat the peanuts with sugar. Within a few minutes, they will be covered with sugar and turn white-keep stirring until the sugar turns back into caramel. When the peanuts are coated with a nice deep amber caramel, remove the pan from the heat and turn the nuts out onto the baking sheet, using the wooden spoon to spread them out as best you can. Cool the nuts to room temperature.

When they are cool enough to handle, separate the nuts or break them into small pieces. Divide the nuts in half. Keep half of the nuts whole or in biggish pieces for the filling, and finely chop the other half for the topping.

Spread the dulce de leche over the shortbread base and sprinkle over the whole candied nuts.
To Make the Topping: Melt the chocolate in a heatproof bowl set over a saucepan of barely simmering water. Remove chocolate from the heat and gently stir in the butter, stirring until it is fully blended into the chocolate.

Pour the chocolate over the dulce de leche, smoothing it with a long metal icing spatula, then sprinkle over the rest of the peanuts. Slide the pan into the fridge to set the topping, about 20 minutes; if you’d like to serve the squares cold, keep them refrigerated for at least 3 hours before cutting.

Cut into 16 bars.

Also – I just got a new camera. This is the first post I’ve used it on, and I guess I was little excited, huh?

double (or triple) chocolate cookies

I made these cookies quite a while ago, but I’ve been putting off posting the entry. Because I think they look like poop in the pictures. Poop!

Now that your appetite is whetted, let me assure you that they’re good. Really good, I swear! My absolute favorite cookie when I’m in the mood for something super chocolately.

They’re about as chocolately as you can get in a cookie. The addition of both cocoa and a whole pound of semisweet chocolate gives them a depth of flavor that using only one type of chocolate can’t provide. I’ve never added the optional chocolate chips, but I think next time I will, just to give them a little textural contrast.

They’re soft and fudgy throughout, and really not appropriate unless you love chocolate. And if you do love chocolate, they’re absolutely perfect.

Thick and Chewy Double Chocolate Cookies (from Cooks Illustrated September 1999)

Makes about 3½ dozen cookies

To melt the chocolate in a microwave, heat at 50 percent power for 2 minutes, stir, then continue heating at 50 percent power for 1 more minute. If not completely melted, heat an additional 30 to 45 seconds at 50 percent power. Semisweet chocolate chips (12 ounces) may be added for a bigger chocolate punch; if used, they will slightly increase the yield on the cookies. We recommend using a spring-loaded ice cream scoop to scoop the dough. Resist the urge to bake the cookies longer than indicated; they may appear underbaked at first but will firm up as they cool.

2 cups unbleached all-purpose flour
½ cup Dutch-processed cocoa powder
2 teaspoons baking powder
1 teaspoon table salt
16 ounces semisweet chocolate, chopped
4 large eggs
2 teaspoons vanilla extract
2 teaspoons instant coffee or espresso powder
10 tablespoons unsalted butter (1¼ sticks), softened but still firm
1½ cups light brown sugar
½ cup granulated sugar

1. Sift together flour, cocoa, baking powder, and salt in medium bowl; set aside. Melt chocolate in medium heatproof bowl set over pan of almost-simmering water, stirring once or twice, until smooth; remove from heat. Beat eggs and vanilla lightly with fork, sprinkle coffee powder over to dissolve, and set aside.

2. In bowl of standing mixer fitted with paddle attachment (or with hand mixer), beat butter at medium speed until smooth and creamy, about 5 seconds (15 seconds with hand mixer). Beat in sugars until combined, about 45 seconds (1½ minutes with hand mixer); mixture will look granular. Reduce speed to low and gradually beat in egg mixture until incorporated, about 45 seconds (1½ minutes with hand mixer). Add chocolate in steady stream and beat until combined, about 40 seconds (1 minute with hand mixer). Scrape bottom and sides of bowl with rubber spatula. With mixer at low speed, add flour mixture and mix until combined, about 40 seconds (1 minute with hand mixer). Do not overbeat. Cover with plastic wrap and let stand at room temperature until consistency is scoopable and fudgelike, about 30 minutes.

3. Meanwhile, adjust oven racks to upper- and lower-middle positions and heat oven to 350 degrees. Line 2 cookie sheets with parchment paper. Leaving about 1½-inches between each ball, scoop dough onto parchment-lined cookie sheets with 1 ¾-inch diameter ice cream scoop.

4. Bake cookies until edges have just begun to set but centers are still very soft, about 10 minutes, turning cookie sheets from front to back and switching from top to bottom racks halfway through baking.

5. Cool cookies on sheets about 10 minutes, slide parchment with cookies onto wire rack and cool to room temperature; remove with wide metal spatula.

cheesecake pops (daring bakers april 2008)

My first impression when I saw Elle and Deborah’s choice for this month’s Daring Bakers challenge was that it was going to be a pain in the ass. Then I convinced myself that it wouldn’t be so bad. I figured it would be a valuable recipe to have in my arsenal. It’s transportable, perfectly portioned, visually impressive, okay to sit at room temperature for a few hours, and well-liked. And how hard could it be? Scoop out some cheesecake, poke a stick in it, dunk it in melted chocolate. Easy cheesy.

Uh-huh.

Mixing up the cheesecake batter was as easy as I expected. The flour is an unusual ingredient in cheesecake which I’m assuming is there to stabilize the cake enough to form balls. I ate a lot of batter during this part. I like batter.

But after the batter-eating, things got dicey. I made half the recipe in a pan exactly half the area of the pan the recipe called for. I baked it far longer than the recipe stated and took it out when a normal cheesecake would be done – when an instant read thermometer read 150 degrees and it was a bit jiggly in the center. I let it chill overnight.

The next day, the center was far too liquidy to be formed into balls, although the outer half of the pan was more solid. I found out later that others had this problem as well. They came up with creative solutions such as piping the batter instead of rolling it and keeping the batter frozen. I just ate the too-soft middle portion with a spoon. Yum.

The rolling process was still a mess. It seemed like there was cheesecake everywhere. The dipping went similarly. Far messier than I had planned for.

But the real problem was that the balls weren’t stable outside of the freezer. Because the cake was so soft, the balls would fall right off the stick. Not good.

Tasty though. It’s hard to go wrong with cheesecake.

Cheesecake Pops

Makes 30-40 pops

5 8-oz. packages cream cheese at room temperature
2 cups (14 ounces) sugar
¼ cup (1.25 ounces) all-purpose flour
¼ teaspoon salt
5 large eggs
2 egg yolks
2 teaspoons pure vanilla extract
¼ cup heavy cream

Boiling water as needed

Thirty to forty 8-inch lollipop sticks

1 pound chocolate, finely chopped – you can use all one kind or half and half of dark,
milk, or white (Alternately, you can use 1 pound of flavored coatings, also known
as summer coating, confectionary coating or wafer chocolate – candy supply
stores carry colors, as well as the three kinds of chocolate.)
2 tablespoons vegetable shortening

(Note: White chocolate is harder to use this way, but not impossible)

Assorted decorations such as chopped nuts, colored jimmies, crushed peppermints, mini chocolate chips, sanding sugars, dragees) – Optional

Position oven rack in the middle of the oven and preheat to 325 degrees F. Set some water to boil.

In a large bowl, beat together the cream cheese, sugar, flour, and salt until smooth. If using a mixer, mix on low speed. Add the whole eggs and the egg yolks, one at a time, beating well (but still at low speed) after each addition. Beat in the vanilla and cream.

Grease a 10-inch cake pan (not a springform pan), and pour the batter into the cake pan. Place the pan in a larger roasting pan. Fill the roasting pan with the boiling water until it reaches halfway up the sides of the cake pan. Bake until the cheesecake is firm and slightly golden on top, 35 to 45 minutes.

Remove the cheesecake from the water bath and cool to room temperature. Cover the cheesecake with plastic wrap and refrigerate until very cold, at least 3 hours or up to overnight.

When the cheesecake is cold and very firm, scoop the cheesecake into 2-ounce balls and place on a parchment paper-lined baking sheet. Carefully insert a lollipop stick into each cheesecake ball. Freeze the cheesecake pops, uncovered, until very hard, at least 1 – 2 hours.

When the cheesecake pops are frozen and ready for dipping, prepare the chocolate. In the top of a double boiler, set over simmering water, or in a heatproof bowl set over a pot of simmering water, heat half the chocolate and half the shortening, stirring often, until chocolate is melted and chocolate and shortening are combined. Stir until completely smooth. Do not heat the chocolate too much or your chocolate will lose it’s shine after it has dried. Save the rest of the chocolate and shortening for later dipping, or use another type of chocolate for variety.

Alternately, you can microwave the same amount of chocolate coating pieces on high at 30 second intervals, stirring until smooth.

Quickly dip a frozen cheesecake pop in the melted chocolate, swirling quickly to coat it completely. Shake off any excess into the melted chocolate. If you like, you can now roll the pops quickly in optional decorations. You can also drizzle them with a contrasting color of melted chocolate (dark chocolate drizzled over milk chocolate or white chocolate over dark chocolate, etc.) Place the pop on a clean parchment paper-lined baking sheet to set. Repeat with remaining pops, melting more chocolate and shortening (or confectionary chocolate pieces) as needed.

Refrigerate the pops for up to 24 hours, until ready to serve.

gooey chocolate cakes (twd)

copy-of-dscn5019.jpg

The popularity of Dorie Greenspan’s Baking: From My Home to Yours is infectious. I’ve been following the baking of the Tuesdays with Dorie group since it was formed in the beginning of this year, but I had no intention of joining, or even buying the book. I once fancied myself a collector of cookbooks, but now I feel silly for having a shelf of books when I only use a few of them. The last thing I needed was another cookbook, especially a baking book.

But after months of overwhelmingly good reviews of the book, plus flipping through it several times in bookstores, plus the fantastic Perfect Party Cake I made for the Daring Bakers, I broke down and bought the book. And TWD is a great way to make sure it doesn’t languish on my bookshelf unused, like so many other cookbooks. Furthermore, it’s actually nice to have someone else pick a recipe for me each week, because it insures that my baking stays creative and I don’t limit myself to my favorite types of recipes.

Leigh of Lemon Tartlet chose Gooey Chocolate Cakes as this week’s recipe, which is Dorie’s take on molten chocolate cakes. It’s a relatively simple dessert to put together, although my first attempt was moist, but certainly not gooey. I made them again and cooked them for one minute less, and they were gooey, but not runny. I made them again and cooked them for another half minute less, and they were exactly what I wanted in the beginning. Maybe it’s because I was using ramekins and not the muffin pan Dorie calls for, maybe my oven’s temperature cycles widely. They were good each time, but the more liquidy, the better, I think.

copy-of-dscn5025.jpg

(Please note that I did not make 18 molten chocolate cakes over the course of a week. That would be insane. I halved the recipe twice, and the second time I baked one in the afternoon to take pictures and stashed the other two in the fridge until I was ready for dessert that evening.)

You really can’t go wrong with molten chocolate cakes. I served mine with ice cream, as per Dorie’s insistence, plus made up a strawberry coulis. This dessert was a great introduction into this group!

Gooey Chocolate Cakes (from Dorie Greenspan’s Baking: From My Home to Yours)

6 servings

It’s been more than ten years since the molten chocolate cake won the hearts of just about every pastry chef here and in France. There doesn’t seem to be a chocolate lover on either side of the ocean who hasn’t savored this cake: small, dark and warm, with a lava-like runny center, sophisticated, easily dressupable and, best of all, truly easy to make. In fact, it’s one of few restaurant desserts that can be made at home with foolproof results, even if you’re not a star baker. The most important rule to remember in making these individual cakes is to use not only the best chocolate you can find, but the chocolate you most love to eat, since that’s the ingredient you will taste.

Usually these cakes are made in individual ramekins, but with all the ramekins stacked in my cupboard, I couldn’t come up with six that were the right size. Then I discovered that disposable aluminum foil muffin pans are ideal. I buy the kind that have six cups and come two pans to a package. I also wash them in the dishwasher and re-use them.

1/3 cup all-purpose flour
3 tablespoons unsweetened cocoa powder
¼ teaspoon salt
5 ounces bittersweet chocolate, 4 ounces coarsely chopped, 1 ounce very finely chopped
1 stick (8 tablespoons) unsalted butter, cut into 8 pieces
2 large eggs, at room temperature
1 large egg yolk, at room temperature
6 tablespoons sugar

Getting Ready: Center a rack in the oven and preheat the oven to 400 degrees. Butter (or spray – it’s easier) 6 cups of a regular-size muffin pan, preferably a disposable aluminum foil pan, dust the insides with flour and tap out the excess. Put the muffin pan on a baking sheet.

Sift the flour, cocoa and salt together.

Set a heat proof bowl over a saucepan of gently simmering water, put the coarsely chopped chocolate and the butter in the bowl and stir occasionally over the simmering water just until they are melted – you don’t want them to get so hot that the butter separates. Remove the bowl from the pan of water.

In a large bowl, whisk the eggs and yolk until homogenous. Add the sugar and whisk until well blended, about 2 minutes. Add the dry ingredients and, still using the whisk, stir (don’t beat) them into the eggs. Little by little, and using a light hand, stir in the melted chocolate and butter. Divide the batter evenly among the muffin cups and sprinkle the finely chopped chocolate over the batter.

Bake the cakes for 13 minutes. Transfer them, still on the baking sheet, to a rack to cool for 3 minutes. (There is no way to test that these cakes are properly baked, because the inside remains liquid.)

Line a cutting board with a silicone baking mat or parchment or wax paper, and, after the 3-minute rest, unmold the cakes onto the board. Use a wide metal spatula to lift the cakes onto dessert plates.

Serving: These should be served as soon as they are put on plates. The cakes are not meant to be served alone – they need something to play off their warm, gooey, soooooo chocolaty interior. Ice cream is the most obvious choice and, to my mind, the best in terms of texture and, of course, temperature. Any chocolate-friendly flavor will be good. Circling the cakes with crème anglaise is another good idea and, for those for whom too much is not enough, circling the cakes with crème anglaise and running a ring of bittersweet chocolate sauce through the custard is an even better idea.

Storing: Although the whole point of a warm, runny cake is to eat it when it is warm and runny, the cake is still delicious, but different, the following day. If you wrap the cooled cakes in plastic wrap and keep them at room temperature, the next day the texture of the center of the cake (the part that was once gooey) will remind you of ganache. Eating the cake will be like enjoying a bonbon: it will be firm on the outside and creamy within.

copy-of-dscn5016.jpg

chocolate sandwich cookies

copy-of-dscn4429.jpg

I made these cookies without knowing what I was getting into. Based on the picture, I thought they’d be a rich, soft chocolate cookie topped with sweet vanilla icing. I didn’t bother reading the part of the description specifically referring to them as “crisp” until it was too late and I was committed.

So, they’re crisp cocoa-flavored cookies with vanilla icing. They’re Oreos. I don’t dislike Oreos, but I don’t think they’re worth making at home.

Especially with Martha Stewart’s recipe. She’s nitpicky. The recipe instructs that the dough should be flattened, chilled, rolled out, chilled, cut, chilled, and finally baked. Wow. I skipped all that. I rolled the dough into a cylinder and put it in the freezer until I was ready to bake it (which was two months later). Then I cut off slices.

Martha’s method would definitely produce more perfectly-shaped cookies. Mine weren’t nearly as uniformly round. But I’m happy with the easier method.

copy-of-dscn4432.jpg

I underbaked the cookies slightly in the hopes that they’d end up more chewy than crisp. They were softer, which was nice, but they were overwhelmingly cocoa-flavored. My kitchen smelled like a nice cup of hot cocoa when the cookies came out of the oven. Not a bad smell, but I was hoping for a deeper chocolate flavor.

So what do I do with a batch of cookies that I’m not impressed with? I make an oreo-cookie crust.

copy-of-dscn4439.jpg

Mmm…chocolate pie…I definitely enjoyed these cookies, in their proper place!

Chocolate Wafer Sandwich Cookies (from Martha Stewart’s Baking Handbook)

Makes about 2 dozen sandwich cookies

MS note: These crisp cookies can be sandwiched with Vanilla Cream Filling, freshly whipped cream, or your favorite ice cream.

Bridget note: If you’re not picky about your cookies being perfectly round, you can skip the rolling, chilling, and cutting, and simply roll the dough into a cylinder of 1½ inch diameter, wrap it in parchment paper, and freeze until firm, about 30 minutes. When you’re ready to bake, remove dough log from wrapping and, using sharp chef’s knife, slice dough into rounds 1/8 inch thick.

1¼ cups (6¼ ounces) all-purpose flour, plus more for dusting
¼ cup plus 2 (1 1/8 ounces) tablespoons Dutch-process cocoa powder
½ teaspoon baking powder
½ teaspoon baking soda
¼ teaspoon salt
1 stick (½ cup) unsalted butter, room temperature
2/3 cup (4 2/3 ounces) packed light-brown sugar
1/3 cup (2 1/3 ounces) granulated sugar
1 large egg
1 teaspoon pure vanilla extract
Vanilla Cream Filling (recipe follows)

Line two large baking sheets with parchment paper; set aside. In a large bowl, whisk together flour, cocoa, baking powder, baking soda, and salt; set aside. In the bowl of an electric mixer fitted with the paddle attachment, beat the butter and both sugars on medium sped until light and fluffy, 2 to 3 minutes. Add the egg and vanilla; beat to combine. With mixer on low speed, add flour mixture, and beat to combine, scraping down the sides of the bowl as needed.

Turn out the dough onto a piece of plastic wrap, and divide in half. With floured hands, shape each piece into a flattened rectangle, wrap with plastic wrap, and refrigerate until firm, about 30 minutes.

Place one rectangle of dough on a lightly floured work surface. Roll out dough to a scant 1/8-inch thickness, stopping every so often to release the dough by running an offset spatula underneath. You should end up with a rectangle that’s about 14 by 11 inches. Transfer dough to a prepared baking sheet, and freeze until very firm, about 30 minutes. Repeat with remaining dough.

Preheat the oven to 350 degrees. Place one rectangle of dough on a clean work surface. Working quickly, cut out rounds using a 2-inch cookie cutter. (If the dough begins to soften too much, return to the freezer for a few minutes.) Using a wide metal spatula, transfer rounds to a parchment-lined baking sheets, about 1½ inches apart. Gather together remaining scraps, reroll, and cut out more rounds. Freeze until firm, about 15 minutes. Repeat with the remaining rectangle of dough.

Bake, rotating sheets halfway through, until the centers of the cookies feel firm when lightly pressed, 12 to 14 minutes. Transfer to a wire rack to cool completely.

Using an offset spatula, spread 1 tablespoon desired filling onto the flat sides of half the cookies. Sandwich with remaining cookies, keeping the flat sides down. Unfilled cookies can be kept in an airtight container at room temperature for up to 1 week. Once filled, cookies are best eaten the day they are made, but they can be kept in an airtight container in the refrigerator for up to 3 days.

Vanilla Cream Filling

Makes enough to fill 2 dozen sandwich cookies

Bridget note: I used all butter in my filling, because butter is good.

1 1/3 (5 1/3 ounces) confectioners’ sugar
1/3 cup vegetable shortening
1/3 cup (5 1/3 tablespoons) unsalted butter, room temperature
½ teaspoon pure vanilla extract
pinch of salt

In the bowl of an electric mixer fitted with the paddle attachment, combine all ingredients. Beat on medium-high speed until fluffy and light, 3 to 4 minutes. Use immediately or refrigerate in an airtight container for up to 3 days. Let soften at room temperature before using.

copy-of-dscn4417.jpg

chocolate cream pie

copy-of-dscn4482.jpg

After weeks of pound cakes, I’d had enough of vanilla-flavored desserts. I was in the mood for chocolate! And I wanted to make a chocolate pie, which I had never done before. I wanted something rich and intensely chocolately. I had 6 ounces of unsweetened chocolate, 4 ounces of bittersweet chocolate, and cocoa. (Fun fact: so far, about 10% of the words in this blog post are “chocolate.”) My dairy options were also limited.

Chocolate Mousse Pie is exactly what I was in the mood for, but it didn’t fit my ingredient limitations. (I’m stubborn about extra trips to the grocery store.) I had to settle for Chocolate Cream Pie.

Chocolate cream pie is just pudding in a pie crust. I was starting to get disappointed that I wasn’t going to end up with a dessert as rich as I had originally intended.

copy-of-dscn4459.jpg

I needn’t have worried. This chocolate pie was plenty rich and chocolatey and delicious. See how I’ve nicely spread the filling into the pie shell here? Okay, now look at the edges, and you can see where I took a spoon around the edge of the pie to scoop up some filling. Just to taste, you know? I had to make sure it was edible. I needed several spoonfuls to really make sure.

Oh, it was edible all right. Topped with whipped cream and dusted with cocoa, this definitely fulfilled my chocolate craving.

Chocolate Cream Pie (adapted from epicurious.com and Cooks Illustrated)

8 to 10 servings

Epicurious note: Pie (without topping) can be chilled up to 1 day.

Bridget note: I made the pie on Friday and we finished it on Tuesday, and I didn’t notice any loss of quality over time. I topped each piece with whipped cream as it was served rather than spreading it on the pie. Also, I used 4 ounces semisweet chocolate and 3 ounces unsweetened chocolate, plus 2 teaspoons extra sugar.

Chocolate Cookie Crumb Crust
16 Oreo cookies (with filling), broken into rough pieces, about 2½ cups
2 tablespoons unsalted butter, melted and cooled

Chocolate Cream Filling
2/3 cup sugar
¼ cup cornstarch
½ teaspoon salt
4 large egg yolks
3 cups whole milk
5 oz fine-quality bittersweet chocolate (not unsweetened), melted
2 oz unsweetened chocolate, melted
2 tablespoons unsalted butter, softened
1 teaspoon vanilla

Whipped Cream Topping
1 cups heavy cream (cold)
1 tablespoons granulated sugar
½ teaspoon vanilla extract

1. For the Crust: Adjust oven rack to middle position and heat oven to 350 degrees. In bowl of food processor fitted with steel blade, process cookies with 15 one-second pulses, then let machine run until crumbs are uniformly fine, about 15 seconds. (Alternatively, place cookies in large zipper-lock plastic bag and crush with rolling pin.) Transfer crumbs to medium bowl, drizzle with butter, and use fingers to combine until butter is evenly distributed.

2. Pour crumbs into 9-inch Pyrex pie plate. Following illustration below, press crumbs evenly onto bottom and up sides of pie plate. Refrigerate lined pie plate 20 minutes to firm crumbs, then bake until crumbs are fragrant and set, about 10 minutes. Cool on wire rack while preparing filling.

3. For the filling: Whisk together sugar, cornstarch, salt, and yolks in a 3-quart heavy saucepan until combined well, then add milk in a stream, whisking. Bring to a boil over moderate heat, whisking, then reduce heat and simmer, whisking, 1 minute (filling will be thick).

4. Force filling through a fine-mesh sieve into a bowl, then whisk in chocolates, butter, and vanilla. Cover surface of filling with a plastic wrap and cool completely, about 2 hours.

5. Spoon filling into crust and chill pie, loosely covered, at least 6 hours.

6. For the topping: Just before serving, beat cream, sugar, and vanilla in bowl of standing mixer on low speed until small bubbles form, about 30 seconds. Increase speed to medium; continue beating until beaters leave a trail, about 30 seconds more. Increase speed to high; continue beating until cream is smooth, thick, and nearly doubled in volume and forms soft peaks, about 20 seconds. Spread or pipe whipped cream over chilled pie filling. Cut pie into wedges and serve.

copy-of-dscn4439.jpg

smitten kitchen recipes

t1.jpg

Smitten Kitchen is my new favorite cookbook. In the past month since discovering Deb’s blog, I’ve made seven of her recipes. When I’m trying to come up with cooking ideas, I just scan through her recipe page. Rather than rehash each dish in detail, I’m combining them into one entry.

bft.jpg

Boozy Baked French Toast

Of all of Deb’s recipes that I’ve made recently, this is my and Dave’s favorite. For one thing, it takes all of 10 minutes to put together, and that can be done the night before. In the morning, just cook it in the oven for half an hour, and voila – a great breakfast. The recipe is supposedly adaptable to whatever flavors you’re in the mood for or you have available, but I’ve only made it one way. I was planning to follow Deb’s recent favorite, with triple sec and orange zest, but I use “planning” loosely, as I didn’t actually bother to get either triple sec or orange zest. Instead, I used Grand Marnier as the alcohol, the zest of one grapefruit, and a splash of vanilla extract. It was fantastic. It was like Creamsicle French Toast. I made it again a week later, exactly the same way. This is why I have a loaf of challah in my freezer right now, and a grapefruit languishing in my crisper drawer, waiting for me to get back from New Mexico and make this great and easy dish for my friends who will be visiting.

copy-of-dscn3652.jpg

Artichoke Ravioli

I love the idea of homemade ravioli. I enjoy working with fresh pasta, and I like the option of customizing my ravioli filling to whatever strikes my interest – mushrooms, squash, seafood, and in this case, artichokes. The problem is, I sort of suck at making it. Both times I’ve tried, the pasta has been too watery after being boiled. This particular recipe is baked after being boiled, which helped dry it out somewhat, but clearly I need to work on my technique. Ravioli is too much tedious work to get anything less than amazing results. I’m not ready to give up yet. This filling was, fortunately, very good. The simple sauce was good too, although I used canned tomatoes instead of fresh, it being February and all.

copy-of-dscn3833.jpg

Creamy Baked Macaroni and Cheese

I already have a macaroni and cheese recipe that I love, but Deb’s photos of a crispy cheesy crust and creamy cheesy sauce had me intrigued to try a new recipe. Did I mention that it’s cheesy? This recipe uses twice as much cheese per pasta as my other favorite recipe. So I made it, and it was delicious, but Dave and I couldn’t decide if it was as good as my other favorite. So I made them side-by-side, which was, well, confusing. Neither recipe is particularly difficult, but I was making half recipes of each sauce, then storing half of that in the fridge so we could have an easy but fresh meal a few days later, which means that each sauce was topping only a quarter recipe of pasta. There was a screw-up here and there, but nothing vital. We weren’t able to pick a favorite. I know they’re both macaroni and cheese, but it felt like comparing apples and oranges. The Cooks Illustrated recipe is creamy and smooth, both in texture and flavor, while the new recipe was far sharper (did I mention that it has twice as much cheese as the other?) and a bit grainy, but oh, that crisp crust was fun. I think I’ll be combining the two in the future. I know Cooks Illustrated uses half cheddar because of its great flavor, and half Monterey jack because of its smooth melting qualities, but I’m going to try using 75% cheddar and 25% Monterey jack next time to get some more of that sharp flavor. I’m also going to skip the bread crumb topping and use more cheese instead, then put that under the broiler to brown the cheese. I think this will combine my favorite aspects of each recipe. (I was also just reminded of a recipe I used to love that uses smoked gouda, so I need to revisit that one. Hey, I love cheesy pasta.)

ribs.jpg

Hoisin and Honey Pork Ribs

When I was a kid, pork ribs were my favorite meal, and I requested them for every birthday. I grew out of that when I decided that ribs were too much effort and mess to eat when there was so little meat. But these ribs were certainly worth the effort. I wanted to make them because I recently tried hoisin sauce for the first time and loved it. This was my first time cooking pork ribs, plus I’m not usually very good with the broiler, but everything worked out great. Because the ribs are boiled first, the broiler is just to crisp them and caramelize the sauce, so it was easy.

ddl2b.jpg

Dulce de Leche Cheesecake Squares

This recipe called to me as soon as Deb posted it. Cheesecake filling, graham cracker crust, chocolate glaze, all mixed up with dulce de leche. I’m not really familiar with dulce de leche, but caramelized milk certainly sounds great. But wow, these were rich. I can usually handle rich foods without a problem, but these were too much even for me. It helped when I thought of them like candy instead of like a bar cookie and started cutting them into the 1-inch squares that the recipe recommends. I did enjoy them, but I don’t think I’ll be making them again.

t3.jpg

Truffles

It sounds like Valentine’s Day is becoming mostly an excuse for couples to enjoy a good meal together, which I think is great. Dave and I weren’t even going to do that (we were having the second day of mac and chz comparison on V-Day), and I was okay with that. I found out on February 13th that Dave wanted to do something extra, so I surprised him by making truffles the next day. I loosely followed the recipe for Robert Linxe’s truffles, except, less fancy. I didn’t use Volrhona chocolate, I didn’t wear gloves, and I didn’t simmer the cream multiple times. It wasn’t worried about details this time. It was my first time making truffles, and I think they came out well. I want to try them again, but comparing a number of different quality chocolates to see how much it really matters.

Pizza Dough

Deb discussed a recipe for pizza dough that replaced some of the water with white wine and added a little honey. I tried it, and while the dough wasn’t sweet and the wine flavor wasn’t obvious, it made a really good pizza crust. Even Dave, who didn’t know that I had changed the recipe, pointed out that it was particularly good. I forgot that this recipe was related to this entry in my blog, so I didn’t think to take a picture, which is unfortunate because the crust was really crisp and light.

Next on the list is Lighter-Than-Air Chocolate Cake. Flourless chocolate cakes are usually dense confections, so I’m interested in this very light version. And then, who knows? World Peace Cookies? Pretzel rolls? Risotto alla Barolo? There’s so many great recipes to choose from, all beautifully photographed and enticingly described.

ddl1.jpg