raspberry bars

1.jpg

I’m a big fan of raspberries. I like them fresh, and in cheesecake, and as a sauce for other desserts. My wedding cake was chocolate cake with raspberry mousse. And because I like raspberries so much, I’m often disappointed by raspberry bars – there’s not enough raspberry flavor. When jam is the only source of fruit, the bars seem dry and the raspberry flavor is overcooked and muted. This recipe solves this problem in the simplest way – adding real raspberries.

2.jpg

These bars are wonderful and addicting. The raspberry flavor is bright and fresh without being too tart. The shortbread base is buttery and tender, but stable enough to support the cookie. And the streusel topping is crunchy and pretty. Plus, there’s oats in the topping, and that makes these cookies healthy. A half cup of oats offsets 18 tablespoons of butter, right?

3.jpg

Raspberry Streusel Bars (from Cooks Illustrated September 2005)

Makes twenty-four 2-inch squares

CI note: This recipe can be made in a standing mixer or a food processor. Frozen raspberries can be substituted for fresh; be sure to defrost them before combining with the raspberry preserves. If your fresh raspberries are very tart, add only 1 or 2 teaspoons of lemon juice to the filling. The bars are best eaten the day they are baked but can be kept in an airtight container for up to 3 days (the crust and streusel will soften slightly with storage).

Bridget note: I prefer walnuts in this recipe.

2½ cups unbleached all-purpose flour (12½ ounces)
2/3 cup granulated sugar (about 4¾ ounces)
½ teaspoon table salt
16 tablespoons unsalted butter (2 sticks) plus 2 tablespoons, cut into ½-inch pieces and softened to cool room temperature
¼ cup packed brown sugar (1¾ ounces), light or dark
½ cup rolled oats (1½ ounces), old-fashioned
½ cup pecans (2 ounces), chopped fine
¾ cup rasberry preserves (8½ ounces)
¾ cup fresh raspberries (3½ ounces)
1 tablespoon lemon juice from 1 lemon

1. Adjust oven rack to middle position; heat oven to 375 degrees. Cut 18-inch length foil and fold lengthwise to 8-inch width. Fit foil into length of 13 by 9-inch baking dish, pushing it into corners and up sides of pan; allow excess to overhang pan edges. Cut 14-inch length foil and fit into width of baking pan in same manner, perpendicular to first sheet. (If using extra-wide foil, fold second sheet lengthwise to 12-inch width.) Spray foil-lined pan with nonstick cooking spray.

2. In bowl of standing mixer fitted with flat beater, mix flour, granulated sugar, and salt at low speed until combined, about 5 seconds. With machine on low, add 16 tablespoons butter one piece at a time; then continue mixing on low until mixture resembles damp sand, 1 to 1½ minutes. (If using food processor, process flour, granulated sugar, and salt until combined, about 5 seconds. Scatter 16 tablespoons butter pieces over flour mixture and pulse until mixture resembles damp sand, about twenty 1-second pulses.)

3. Measure 1 ¼ cups flour mixture into medium bowl and set aside; distribute remaining flour mixture evenly in bottom of prepared baking pan. Using hands or flat-bottomed measuring cup, firmly press mixture into even layer to form bottom crust. Bake until edges begin to brown, 14 to 18 minutes.

4. While crust is baking, add brown sugar, oats, and nuts to reserved flour mixture; toss to combine. Work in remaining 2 tablespoons butter by rubbing mixture between fingers until butter is fully incorporated. Pinch mixture with fingers to create hazelnut-sized clumps; set streusel aside.

5. Combine preserves, raspberries, and lemon juice in small bowl; mash with fork until combined but some berry pieces remain.

6. Spread filling evenly over hot crust; sprinkle streusel topping evenly over filling (do not press streusel into filling). Return pan to oven and bake until topping is deep golden brown and filling is bubbling, 22 to 25 minutes. Cool to room temperature on wire rack, 1 to 2 hours; remove from baking pan by lifting foil extensions. Using chef’s knife, cut into squares and serve.

4.jpg

cream cheese brownies

14.jpg

I’m torn on my opinion of these brownies. On the one hand – totally delicious. But on a continuum from brownies to cheesecake, these may be too far on the cheesecake side for my preference. The chocolate part is intensely fudgy, the brownies are best served cold, and there’s a full 8-ounce package of cream cheese in an 8-inch square pan. They’re rich, and I love rich. But they’re not really brownies.

I made these for SuperBowl Sunday, and in a surprising display of self-control, it was a full 5 days before Dave and I finished the whole pan. What Dave doesn’t know is that in addition to the squares we’d have together with tea in the evenings, I kept shaving off bits of brownie for myself during the day. Just to “even out” a row. And then even it out some more.

Obviously I liked these! And I whole-heartedly recommend them if you want something that walks the line between brownie and cheesecake.

24.jpg 33.jpg

Cream Cheese Brownies (from Cooks Illustrated January 1999)

CI note: Knowing when to remove a pan of brownies from the oven is the only difficult part about baking them. If you wait until an inserted toothpick comes out clean, the brownies are overcooked. But if a toothpick inserted in the middle of the pan comes out with fudgy crumbs, remove the pan immediately. If you are a nut lover, you can stir 1 cup toasted walnuts or pecans into the brownie batter. To melt the chocolate and butter in a microwave oven, microwave chocolate alone at 50 percent power for 2 minutes. Stir chocolate; add butter; and continue microwaving at 50 percent for another 2 minutes, stopping to stir the mixture after 1 minute. If chocolate is not entirely melted, microwave an additional 30 seconds at 50 percent power.

Makes 16 2-inch brownies

2/3 cup unbleached all-purpose flour
¼ teaspoon table salt
½ teaspoon baking powder
2 ounces unsweetened chocolate
4 ounces bittersweet chocolate or semisweet chocolate
1 stick unsalted butter (4 ounces)
1¼ cups granulated sugar
2½ teaspoons vanilla extract
3 large eggs
8 ounces cream cheese at room temperature
1 egg yolk

1. Adjust oven rack to lower-middle position, and preheat oven to 325 degrees. Whisk flour, salt, and baking powder in a small bowl; set aside. Coat an 8-inch-square baking pan with cooking spray, and, fit an 8-by-16-inch sheet of aluminum foil in bottom of pan. (Foil overhangs both sides of the pan; use as handles to remove baked brownies from pan.) Coat foil with cooking spray.

2. In a medium heat-proof bowl set over a pan of almost simmering water, melt chocolate and butter, stirring occasionally until mixture is smooth. (Alternatively, melt chocolate and butter in microwave oven.) Remove melted chocolate mixture from heat; whisk in 1 cup sugar and 2 teaspoons vanilla; then whisk in 3 eggs, one at a time, fully incorporating each before adding the next. Continue whisking until mixture is completely smooth. Add dry ingredients; whisk until just incorporated.

3. In a small bowl, beat cream cheese with remaining ¼ cup sugar, ½ teaspoon vanilla, and egg yolk until of even consistency.

4. Pour half the brownie batter into prepared pan. Drop half the cream cheese mixture, by spoonfuls, over batter. Repeat layering and swirling with remaining brownie batter and cream cheese filling. Use blade of a table knife or a spoon handle to gently swirl batter and cream cheese filling, creating a marbled effect.

5. Bake until edges of brownies have puffed slightly, center feels not quite firm when touched lightly, and a toothpick or cake tester inserted into center comes out with several moist, fudgy crumbs adhering to it, 50 to 60 minutes.

6. Cool brownies in pan on a wire rack for 5 minutes. Use foil sling handles to lift brownies from pan. Place brownies on wire rack; allow them to cool to room temperature. Refrigerate until chilled, at least 3 hours. (To hasten cooling, place brownies in the freezer for about 1½ hours.) Cut into squares and serve. (Do not cut brownies until ready to serve. Whole bar can be wrapped in plastic wrap, then foil, and refrigerated up to 5 days.)

42.jpg

food for the snobs (lemon squares)

back.jpg

There are those that would call me a food snob. And while it’s true that I chop my own garlic and refuse to use margarine, I don’t think you can decide who’s a food snob until you’ve read Amanda Hesser’s Cooking for Mr. Latte. With all her guinea hens, haricots verts, and crème fraiche, Hesser takes the food snob cake.

Not that I didn’t enjoy her book, which I did, or that it didn’t get me interested in some fancy schmancy ingredients. Meyer lemons in particular caught my eye, because lemons are already so good. There’s a better version? I need to check that out!

So I was very excited when I saw Meyer lemons at my awesome grocery store yesterday! Of course it was a totally inconvenient week to be buying random ingredients. Since we’re moving soon, the rest of my grocery list was geared toward emptying out our freezer and cabinets. But, I had seen Meyer lemons at my grocery store once before and passed up my chance to buy them, assuming that if they carried them once, they would again. So wrong.

But what to do with my prize. I wanted something to showcase the flavor of the lemons, so I could really get a feel for the difference between these and regular lemons. My copy of Cooking for Mr. Latte was already packed, but I dug it out anyway. Hesser recommends a (fancy schmancy) recipe for lemon squares using Meyer lemons, and I so love lemon squares. I’ve tried a good number of lemon square recipes and refined them to fit my own tastes, so in the end I used Hesser’s recipe only to adjust the sugar for the difference in sweetness between Meyer and regular lemons.

I haven’t made lemon squares in years, and after I made these, it didn’t take me long to remember why – it’s my total lack of self-control. Something about them just seems so light, and I forget there’s a stick of butter in only 16 squares.

three.jpg

And what about the much-hyped Meyer lemons? I’m a bit disappointed, to be honest. I reduced the sugar in the original recipe, but I still feel like the lemon flavor is too weak. I don’t notice any extra complexity. I haven’t given up on this ingredient yet though. I’m going to try a savory recipe later this week, and we’ll see from there.

And I still can’t resist these lemon squares.

Lemon Squares
(adapted from Betty Crocker’s Best of Baking)
makes 16 (one 8 by 8 inch pan)

If you’re using Meyer lemons, reduce the sugar in the filling to ½ cup plus 2 tablespoons (4.375 ounces).

Update 12.18: I made these again (with regular lemons) soon afterwards.  I think the flour in the crust should be increased to 3/4 cup + 2 tablespoons (4 3/8 ounces).  With this amount, the crust has more structure but is still very tender.  Also, I beat the filling on high with the whisk attachment for 3 minutes, and it certainly wasn’t light and fluffy.  So just mix it until it’s mixed.  One more thing: 1/2 cup lemon juice makes for a sour lemon square.  If you’re not into that, you may want to cut that amount in half.

Crust:
¾ cup (3¾ ounces) unbleached flour
½ cup (8 tablespoons or 1 stick) unsalted butter, softened
¼ cup powdered sugar

Filling:
¾ cup (5 ¼ ounces) granulated sugar
2 eggs
zest from 1 lemon
½ cup lemon juice (from 3-4 lemons)
½ teaspoon baking powder
¼ teaspoon salt
powdered sugar for dusting baked squares

Heat oven to 350 degrees. Mix crust ingredients until dough comes together. (It shouldn’t be crumbly.) Press into ungreased 8 by 8-inch baking pan. Bake for 20 minutes, or until golden brown on top.

crust.jpg

Beat all filling ingredients until light and fluffy, about 3 minutes. (You’re going to want to cover to bowl with a towel or something, because it’s very splattery.) Pour over baked crust.

Bake at 350 degrees for about 25 minutes, or until no indentation remains when touched in center. Cool completely. Dust with powdered sugar. Cut into squares; serve.

side.jpg

belated wishes (slice-a-fancy cookies)

dscn1929.jpg

As much as I love my friends and family, I am terrible at getting gifts out to them on time. Invariably, I won’t start looking for gift ideas until after I’ve made the call (or email or text message) to wish the person a happy birthday

And that is why my good friend Sidfaiwu, whose birthday is before Thanksgiving, got Christmas cookies along with the rest of his birthday gift.

copy-of-img_0256Updated photo 12.13.08

These cookies are as much a Christmas tradition in my family as santa or the decorated tree. Although I can’t remember a Christmas without them, this is my first time making them.

The dough itself is simple – a classic cookie dough recipe where the butter and sugars are creamed together, the eggs are beaten in, and the pre-mixed dry ingredients are added. It’s in the shaping that the recipe gets interesting. The dough is divided into equal portions, colored, patted into rectangles, then stacked and cut to form cookies. This is where the recipe really shines, because it’s an easy way to make an impressive variety of shapes.

dscn1875.jpg dscn1882.jpg

dscn1888.jpg dscn1918.jpg

I hope Sid enjoys these as much as I always have!

Yes, Dave and I got him a math calendar for his birthday.  We are the coolest friends ever.

dscn1944.jpg

Slice a Fancy Cookies (from Family Circle)

I was working from a shorthand recipe that I’d copied in a hurry a few years ago.  This is the real version (updated from my original post), although I’ve modernized it a bit.  Apparently I made the “ribbon fancies”.  I would just call them striped, but what do I know.

Makes about 12 dozen cookies

4 cups (18 ounces) unbleached flour
1 teaspoon baking powder
1 teaspoon salt
¼ teaspoon baking soda
1¼ cups (2½ sticks) butter
1 cup (7 ounces) firmly packed light brown sugar
½ cup (3 1/2 ounces) granulated sugar
2 eggs
2 teaspoons vanilla
1. Mix flour, baking powder, salt, and baking soda.
2. Beat butter with brown and granulated sugars until fluffy; beat in eggs and vanilla. Blend in flour mixture.
3. Divide evenly into 3 bowls. Flavor, shape, and decorate each variety, following recipes below.
4. Slice frozen cookie dough into 1/4-inch sections and place on ungreased cookie sheets. Bake at 350º for 8-10 minutes. Remove from cookie sheets to wire racks; cool completely.

Ribbon Fancies

Divide one bowl of dough into three equal portions. Tint one third red, one green and leave one plain. Roll out each section into a 9 x 3-inch rectangle between sheets of parchment (or wax) paper; chill in freezer 10 minutes; halve each rectangle lengthwise. Brush tops very lightly with milk. Lay one plain stripe, on top of that place a green, then red, than green again, and red, and then white layer on top of each other. Wrap in wax paper and freeze for several hours at least. When ready to bake, follow above directions.

Pinwheel Twirls

Divide second bowl of dough in half. Tint one half red or green; leave other half plain. Roll out each half to a 9×9-inch square between sheets of parchment paper; peel off top sheets. Lay tinted dough, paper side up, on top of plain dough. Peel off paper. Roll up doughs tightly, jelly-roll fashion. Wrap in wax paper; freeze at least several hours. When ready to bake, follow above directions.

Checkerboards

Divide third bowl of dough in half. Blend ½ square unsweetened chocolate, melted and cooled, into one half; leave other half plain. Roll out each half to a 9×3-inch rectangle, chill. Cut each rectangle lengthwise into 8 strips, each 3/8-inch wide. Carefully lift a chocolate strip with a long-bladed spatula and place on a clean sheet of wax paper; lay a plain strip close to it, then repeat with a chocolate and plain strip to make a four-stripe ribbon about 1½ inches wide. Brush very lightly with milk. Build a second, third, and fourth layer, alternating plain and chocolate strips each time and brushing each layer with milk before adding the next one. Wrap in wax paper; freeze. When ready to bake, follow above directions.

Cookie deliciousness (cream cheese chocolate chip cookies)

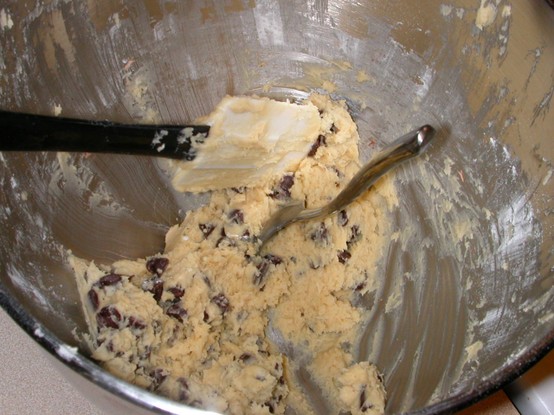
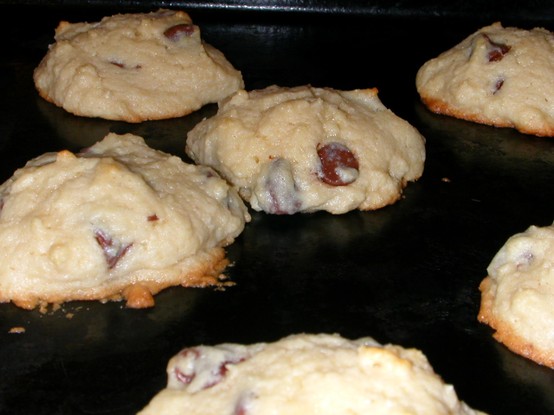
cream cheese chocolate chip cookies 2

I’ve read so many great food blogs lately that I’ve gotten excited about starting my own!  My husband Dave came up with the name–I wanted something that would reflect the main topic of food, as well as my interest in the science of food and cooking.

cream cheese chocolate chip cookies 1

I had a professor once who started his course by discussing the physics of crumbly cookies. That same day, he brought us cookies that his wife had made. They were these delicious cream cheese chocolate chip cookies, and I’ve been wanting to make them since. This seemed like the perfect way to start my blog!

I love chocolate chip cookies. And I love cream cheese. I think these cookies are quite delicious. Dave isn’t as impressed, but he’s not as in to cream cheese as I am.  Regardless, these will be a nice change from my regular chocolate chip cookie routine.  I know the final result will be good when I can’t resist the dough!

cream cheese chocolate chip cookies 3

Printer Friendly Recipe
Cream Cheese Chocolate Chip Cookies

Makes about 4 dozen cookies

2½ cups (12.5 ounces) unbleached all-purpose flour
1 teaspoon baking soda
½ teaspoon salt
16 tablespoons (2 sticks) butter, softened
8 ounces cream cheese, at room temperature
¾ cup (5.25 ounces) light brown sugar
¾ cup (5.25 ounces) granulated sugar
1 egg
½ teaspoon vanilla extract
2 cups (12 ounces) semi-sweet chocolate chips

1. Adjust an oven rack to the middle position and heat the oven to 375 degrees.  Whisk the flour, salt and baking soda in a medium bowl; set aside.  Beat the butter, cream cheese, and sugars until creamy; add the egg and vanilla and beat until combined.  Add the flour mixture and mix until just combined.  Stir in the chocolate chips.

2. Drop dough by 1-inch spoonfuls onto cookie sheet, about 2 inches apart.  Bake until brown around edges and center is set. 8-10 minutes.  Cool on a cookie sheet for 2 minutes; transfer to a wire rack to cool completely.