apple cake

apple cake 5

When I saw this beautiful apple walnut cake, with those perfectly arranged apple slices on top, I wanted to make it as soon as possible. I bought the walnuts and apples, I printed out the recipe, and then I…I made a different cake.

apple cake 2

I just couldn’t get past the step that required slicing apples fussily thin and fussily arranging the slices in the pan. I want to be the type of person who spends the time to precisely arrange fruit for the prettiest possible dessert, but I am just not.

apple cake 3

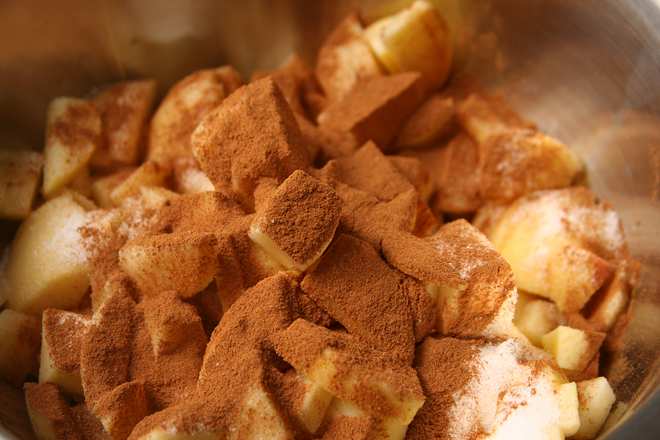
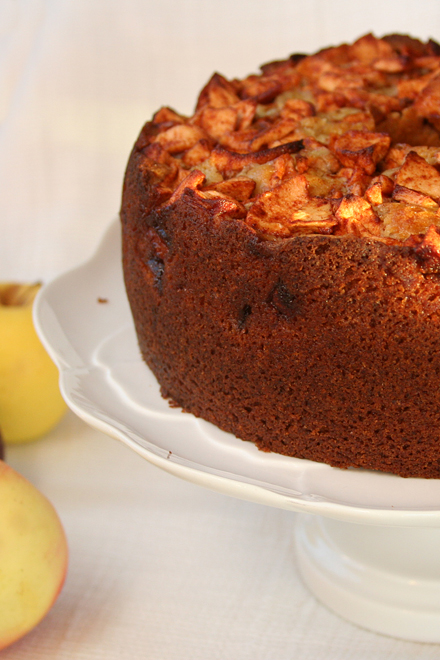
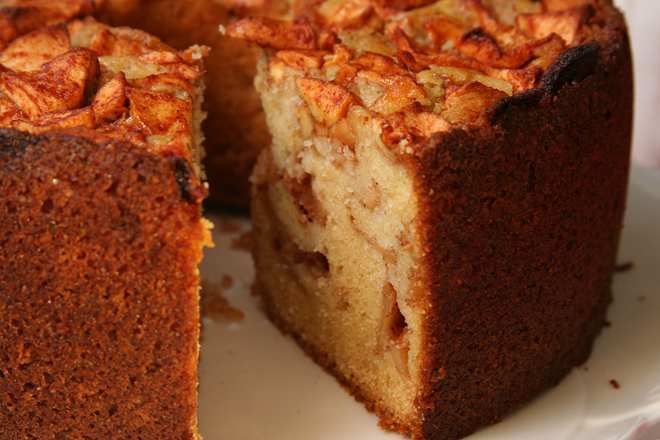
But I have no regrets. The cake I made instead is more rustic than the one that had initially caught my eye, but no less delicious for it. In this case, instead of paper thin apples painstakingly arranged in a pretty pattern, the apples are unceremoniously spread in two layers, one in the middle of the cake and one on top. You still have to peel and core the apples, but the coarse cut takes a fraction of the time as getting out the mandoline to make even slices.

apple cake 4

In its own tall, straight-sided way, this cake is just as impressive as the other. It’s also rich and moist and just sweet enough, filled with baked apples that taste just like fall. I still want to try the apple walnut cake, but it’s going to require magical amounts of free time and patience, especially now that I have an easier recipe in my back pocket.

apple cake 7

One year ago: Notes on planning a Thanksgiving feast
Two years ago: Cranberry Shortbread Cake
Three years ago: Buffalo Chicken Pizza
Four years ago: Breakfast Tacos

Printer Friendly Recipe
Apple Cake (adapted from Smitten Kitchen)
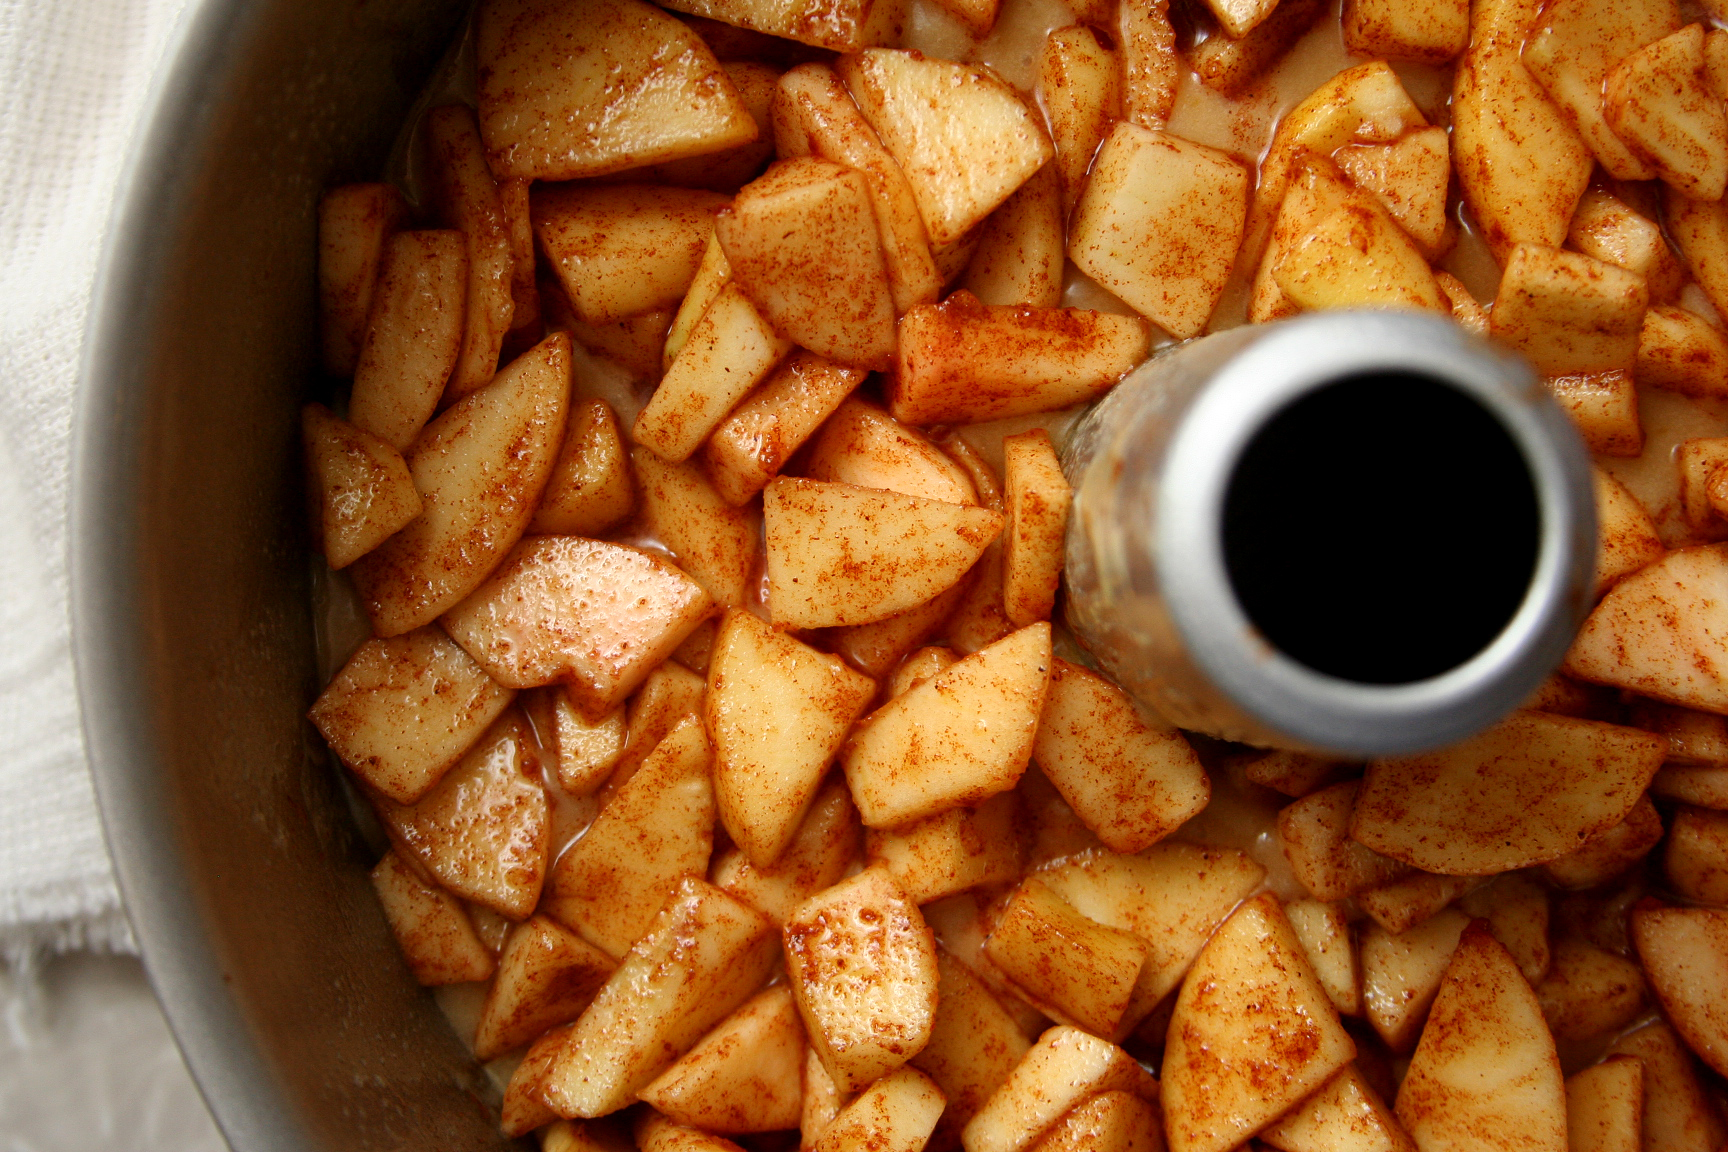
Apples:
3 pounds apples (about 6 medium), peeled, cored, chopped into ¼- to ½-inch pieces
1 tablespoon cinnamon
5 tablespoons sugar

Cake:
2¾ cups (13.2 ounces) all-purpose flour
1 tablespoon baking powder
1¼ teaspoon salt
½ cup vegetable oil
8 tablespoons (1 stick) butter, melted
2 cups (14 ounces) sugar
¼ cup orange juice
1 tablespoon vanilla
4 eggs

1. Heat the oven to 350 degrees. Spray a tube pan, preferably with removable sides, with nonstick spray.

2. In a medium bowl, combine the apples, cinnamon, and 5 tablespoons sugar.

3. In a separate medium bowl, whisk together flour, baking powder and salt in a large mixing bowl. In a large bowl, whisk the eggs, then add the oil, butter, orange juice, sugar, and vanilla. Add the flour mixture to the bowl with the oil mixture and stir to incorporate.

4. Pour half of the batter into the prepared pan. Spread half of apples over it. Pour the remaining batter over the apples, then arrange the remaining apples on top. Bake for 1 hour 15 minutes to 1 hour 30 minutes, or until a tester comes out clean.

5. Transfer the cake to a cooling rack. After 15 minutes, remove the cake from the pan. Cool at least an hour before serving. The cake will keep, covered tightly, for up to 2 days.

apple cake 6

cinnamon macarons with apple buttercream

apple cinnamon macarons 4

Macarons have been all the rage recently, and yet, I’ve had no real desire to make them myself. This, even though they’re known to be finicky, and I do love making my life unnecessarily complicated. But while I do love a challenge, I don’t particularly love meringue cookies.

apple cinnamon macarons 1

This is probably because I’ve never gotten them quite right, as they always seem to be chewy in the center instead of crisp the whole way through. Maybe the precise directions included with many macaron recipes could help me avoid this pitfall. If not, at least they’d be filled with swiss meringue buttercream.

apple cinnamon macarons 2

One of the hallmarks of good macarons is the foamy feet around the bottom edge, which show that your macarons rose up in the oven instead of spreading out. When I started to see those feet form, I made Dave come over to look through the oven window with me and give me a high-five. I was also happy with the smooth tops of the cookies, and it goes without saying that I was happy with the apple buttercream, which was noticeably and pleasantly appley.

apple cinnamon macarons 3

The only problem? A chewy center. I guess practice makes perfect. Fortunately, I think it’s safe to say that meringues are good enough to make again.

apple cinnamon macarons 6

One year ago: Butternut Squash Risotto
Two years ago: Pomegranate Glazed Salmon
Three years ago: Sun-Dried Tomato Jam
Four years ago: Sushi Bowls

Printer Friendly Recipe
Cinnamon Macarons with Apple Buttercream (adapted from Tartelette)

Makes about 20 sandwich cookies

For a lot of meringue-making tips, read Tartelette’s article.

Meringues:
110 grams blanched almonds or almond meal
200 grams powdered sugar
½ teaspoon cinnamon
100 grams egg whites (from about 3 large eggs), aged overnight
25 grams sugar
Pinch salt

Apple buttercream:
4 egg whites
1¼ cups (8.75 ounces) granulated sugar
Pinch salt
24 tablespoons (3 sticks) unsalted butter, softened
⅓ cup apple butter
1 teaspoon vanilla extract

1. In a food processor, process the almonds and powdered sugar until the nuts are finely ground. In a stand mixer fitted with the whisk attachment (or a large bowl with a handheld mixer), beat the egg whites, sugar, and salt on medium-high speed (high speed if using a stand mixer) until soft peaks form. Use a large rubber spatula to fold the nut mixture into the egg mixture. After about 50 folds, the batter should be evenly mixed, with no streaks of egg white.

2. Line 2 baking sheets with parchment paper or silicone mats. Spray the lined sheets lightly with cooking spray. Transfer the batter to a piping bag fitted with a wide (about ½-inch) round tip. Pipe quarter-sized rounds onto the prepared pans, leaving about an inch between rounds. Gently rap the baking sheet against the counter to pop any large bubbles. Set the piped dough aside for 1 hour.

3. Adjust a rack to the middle position and heat the oven to 300 degrees. Bake one sheet at a time until the cookies are lightly browned around the bottom edges, about 15 minutes. Transfer the baking sheet to a wire rack; cool for about 5 minutes, then use a thin spatula to transfer the cookies from the pan to the wire rack. Cool completely before filling.

4. In the bowl of a stand mixer (or a large bowl if using a hand-held mixer), combine the egg whites, sugar, and salt. Set the bowl over a pot of simmering water, making sure the bottom of the bowl does not touch the water. Whisk constantly until the mixture reaches 160 degrees.

5. Fit the mixer with the whisk attachment; beat the egg white mixture on medium-high speed until stiff peaks form and it has cooled to room temperature, about 8 minutes. Reduce the mixer speed to medium and add the butter 2 tablespoons at a time, adding more once each addition has been incorporated. Increase the mixer speed to medium-high and beat until the buttercream is thick and smooth, 3-5 minutes. Add apple butter and vanilla; mix until incorporated.

6. Pipe the buttercream onto the flat sides of half of the cookies.  Top with the remaining cookies.  Serve immediately or cover and store overnight in the refrigerator (bring to cool room temperature before serving).

apple cinnamon macarons 5

candy corn cheesecake

candy corn cheesecake 10

I don’t know what it is about candy corn that makes some people eat it until they’re sick, but for the people who love it, they can’t seem to resist.  My sister is one of those people.  She also considers cheesecake one of her favorite desserts, so obviously a cheesecake baked to look like candy corn was the perfect dessert for her.

candy corn cheesecake 6

It’s just a regular cheesecake with colored batter poured into divided rings. The dividers are carefully removed before baking. However, I refused to buy a special cake batter divider tool, so I looked around my kitchen for alternatives. A 6-inch springform pan would work for the outer ring, and I went really low-tech for the inner ring – a Dixie cup with the bottom cut off. There was some leakage of each color below the dividers, but I think that would be hard to avoid with nearly any set up.

candy corn cheesecake collage

As for which cheesecake recipe to use, that was easy. It was a cake for my sister, so I made her favorite. It worked perfectly – the batter was thin enough that it didn’t stick to the dividers when I removed them, but thick enough not to mix once the dividers were removed.  My sister loved it just as much as I knew she would – and she even managed to restrain herself from eating it until she felt sick.

candy corn cheesecake 8

One year ago: Butternut Squash Risotto
Two years ago: Pomegranate-Glazed Salmon
Three years ago: Sun-Dried Tomato Jam
Four years ago: Sushi Bowls

Printer Friendly Recipe
Candy Corn Cheesecake (adapted from Dorie Greenspan’s Tall and Creamy Cheesecake)

Makes 16 servings

I didn’t want the cheesecake to be too tall, because I wanted slices to have the approximate dimensions of one piece of candy corn, so I cut the recipe down by a fourth, but I think it was too short then. I’ve increased the ingredient amounts back to those in the original recipe, so your cheesecake will be taller than mine.

For the crust:
4 ounces graham crackers (about 8 full crackers)
2 tablespoons sugar
⅛ teaspoon salt
4 tablespoons unsalted butter, melted

For the cheesecake:
4 (8-ounce packages) cream cheese, at room temperature
1⅓ cup (9.33 ounces) sugar
½ teaspoon salt
2 teaspoons pure vanilla extract
4 large eggs, at room temperature
1⅓ cups sour cream

1. For the crust: Grease a 9-inch springform pan and wrap the bottom of the pan in aluminum foil. Heat the oven to 350 degrees.

2. In the food processor, process the graham crackers until finely ground; add the sugar and salt and pulse to combine. Pour the melted butter over the crumbs; pulse until evenly coated. Press the mixture evenly onto the bottom of the prepared pan. Bake until fragrant and beginning to brown around the edges, 10 to 12 minutes. Cool on a wire rack while preparing the filling. Reduce the oven temperature to 325°F.

3. For the cheesecake: Working in a stand mixer, preferably fitted with a paddle attachment, or with a hand mixer in a large bowl, beat the cream cheese at medium speed until it is soft and creamy, about 4 minutes. With the mixer running, add the sugar and salt and continue to beat another 2 minutes, until the cream cheese is light. Beat in the vanilla. Add the eggs one at a time, beating until each is thoroughly combined. Reduce the mixer speed to low and stir in the sour cream.

4. Bring 2 quarts of water to a boil. Place the foil-wrapped springform pan in a larger baking dish.

5. Arrange molds of 2-inch diameter and 6-inch diameter in the springform pan. Pour uncolored batter into the smallest mold in the middle, to a height about 1-inch below the top of the pan. Color the remaining batter yellow and fill the outermost ring. Use a small amount of red food coloring to color the remaining batter orange and pour the rest of the batter into the second ring. Carefully remove the molds by lifting them straight up out of the batter.

6. Pour the boiling water into the baking dish around the springform pan. Transfer to the oven and bake for 1 hour and 30 minutes, until the center jiggles like jello when lightly shook and a thermometer inserted into the center of the cheesecake reads 150 degrees. Turn the oven off, prop open the oven door, and leave the cheesecake in the oven for another hour.

7. Remove the cheesecake from the oven and the water bath. Cool on a wire rack until it reaches room temperature, then transfer to the refrigerator and chill for at least 4 hours or up to a week.

candy corn cheesecake 9

raspberry-swirled cheesecake cupcakes

raspberry swirl cheesecake cupcakes 6

I did a lot of things I’m proud of this weekend. I didn’t have to work Friday, so I kicked off the three-day weekend with the second-longest run I’ve ever done, and the longest run that wasn’t part of a big race. Then I made Dave give me hourly high-fives for the rest of the day.

raspberry swirl cheesecake cupcakes 1

The next day, I had my first-ever paid baking order. A coworker hired me to make a dozen each of two different types of cupcakes for her daughter’s wedding. Two dozen isn’t a lot of cupcakes, but I wanted to get them just right, with great taste and beautiful garnishes.

raspberry swirl cheesecake cupcakes 2

Less than an hour after I dropped those off, we had a bunch of people over to watch football – the first time Dave and I have entertained more than a couple friends at a time since we’ve been married. By keeping things casual (or at least, my version of casual), enlisting a lot of help from Dave, and being creative with what I already had around, I managed to entertain the way I like to – with a lot of food, of course – but without a lot of stress.

raspberry swirl cheesecake cupcakes 3

One of the ways I made the most of what I had available was to make extras of these cupcakes. The wedding’s colors were black, ivory, and red, so the bride chose these raspberry-swirled cheesecake cupcakes drizzled with chocolate and topped with raspberry truffles, as well as chocolate cupcakes with champagne frosting topped with chocolate-covered strawberries. While I was at it, I went ahead and made extra chocolate-covered strawberries and raspberry truffles for my friends too.

raspberry swirl cheesecake cupcakes 4

Both sets of cupcakes turned out every bit as good as I’d hoped, and that never happens! The swirls on the cheesecake were pretty and not sloppy, the drizzle didn’t cover up as much as the swirls as I was worried about, the fresh raspberries fit nicely onto the tops. The chocolate cupcakes rose into a perfect mound, and the swirls of frosting didn’t look too amateurish. My first time making chocolate-covered strawberries went just fine, even the stressful part that involved melting white chocolate. I dropped the cupcakes off and then entertained guests all evening, only spitting half-chewed chips on someone once! This is about as successful as my life gets.

raspberry swirl cheesecake cupcakes 7

One year ago: Croissants (Tartine Bread)
Two years ago: Coffee Break Muffins
Three years ago: Green Chile Huevos Rancheros
Four years ago: Pan-Seared Steak with Red Wine Pan Sauce

Printer Friendly Recipe
Raspberry-Swirled Cheesecake Cupcakes (adapted from Martha Stewart’s Cupcakes via Annie’s Eats)

Makes 32 cupcakes

The truffles and drizzle make for a nice presentation, but the swirled cupcakes are plenty tasty and pretty on their own.
For the crust:
1½ cups (about 8 full crackers) graham cracker crumbs
4 tablespoons unsalted butter, melted
3 tablespoons sugar

For the raspberry swirl:
6 ounces (¾ cup) frozen or fresh raspberries
2 tablespoons sugar
1 teaspoon cornstarch

For the filling:
4 (8-ounce) cream cheese, at room temperature
1½ cups (10.5 ounces) sugar
Pinch of salt
1 teaspoon vanilla extract
4 large eggs, at room temperature

1. Preheat the oven to 300 degrees. Line 32 muffin wells with paper liners.

2. For the crust: In a food processor, process the graham crackers and sugar until evenly ground. Add the butter and pulse to combine, scraping the sides of the bowl as needed. Press 1 tablespoon of the crumb mixture onto the bottom of each liner. Bake until fragrant, about 10 minutes. Cool on a wire rack, maintaining the oven temperature.

3. For the raspberry swirl: Combine the raspberries, sugar, and cornstarch in a blender or food processor. Process until smooth, then pour through a fine mesh sieve to remove the seeds. (Or press the raspberries through a food mill, stirring the cornstarch and sugar into the puree.)

4. For the filling: Beat the cream cheese on medium speed in the bowl of an electric mixer until smooth. Gradually add the sugar and salt, then the vanilla. Beat in the eggs one at a time, mixing well after each addition.

5. To assemble, spoon 3 tablespoons of the cheesecake batter over the crust in each cupcake liner. Dot ½ teaspoon of the raspberry puree in a few dots over the cheesecake filling. Use a toothpick or a wooden skewer to lightly swirl the puree.

6. Bake until the filling is set, about 30 minutes, rotating the pans halfway through baking. Transfer to a wire cooling rack and let cool to room temperature. Transfer to the refrigerator and let chill for at least 2 hours before serving.

Raspberry Truffles (seen on Annie’s Eats, but I didn’t use the same recipe)

6 ounces fresh raspberries
2 ounces bittersweet chocolate, finely chopped
2½ tablespoons heavy cream

1. Gently wash and dry the raspberries.

2. In a small heavy saucepan, bring the cream to a simmer over medium-high heat. (Do not rapidly boil.) Pour the cream over the chocolate. With a fork, gently stir, starting in the center and working toward the edge, until the ganache is smooth.

3. Let the mixture stand at room temperature until it’s thick enough to hold a shape, about 45 minutes, then, using a pastry bag with a small opening, pipe into the stemmed opening on the raspberries.

Chocolate Drizzle (adapted from Tartine’s Chocolate Friands)

I didn’t make this separately, I just stirred in more cream to the ganache leftover from the raspberry truffles. I’m offering it here separately as a good chocolate drizzle recipe.

2 ounces bittersweet chocolate, finely chopped
⅓ cup heavy cream

In a small heavy saucepan, bring the cream to a simmer over medium-high heat. (Do not rapidly boil.) Pour the cream over the chocolate. With a fork, gently stir, starting in the center and working toward the edge, until the ganache is smooth.

raspberry swirl cheesecake cupcakes 5

For the chocolate cupcakes, I used this recipe for the cupcake portion; this champagne buttercream for the frosting; and this method for the chocolate-covered strawberries.

strawberry poptarts

poptarts 9

I like to keep track of things. This is why I have a website showcasing new recipes. But I also have calendars (printed out and filled in with pencil, old school) logging all the workouts I’ve done for years, a list updated daily of which projects I spend time on at work, and a color-coded Google Calendar that I check and update several times a day.

poptarts 4

This apparently wasn’t enough for me, so I’ve recently started tracking some new things – indulgences. Desserts, alcohol, restaurant meals, snacking on ingredients while making dinner – those are the biggies for me. I set goals for the month, and they are generous, and I don’t get bent out of shape if I miss them (and I always go over on both alcohol and desserts), but having it laid out in front of me in a spreadsheet does help my self-control sometimes. Is munching on this cucumber, even if it’s dipped in dressing, really worth having to log a day of ingredient snacking?

poptarts 3

There are loopholes though. Shortcake, obviously that’s dessert. But scones are breakfast, so I don’t need to record those, even if they do contain just as much butter and sugar as shortcake. Cupcakes, dessert; muffins, breakfast. Poptarts are breakfast, right?

poptarts 6

That might be a stretch, even by my standards. Yes, there is jam involved, but a spoonful of jam is squeezed between two sheets of buttery delicious pie crust. And that’s all there is to it, unless you add icing. But once you add icing, any hope of calling this anything but a treat of the most indulgent manner is lost. It went on the list as dessert, and it was worth every mark on the spreadsheet.

poptarts 10

One year ago: Banh Mi (I absolutely love this recipe)
Two years ago: Taco Pasta Salad
Three years ago: Twice Baked Potato Cups
Four years ago: Banana and Peanut Butter Stuffed French Toast

Printer Friendly Recipe
Strawberry Pop-Tarts (adapted from King Arthur Flour via Smitten Kitchen)

Makes 9 (although I made 10 out of a half recipe)

My dough was too crumbly with just one egg, so I also used part of the egg used for the egg wash.

I used the icing because I wanted my tarts to be as traditional as possible, but, it turns out, royal icing on pie just isn’t that good. It’s pretty, but I don’t recommend it for the best flavor.

I replaced a quarter of the flour with whole wheat pastry flour.

Pastry:
2 cups (8½ ounces) all-purpose flour
1 tablespoon sugar
1 teaspoon salt
2 sticks (16 tablespoons) unsalted butter, diced
1 large egg, lightly beaten
2 tablespoons milk

Filling:
1 tablespoon cornstarch
1 tablespoon water
¾ cup (8 ounces) strawberry jam

Egg wash:
1 large egg
salt

Icing:
½ cup (2 ounces) powdered sugar
1 teaspoon meringue powder
1 tablespoon water

1. For the dough: Combine the flour, sugar, and salt in a food processor. Add the butter and pulse until it is cut into pea-sized pieces. Add the egg and milk and pulse until the dough looks crumbly but stays together when pinched. Turn the dough out onto a work surface or shallow bowl, forming it into a ball and kneading a few times. Divide the dough in half and shape each half into a rectangle, about 3 by 5 inches. Wrap the dough tightly in plastic wrap; chill for at least 30 minutes or up to 2 days.

2. Meanwhile, make the filling: In a small saucepan, stir together the cornstarch and water. Mix in the jam. Bring the mixture to a simmer over medium heat; simmer for 2 minutes. Remove from the heat; cool completely before using.

3. On a lightly floured work surface, roll one portion of the dough to ⅛-inch thick, slightly larger than a 9 by 12-inch rectangle. Repeat with the second piece of dough. Trim each portion of dough into a 9 by 12-inch rectangle. Cut each piece of dough into thirds both lengthwise and crosswise, forming a total of 18 3 by 4-inch rectangles.

4. Beat the additional egg with a pinch of salt and brush it over the entire surface of half of the dough. Place a heaping tablespoon of filling into the center of each egg-brushed rectangle, keeping a bare ½-inch perimeter around the jam. Place a second rectangle of dough on top of the jam, using your fingertips to press firmly around the pocket of filling, sealing the dough well on all sides. Press the tines of a fork all around the edge of the rectangle. Repeat with remaining rectangles of dough to form 9 tarts.

5. Transfer the tarts to a baking sheet lined with parchment paper or a silicone mat. Prick the top of each tart multiple times with a fork to allow steam to escape. Refrigerate the tarts (they don’t need to be covered) for 30 minutes (or freeze for 15 minutes), while you heat your oven to 350 degrees.

6. Bake the tarts for 20 to 25 minutes, until they’re light golden brown. Transfer them to a wire rack to cool for at least 10 minutes before icing.

7. In a small bowl, beat the powdered sugar, meringue powder, and water with a hand mixer until soft peaks form. Dribble over the tarts. Let set at least 20 minutes for the icing to set.

poptarts 8

chocolate chip cookie comparison 2

chocolate chip comparison 2
The Chewy

I’ve done all these comparisons and experiments with chocolate chip cookies, and yet, I don’t make any of those recipes. Usually, I make chocolate chip cookies to please myself, because I think it’s fun, so I’m more concerned with which recipe I most enjoy baking instead of which recipe has the best result. But maybe this isn’t so bad – maybe my hacked combination of recipes could stand up to the originals.

chocolate chip comparison 1
The Chewy dough

It was time to find out. For a comparison of the best of the best, I chose Alton Brown’s The Chewy recipe, winner of my last comparison; Cook’s Illustrated’s Perfect Chocolate Chip Cookie, a true standout; Kelsey’s Best Ever Chewy Chocolate Chip Cookies (adapted from Anna Olson’s original recipe), which are the most popular post on her blog; and the one I always make when I’m too lazy to follow an actual recipe.

chocolate chip comparison 3
The Chewy

What sets Alton’s recipe apart is the use of bread flour instead of regular and the replacement of an egg white with milk. Cook’s Illustrated Perfect recipe is designed to mimic the effects of the overnight rest of the dough recommended by the New York Times, which it does using melted browned butter. Compared to the traditional Tollhouse recipe, Kelsey’s recipe uses a higher ratio of flour (plus a bit of cornstarch). My recipe has some similar traits to those above, like bread flour instead all-purpose and an overnight chill to enhance the butterscotch flavor.

chocolate chip comparison 4
my recipe dough

Between the four tasters I had, there was no unanimous favorite. Dave’s favorite was CI’s Perfect cookies. My sister and her husband both chose Alton Brown’s The Chewy as their favorite; it was chewier, but, to Dave, it was too greasy. Kelsey’s recipe was drier than the others; compared to the ultra-rich versions it was being compared to, it had less flavor. My hacked together recipe was the most traditional, crispy around the edges and gooey in the middle.

chocolate chip comparison 6
Cook’s Illustrated’s Perfect

As for me, I’ll certainly keep making the version I have been, now that I know that it can hold its own with the big dogs. I love it because I don’t have to look at a recipe and the dough is perfect for snacking. The Chewy tends to come out a little too flat, and I don’t like the dough for CI’s Perfect (which makes it the recipe of choice when self-control is necessary!), plus it simply isn’t as fun to make cookies with a whisk as it is with a mixer. Slight differences aside, these were all standout recipes, but I appreciate the validation to keep being lazy with my hacked together version.

chocolate chip comparison 5
left to right: The Chewy, my recipe, Kelsey’s Best-Ever, Cook’s Illustrated’s Perfect

One year ago: Kofta
Two years ago: Grilled Corn Salad
Three years ago: Espresso Cheesecake Brownies
Four years ago: Chunky Peanut Butter and Oatmeal Chocolate Chipsters

Printer Friendly Recipe
Accidental Variation of The Chewy (adapted from Alton Brown)

As I was writing up this recipe, I realized I did not actually make The Chewy, which I now see is supposed to use melted butter. I used room temperature solid butter. The recipe below is what I did. This means that the only difference between my recipe and The Chewy is a lower ratio of brown sugar to white and the use of an egg white instead of milk.

16 tablespoons (2 sticks) unsalted butter, room temperature
2¼ cups (11.25 ounces) bread flour
1 teaspoon table salt
1 teaspoon baking soda
¼ cup granulated sugar
1¼ cups brown sugar
1 egg
1 egg yolk
2 tablespoons milk
1½ teaspoons vanilla extract
2 cups (12 ounces) semisweet chocolate chips

1. Heat oven to 375 degrees. Sift together the flour, salt, and baking soda and set aside.

2. Add the butter to the mixer’s work bowl with the sugars. Cream the butter and sugars on medium speed. Add the egg, yolk, 2 tablespoons milk, and vanilla extract, and mix until well combined. Slowly incorporate the flour mixture until thoroughly combined. Stir in the chocolate chips.

3. Scoop the dough in heaping tablespoons onto the prepared baking sheets. Bake the cookies, one sheet at a time, until they are browned around the edges and do not look wet on top, 8-12 minutes. Let the cookies cool on the cookie sheets for 5 minutes, then transfer to wire racks to cool completely.

Printer Friendly Recipe
Perfect Chocolate Chip Cookies (from Cook’s Illustrated May/June 2009)

I baked smaller cookies – tablespoon-sized dollops of dough – for about 9 minutes at 375 degrees.

1¾ cups (8¾ ounces) unbleached all-purpose flour
½ teaspoon baking soda
14 tablespoons (1¾ sticks) unsalted butter
½ cup (3½ ounces) granulated sugar
¾ cup (5¼ ounces) packed dark brown sugar
1 teaspoon table salt
2 teaspoons vanilla extract
1 large egg
1 large egg yolk
1¼ cups semisweet chocolate chips or chunks
¾ cup chopped pecans or walnuts, toasted (optional)

1. Adjust oven rack to middle position and heat oven to 375 degrees. Line 2 large baking sheets with parchment paper. Whisk flour and baking soda together in medium bowl; set aside.

2. Heat 10 tablespoons butter in 10-inch skillet over medium-high heat until melted, about 2 minutes. Continue cooking, swirling pan constantly until butter is dark golden brown and has nutty aroma, 1 to 3 minutes. Remove skillet from heat and, using heatproof spatula, transfer browned butter to large heatproof bowl. Stir remaining 4 tablespoons butter into hot butter until completely melted.

3. Add both sugars, salt and vanilla to bowl with butter and whisk until fully incorporated. Add egg and yolk and whisk until mixture is smooth with no sugar lumps remaining, about 30 seconds. Let mixture stand for 3 minutes, then whish for 30 seconds. Repeat process of resting and whisking 2 more times until mixture is thick, smooth and shiny. Using rubber spatula or wooden spoon, stir in flour mixture until just combined, about 1 minute. Stir in chocolate chips and nuts (if using), giving dough final stir to ensure no flour pockets remain.

4. Divide dough into 16 portions, each about 3 tablespoons (or use a #24 cookie scoop). Arrange 2 inches apart on prepared baking sheets, 8 dough balls per sheet.

5. Bake cookies 1 tray at a time until cookies are golden brown and still puffy, and edges have begun to set but centers are still soft, 10-14 minutes, rotating baking sheet halfway through baking. Transfer baking sheet to wire rack; cool cookies completely before serving.

Printer Friendly Recipe
Best-Ever Chocolate Chip Cookies (rewritten but not changed from Kelsey’s Apple a Day, who adapted it from Anna Olson)

2 cups (9.6 ounces) all-purpose flour
2 teaspoons cornstarch
1 teaspoon baking soda
½ teaspoon table salt
12 tablespoons (1½ sticks) unsalted butter, softened
¾ cup (5.25 ounces) brown sugar
¼ cup (1.75 ounces) granulated sugar
1 egg
2 teaspoons vanilla extract
1 cup (6 ounces) bittersweet chocolate chips

1. Heat the oven to 350 degrees. Line two baking sheets with parchment paper or silicone mats. In a medium bowl, mix the flour and baking soda.

2. In the bowl of a stand mixer fitted with the paddle attachment (or a large bowl if using a stand mixer), beat the butter, salt, and sugars on medium speed until light and fluffy, 1-2 minutes. Add the egg, beating until incorporated, then mix in the vanilla. Reduce the mixer speed to low and gradually add the flour, mixing just until incorporated. Stir in the chocolate chips.

3. Scoop the dough in heaping tablespoons onto the prepared baking sheets. Bake the cookies, one sheet at a time, until they are slightly browned around the edges, 8-10 minutes. Let the cookies cool on the cookie sheets for 5 minutes, then transfer to wire racks to cool completely.

Printer Friendly Recipe
Chocolate Chip Cookies (adapted from nearly every single chocolate chip cookie recipe I’ve ever read)

I haven’t found a dependable measurement for the weight of 1 cup of bread flour.  I used to assume 5 ounces for 1 cup of bread flour, but I think this is on the high side, so I’m changing the volume measurement in this recipe from 2¼ cups to 2⅓ cups.  Unfortunately,  it could be as high as 2½ cups, depending on how you measure your flour.  If you can, definitely measure by weight and not volume (food scales are cheap!)!

16 tablespoons (2 sticks) unsalted butter, room temperature
1 teaspoon table salt
1 cup (7 ounces) brown sugar
½ cup (3.5 ounces) white sugar
2 eggs
1 teaspoon vanilla
2¼ cups (11.25 ounces) bread flour
1 teaspoon baking soda
2 cups (12 ounces) semisweet chocolate chips

1. Heat the oven to 375 degrees. Line two baking sheets with parchment paper or silicone mats. In a medium bowl, mix the flour and baking soda.

2. In the bowl of a stand mixer fitted with the paddle attachment (or a large bowl if using a stand mixer), beat the butter, salt, and sugars on medium speed until light and fluffy, 1-2 minutes. Add the eggs, one at a time, beating until incorporated, then mix in the vanilla. Reduce the mixer speed to low and gradually add the flour, mixing just until incorporated. Stir in the chocolate chips.

3. Scoop the dough in heaping tablespoons onto the prepared baking sheets. Bake the cookies, one sheet at a time, until they are browned around the edges and do not look wet on top, 8-12 minutes. Let the cookies cool on the cookie sheets for 5 minutes, then transfer to wire racks to cool completely.

orange vanilla creamsicle whoopie pies

creamsicle whoopie pies 5

I brought pumpkin whoopie pies to a company picnic a couple years ago, and my coworkers got quite a kick over the name. So you’ll forgive me if the post-it next to these in the office kitchen said “orange vanilla creamsicle sandwich cookies”, with no mention of whoopie. I didn’t need the giggles today.

creamsicle whoopie pies 2

I’m not sure if these are more whoopie pie or more sandwich cookie anyway. The cookie part ended up on the chewy side, not as tender and fluffy as the traditional cakey whoopie pie. At least it seemed that way to me fresh out of the oven.

creamsicle whoopie pies 4

Sandwiched with cream cheese frosting and left overnight in the fridge, they seem to have become more cakey, because the several coworkers I quizzed about whether these seemed more cookie-like or more cake-like guessed cake. (They didn’t seem excited about the pop quiz, but they passed with flying colors.) More importantly, they raved, so whoopie pies or sandwich cookies, it doesn’t matter; all that matters is how good they are.

creamsicle whoopie pies 6

One year ago: Blueberry Barbecue Salmon
Two years ago: Rhubarb Crumb Coffee Cake
Three years ago: Quick Baking Powder Pizza Crust
Four years ago: Mashed Potatoes with Kale

Printer Friendly Recipe
Orange Vanilla Creamsicle Whoopie Pies (adapted from Culinary Concoctions by Peabody)

Makes about 3 dozen sandwiches

If you have vanilla sugar, use that!

I am a food blogger failure and used cream cheese frosting that I’ve had in my freezer for months, doctored up with vanilla seeds.

Cookies:
3½ cups (16.8 ounces) all-purpose flour
1¼ teaspoon baking soda
1¼ teaspoon baking powder 2 cups (14 ounces) sugar
zest from 2 oranges
12 tablespoons unsalted butter, room temperature
½ teaspoon salt
1 vanilla bean, seeds scraped
½ cup sour cream
2 eggs, room temperature

Filling:
3 ounces cream cheese
3 tablespoons unsalted butter
1 vanilla bean, seeds scraped
pinch salt
1½ cups (6 ounces) powdered sugar
1 teaspoon vanilla extract

1. For the cookies: Adjust an oven rack to the middle position; preheat the oven to 350 degrees. Line two baking sheets with parchment paper or silicone mats. In a medium bowl, whisk together the flour, baking soda, and baking powder.

2. In a stand mixer fitted with the paddle attachment (or a large mixing bowl with a hand mixer), beat the sugar and orange zest on medium speed until fragrant, about a minute. Add the butter, salt, and vanilla seeds; continue beating until fluffy, about 2 minutes. Beat in the sour cream. Add the eggs, one at a time, beating to incorporate each addition. Reduce the mixer speed to low, and gradually add the flour mixture, beating just until combined.

3. Spoon (or pipe) the batter in 1 tablespoon rounds on the prepared baking sheets, leaving 2 inches between rounds.

4. Bake until the tops of the cookies don’t look wet and the bottoms just begin to brown, 8-12 minutes. Cool for 2 minutes on the cookie sheet before transferring the cookies to a wire rack to cool completely.

5. For the filling: Add the cream cheese, butter, vanilla seeds, and salt to a clean mixer bowl and beat until smooth. Gradually add the powdered sugar, beating until smooth. Beat in the vanilla extract.

6. To fill, dollop (or pipe) the filling onto the flat sides of half of the cookies. Top with the remaining cookies, flat sides down. Serve immediately, or cover tightly and store in the refrigerator for up to 2 days, bringing to cool room temperature before serving.

creamsicle whoopie pies 8

key lime cheesecake

key lime cheesecake 6

This was the last of my three birthday cakes. That’s right, I got three birthday cakes. The first was the blackberry oreo cake while on vacation with my family, and then I brought funfetti cupcakes to work, and then I made this one for myself to enjoy over my birthday weekend. Making three birthday cakes really takes the pressure off of making the perfect choice. You can have the dramatic, the fun, and the rich. (Okay, I confess that they’re all rich.)

key lime cheesecake 2

Although cheesecake might not seem like a traditional celebration cake, this one, with its four separate layers, is certainly involved enough to qualify. The graham cracker crust and zest-infused cream cheese might be expected, but it’s the layer of curd under the cream cheese that delivers most of the lime pucker. I had some reservations about the sour cream topping, but the sweet-tart coating complimented and balanced the lime and sugar in the other layers.

key lime cheesecake 3

It probably isn’t right to choose favorites, is it? Something went wrong with the funfetti cupcakes, so they don’t stand a chance anyway.  The blackberry oreo cake was tall and colorful and had dark chocolate and bright berries, so there’s no complaints there. But…cheesecake always wins.  If I’m ever confronted with a one-cake birthday again, remind me: cheesecake.

key lime cheesecake 7

One year ago: Spice-Rubbed Picnic Chicken
Two years ago: Whole Wheat Challah
Three years ago: Vegetable Curry
Four years ago: Fruit Bruschetta

Key Lime Cheesecake
Key Lime Cheesecake (from Bon Appétit via epicurious)

I used Key limes, but you can certainly use regular (Persian) limes instead.

The recipe calls for an 8- or 8½-inch round springform pan, but if you only have the more common 9-inch springform pan, you can certainly use that. I made a half recipe, split between a 5-inch round pan and a 3.5-inch round pan.

Crust:
12 whole graham crackers
¼ cup (1.75 ounces) sugar
¼ teaspoon table salt
½ cup (1 stick) unsalted butter, melted

Lime custard:
6 large egg yolks
¾ cup (5.25 ounces) sugar
6 tablespoons fresh Key lime juice
1 teaspoon grated Key lime zest

Filling:
2 (8-ounce) packages cream cheese, room temperature
⅔ cup (4.67 ounces) sugar
¼ teaspoon table salt
2 large eggs, room temperature
3 tablespoons fresh Key lime juice
1 tablespoon grated Key lime zest

Topping:
1 (16-ounce container) sour cream
3 tablespoons sugar

1. For the crust: Preheat the oven to 350 degrees. Spray an 8- to 8½-inch springform pan with nonstick spray. Wrap a layer of foil around the outside of the pan. Place the springform pan in a large baking pan with at least 2-inch sides. Bring 6 cups of water to a simmer; cover to keep warm.

2. In a food processor, process the graham crackers, sugar, and salt until evenly ground. Add the butter and pulse to combine, scraping the sides of the bowl as needed. Press the crumb mixture onto the bottom of the prepared pan. Bake until fragrant and browning slightly around the edges, about 10 minutes. Set aside to cool, maintaining the oven temperature.

3. For the lime custard: In the top of a double boiler or a heatproof bowl set over a saucepan of simmering water, whisk together the egg yolks, sugar, lime juice and zest. Cook, whisking frequently, until thick enough to coat the back of a spoon, about 8 minutes.

4. For the filling: In the bowl of a stand mixer fitted with the paddle attachment (or in a medium mixing bowl with a hand mixer), beat the cream cheese until smooth, about 1 minute. Add the sugar, salt, and lime zest; beat until light, about 2 minutes. Add the eggs one at a time, beating just until each addition is incorporated. Add the lime juice, blending well.

5. Scrape the lime custard over the crust, spreading it into an even layer. Spoon the cream cheese filling over the custard. Add enough of the hot water to the larger baking pan to come 1 inch up the sides of the cheesecake pan. Bake until the middle of the cheesecake is almost set, but not puffed and center moves slightly when pan is gently shaken, about 45 minutes.

6. For the topping: Stir the sour cream and remaining 3 tablespoons sugar in a medium bowl to blend.

7. Remove the hot cheesecake from the oven, leaving it in the baking pan. Carefully spoon the sour cream mixture over the hot cheesecake; let it set a few seconds to soften, then smooth it into an even layer. Bake the cheesecake for 10 more minutes. Transfer it to a wire rack to cool completely, then cover and refrigerate overnight. (Can be made 2 days ahead.) Release the pan sides from cheesecake; serve.

key lime cheesecake 4

chocolate oreo blackberry cake

blackberry oreo cake 6

I know there are bakers out there who are sad when their birthday rolls around and none of their friends offer to bake them a cake, because their friends are all used to the baker making the cakes. Or maybe their friends don’t feel like their cake could ever live up to one of the baker’s cakes. But even if the baker is the one known for their delicious and beautiful birthday cakes, a birthday cake is more than dessert, it’s a gift, so I understand why people are disappointed when no one makes them one.

blackberry oreo cake 8

But I am not one of those bakers. Without family or a large group of friends nearby, my opportunities to make dramatic layer cakes are few and far between. My birthday is one of those rare chances, and I soak it up for all its worth. For me, letting me bake my own cake is the gift.

blackberry oreo cake 9

This year, I did have someone to share that cake with, when my family celebrated my birthday on vacation last week on the beach in Mexico. Vacation baking holds its own challenges, but I can adapt. I did as much as possible at home – mixing up the dry ingredients, measuring and crushing the oreos, and making and freezing the buttercream. The cake itself is an easy one to mix up, no mixer required, but the swiss meringue buttercream needed to be re-whipped after defrosting to restore its smooth and airy texture. My original intention was to smooth the buttercream over the top and sides of the cake and coat the cake with a glossy and dramatic chocolate glaze, but with the scalloped edges of the disposable pans I baked the cakes in, that seemed like a messy prospect. Fortunately, I love the look of an open-sided cake like this.

blackberry oreo cake 11

With eight people to share it with, this cake went fast! It probably doesn’t hurt that chocolate and berries are such a great flavor combination, not to mention that everyone loves moist cake and fluffy frosting. And the best part is that, since my family celebrated early and this cake was gone by my actual birthday, I get to make another cake just for me!

blackberry oreo cake 5

One year ago: Pesto
Two years ago: Banana Peanut Butter Muffins
Three years ago: Lemon Meringue Cake
Four years ago: Black (and Pink) and White Chocolate Cake

Printer Friendly Recipe
Chocolate Oreo Blackberry Cake (cake adapted from Dessert for Breakfast; buttercream adapted from Martha Stewart)

Makes one three-layer 8-inch cake

Note that the 8 ounces of blackberries is before straining. You should end up with about ¾ cup (which is 6 ounces both by weight and volume) of puree.

Cake:
2 cups (8 ounces) cake flour
2 cups (14 ounces) sugar
1 cup (4 ounces) Dutch-processed cocoa powder
1 teaspoon table salt
1 teaspoon baking powder
1 teaspoon baking soda
2 eggs, room temperature
½ cup vegetable oil
1 cup milk, room temperature
1 cup hot coffee

Buttercream:
8 ounces (by weight; about 1¼ cups) blackberries, pureed and strained
3 egg whites
1 cup (7 ounces) sugar
pinch salt
18 tablespoons (2¼ sticks) unsalted butter, at room temperature

For assembly:
18 Oreos, coarsely chopped or crumbled

1. For the cake: Adjust a rack to the middle position and heat the oven to 350 degrees. Grease and flour three 8-inch round pans.

2. In a large bowl, mix the flour, sugar, cocoa, salt, and baking powder, and baking soda. In a separate bowl, mix the eggs, oil, and milk. Pour the wet ingredients into the dry ingredients and whisk until evenly distributed. Pour in the coffee and mix until smooth.

3. Divide the batter evenly between the prepared pans. Bake for 25 to 35 minutes, until a toothpick inserted into the center of a cake comes out clean. Transfer to a wire rack and let the cakes cool for 10 minutes. Use a knife to loosen the sides of the cakes from the pans, then invert the cakes onto the wire rack and remove the pans. Cool completely before frosting.

4. For the buttercream: Combine the egg whites, sugar, and salt in a heatproof mixer bowl set over a pot of simmering water. Whisk until the sugar dissolves and the mixture registers 160 degrees on an instant-read thermometer. Remove the bowl from heat and attach it to a mixer fitted with the whisk attachment. Beat on medium-high speed until stiff peaks form and the mixture has cooled to room temperature, about 8 minutes. Reduce the speed to medium and add the butter, 2 tablespoons at a time, beating after each addition. With the mixer on low, add the strained blackberry puree, mixing just until incorporated. Use immediately, or cover and refrigerate for up to 3 days. (Bring to room temperature, and beat on low speed until smooth before using.)

5. To assemble the cake: If necessary, trim the top of each layer to make a flat, even surface. Transfer one layer to a cake plate or large platter. Spread one-third of the buttercream over the cake, then distribute one-third of the crushed cookies evenly over the buttercream. Repeat the layering of cake, buttercream, and oreos twice more. Serve immediately or loosely cover for up to 8 hours.

blackberry oreo cake 7

honey ice cream

honey ice cream 4

I’m a big fan of sweeteners that are more than just sweet. Sometimes granulated sugar is exactly what you want, when you’re sweetening something subtle, like a snickerdoodle where the sour flavor from cream of tartar is so important, or where you don’t want the sweetener to distract from the main event, like in almost anything chocolate. Other times, it’s fun to let the sweetener itself play the main role, and nothing does that better than honey. Except for maybe maple syrup.

honey ice cream 1

I’ve built up a bit of a honey collection over the last couple years, from craft fairs, the local natural food store, and my boss’s beekeeping hobby. While I would have loved to use the slightly smoky flavored mesquite honey my boss gave me, it’s still in the waxy honeycomb. Instead, I used up the last of an unlabeled jar I picked up last year at a honey tasting stand.

honey ice cream 2

Molly said the half cup of honey for a quart of ice cream that the original recipe called for was overpowering, so I went with 6 tablespoons, and it was perfect. The honey flavor doesn’t slap you in the face, but it doesn’t hide either. It’s just the right balance of honey and cream. Next up: maple syrup ice cream.

honey ice cream 5

One year ago: Chocolate Sorbet
Two years ago: Lemon Curd Tart
Three years ago: Puff Pastry Dough
Four years ago: Soba Salad with Feta and Peas

Printer Friendly Recipe
Honey Ice Cream (adapted slightly from Alice Medrich’s Pure Dessert via Orangette)

Makes about 1 quart

I’m assuming that scalding the milk has a point, but I don’t know what it is.

My honey was slightly crystallized, which may be why it took a while to dissolve into the milk, but with some vigorous whisking, it did eventually mix in evenly.

½ cup whole milk
6 tablespoons honey
⅛ teaspoon salt
2 cups heavy cream

1. In a small saucepan over medium heat, heat the milk until it begins to steam and bubbles form around the edge of the pot. Remove it from the heat and let it cool.

2. Whisk the honey and salt into the milk until dissolved. Add the cream. Cover and refrigerate to thoroughly chill, at least 2 hours or up to overnight.

3. Churn until it’s at least as thick as soft serve ice cream, 15 to 20 minutes. Transfer to a chilled container; freeze at least 2 hours before serving.

honey ice cream 7