shrimp and avocado ceviche

shrimp ceviche 6

Both times I’ve had barbacoa tacos for dinner, I’ve made this the same day – but not as an appetizer. When dinner is one of your absolute favorite foods, an appetizer just takes up valuable stomach space. But I love this dip almost as much as the barbacoa, and they’re a great match, so we have it for lunch instead.

shrimp ceviche 3

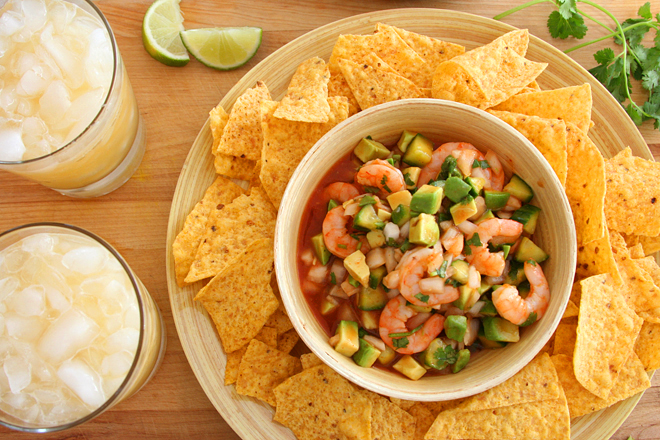
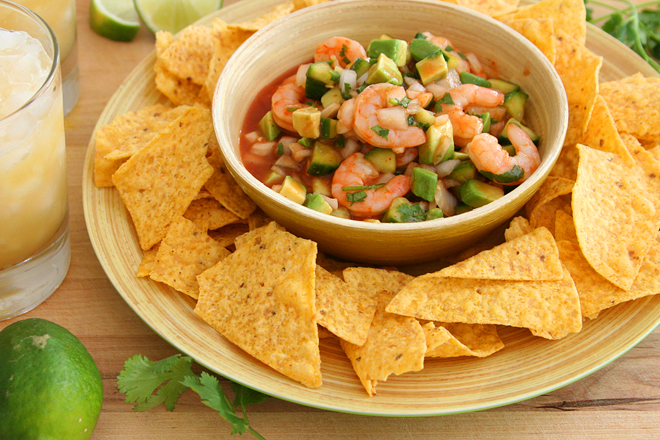
I appreciate that the shrimp are cooked first. Maybe that’s cheating, maybe that makes it something other than ceviche – I don’t care. It means I can have it without worrying about food poisoning, and that’s good enough for me.

shrimp ceviche 4

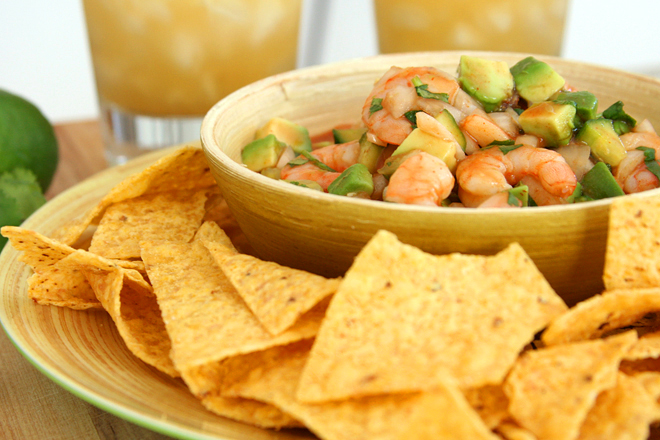
The cooked shrimp are marinated in lime juice, then mixed with avocados, cucumbers, onions, and cilantro. The dressing is made from more lime juice, olive oil, and, oddly, ketchup. I liked the tomatoey sweetness from the ketchup, but I didn’t like a lot of it – the second time I made this, I cut the ketchup down by half, and next time, I’ll use just half of that.

shrimp ceviche 2

Not that a little extra ketchupiness has stopped this from being my new favorite chip topper – yes, even more so than plain guacamole.  It has the avocado I love, but balanced by all this citrusy crunch.  This for lunch and barbacoa tacos for dinner make for a ridiculously good day of eating.

shrimp ceviche 7

One year ago: Fish Tacos
Two years ago: Tartine Country Bread
Three years ago: Spinach Artichoke Pizza
Four years ago: Tofu Mu Shu
Five years ago: Crockpot Pulled Pork

Printer Friendly Recipe
Shrimp and Avocado Ceviche (adapted from Rick Bayless’s Mexico One Plate at a Time via epicurious)

6 servings

I used 51/60 shrimp for this. The second time, I cut the shrimp in half after peeling so that they’d be about the same size as everything else in the dip – better for getting all sorts of goodies on a single chip.

½ cup plus 2 tablespoons fresh lime juice
1 pound unpeeled small shrimp
½ medium white onion, chopped into ¼ inch pieces
⅓ cup chopped fresh cilantro, plus several sprigs for garnish
2 tablespoons ketchup
2 tablespoons vinegary Mexican bottled hot sauce
1 tablespoon extra virgin olive oil
1 cup diced peeled cucumber or jicama (or a mix)
2 small ripe avocados, peeled, pitted and cubed
salt
Several lime slices for garnish
tortilla chips for serving

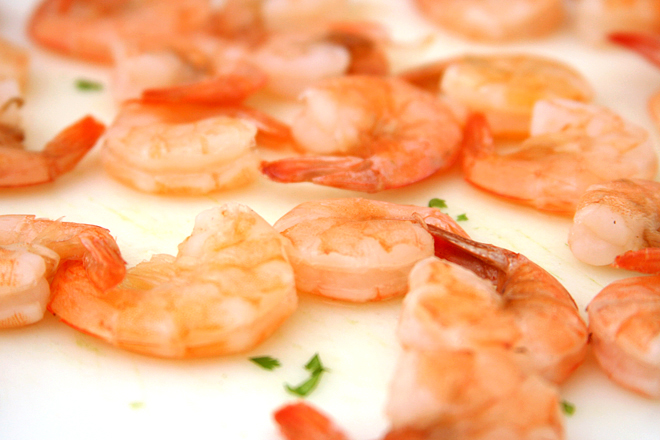
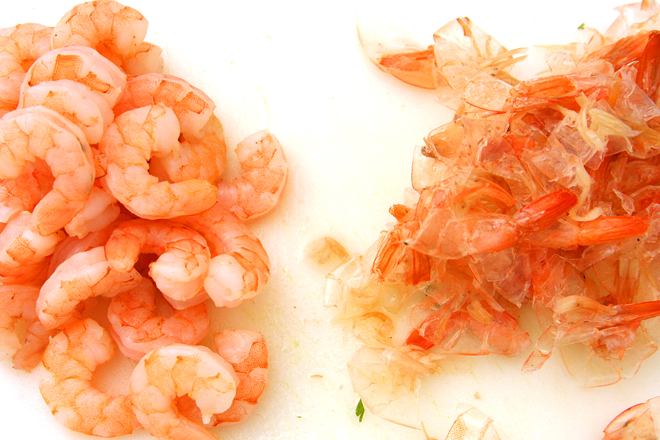
1. In a small saucepan, bring 2 cups of salted water to a boil; add 2 tablespoons of the lime juice and the shrimp. Cover the saucepan and let the water return to a boil. Once it boils, immediately remove the pot from the heat and pour off all the liquid. Replace the cover and let the shrimp steam off the heat for 8 minutes. Transfer the shrimp to a large glass or stainless steel bowl to cool completely. Once cook, peel and devein the shrimp. Toss the shrimp with the remaining ½ cup lime juice; cover and refrigerate for about an hour.

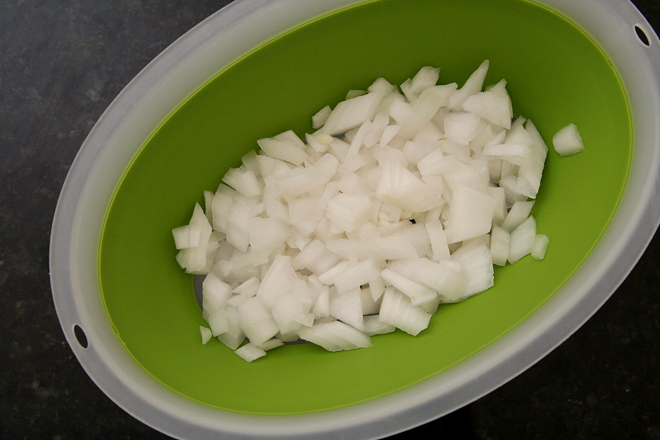
2. After the shrimp has marinated, in a small strainer, rinse the diced onion under cold water, then shake off the excess liquid. Add to the shrimp bowl along with the cilantro, ketchup, hot sauce, olive oil, cucumber and/or jicama, avocado, and ¼ teaspoon salt. Cover and refrigerate if not serving immediately.

3. Spoon the ceviche into sundae glasses, martini glasses, or small bowls; garnish with sprigs of cilantro and slices of lime. Serve with tortilla chips.

shrimp ceviche 5

ultimate seven-layer dip

seven layer dip 4

Seven layer dip has become a holiday tradition in my family, and most of the work is usually assigned to a son-in-law. The rest of us have long-since fallen into a routine; my mom makes the turkey, my sister makes mashed potatoes, my brother makes stuffing, my dad is coerced into making the green bean casserole. For a long time, my mom asked my sister’s husband to make seven layer dip, but recently, that job has often gone to Dave.

seven layer dip 1

With a can of refried beans, sour cream, mayonnaise, cheese, and guacamole, it’s an irresistible treat best saved for holidays. When I saw Cook’s Illustrated’s version, I thought I might be able to lighten it up. This recipe uses canned black beans, pureed with seasonings, for the bean layer. The sour cream could easily be replaced with lower fat Greek yogurt. Chopped salsa-like vegetables added freshness.

seven layer dip 2

It creates a number of extra steps that result in this recipe being considerably more effort than Dave would be willing to exert – I think. Because it also resulted in a dip that Dave and I both raved about as we ate. Dave, vegetable lover that he is, loves the lighter, fresher taste. For me, the biggest difference was that every bite wasn’t full of guilt. That’s worth some extra effort.

seven layer dip 5

One year ago: Strawberry Daiquiri Ice Cream
Two years ago: Chicken Fajitas
Three years ago: Black Bean Squash Burritos
Four years ago: Lemon Cream Tart

Printer Friendly Recipe
Ultimate Seven-Layer Dip (from America’s Test Kitchen Feed)

Serves 8 to 10

CI note: This recipe is usually served in a clear dish so you can see the layers. For a crowd, double the recipe and serve in a 13 by 9-inch glass baking dish. If you don’t have time to make fresh guacamole as called for, simply mash 3 avocados with 3 tablespoons lime juice and ½ teaspoon salt.

This is exactly the original recipe. I made just a few small changes: Greek yogurt for the sour cream, cheddar for the pepper Jack, and I made a simple guacamole as described in Cook’s Illustrated’s note, above.

4 large tomatoes, cored, seeded, and chopped fine
2 jalapeño chiles, seeded and minced
3 tablespoons minced fresh cilantro
6 scallions, 2 minced and 4 with green parts sliced thin (white parts discarded)
2 tablespoons fresh lime juice plus 2 teaspoons, from 2 limes
¼ teaspoon salt
1 can black beans (16-ounces), drained but not rinsed
2 cloves minced garlic
¾ teaspoon chili powder
1½ cups sour cream
4 cups (16 ounces) shredded pepper Jack cheese
3 cups chunky guacamole
Tortilla chips for serving

1. Combine the tomatoes, jalapeños, cilantro, minced scallions, and 2 tablespoons lime juice in a medium bowl. Stir in ⅛ teaspoon salt and let stand until the tomatoes begin to soften, about 30 minutes. Strain the mixture into a bowl and discard the liquid.

2. Pulse the black beans, garlic, remaining lime juice, chili powder, and remaining salt in the food processor until it resembles a chunky paste. Transfer to a bowl and wipe out the food processor. Pulse the sour cream and 2½ cups (10 ounces) of the cheese until smooth. Transfer to a separate bowl.

3. Spread the bean mixture evenly over the bottom of an 8-inch square glass baking dish or 1-quart glass bowl. Spread the sour cream mixture evenly over the bean layer, and sprinkle evenly with the remaining cheese. Spread the guacamole over the cheese and top with the tomato mixture. Sprinkle with the sliced scallions and serve with tortilla chips. (The dip can be refrigerated for up to 24 hours. Let the dip stand at room temperature for 1 hour before serving.)

seven layer dip 6

homemade mustard

mustard 7

My sister got me hooked on fancy mustard by buying me a jar of champagne mustard for Christmas a couple years ago. I had had no idea that mustard could taste so good. It was tangy, a little spicy, maybe just a bit sweet. We slathered it on bread, no other toppings necessary. It’s still the best mustard I’ve ever tasted, despite a newfound appreciation for the variety and quality that was possible in mustards. Right now I have four mustards in my fridge – a whole grain version, a smooth French Dijon (this one is sharp!), red chile mustard, and a generic Dijon I use for cooking.

mustard 1

But then my sister took my mustard fixation one step further when she started mixing up her own mustards. While I’d always had some vague idea of the relationship between prepared mustard and the mustard powder I add to my roux for mac and cheese, it had never occurred to me to take it to the next step and make homemade mustard. But the types she was making, flavored with herbs, cognac, or beer, sounded too good to pass up.

mustard 3

The article she led me to had six mustard recipes, and never one to be able to make a decision, I opted to make three of them. Mustard is easy enough that this was reasonable – to make, although it was far too much mustard for us to eat. All of the recipes required several days of soaking mustard powder or seeds in vinegar, but then one just needed to be blended and the other two were cooked briefly over a double boiler.

mustard 2

The thing about making condiments (or anything, really) from scratch is that they really need to be better than a storebought version to justify the effort.  On that note, the rosemary thyme mustard was by far my favorite. Not only was the texture just right – thick with fun mustardy bits when you pop the seeds in your mouth – but this was a flavor you don’t often see for sale.  The other two mustards I made, which both required an egg and a trip over the double boiler, ended up too thin, but I still loved the sweet flavor of the agave version. The bright yellow beer mustard certainly wasn’t bad, but it had a lot more bite than the others.  And if I thought I was fixated on mustards before, that was nothing to how I am now that I know I can make any flavor I want.

mustard 5

One year ago: Scampi fra Diavolo
Two years ago: Chicken Mushroom Spinach Lasagna
Three years ago: Lemon Poppy Seed Waffles
Four years ago: Whole Wheat Pasta with Greens, Beans, Tomatoes, and Garlic Chips

Printer Friendly Recipe
Rosemary Thyme Mustard (from Sunset magazine)

3 tablespoons yellow mustard seeds
1 tablespoon brown mustard seeds
3 teaspoons minced fresh thyme, divided
2 teaspoons minced fresh rosemary
⅓ cup apple cider vinegar
1 teaspoon light brown sugar
¾ teaspoon salt

1. Stir together the mustard seeds, 2 teaspoons thyme, the rosemary, ⅓ cup water, and the vinegar in a bowl until seeds are submerged. Let sit at room temperature, covered, 2 to 3 days.

2. Put the mustard mixture in a blender along with the brown sugar and salt and blend until mixture is thick but still coarse-textured. Stir in the remaining 1 teaspoon thyme. (Can be made 2 weeks in advance. Cover and refrigerate.)

Printer Friendly Recipe
Seeded Agave Nectar Mustard (from Sunset magazine)

¼ cup Colman’s dry mustard
½ cup white wine vinegar
¼ cup agave nectar
2 teaspoons canola oil
2 tablespoons black or brown mustard seeds
1 large egg
1 teaspoon salt
2½ teaspoons cornstarch

1. Stir together the dry mustard, vinegar, 2 tablespoons water, and agave nectar in a medium metal bowl until smooth. Chill, covered, overnight.

2. Put the oil and mustard seeds in a small frying pan and heat over medium heat, covered. As soon as the mustard seeds start to pop, about 3 minutes, remove from the heat. Let cool.

3. Bring a medium saucepan filled with 1 inch of water to a simmer. To the mustard-vinegar mixture, add the toasted mustard seeds in oil, the egg, salt, and cornstarch and whisk to blend. Set the bowl over the simmering water and cook, whisking constantly, until the mustard thickens, 3 minutes. (Can be made 2 weeks in advance. Cover and refrigerate.)

mustard 4

Printer Friendly Recipe
Ballpark Beer Mustard (from Sunset magazine)

¼ cup Colman’s dry mustard
½ cup light-bodied beer
1 teaspoon turmeric
1 egg
1¼ teaspoons salt
1 teaspoon cornstarch
½ teaspoon lemon juice
½ teaspoon sugar

1. Whisk together the dry mustard, beer, 2 tablespoons water, and turmeric in a medium metal bowl until smooth. Chill, covered, overnight.

2. Bring a medium saucepan filled with 1 inch water to a simmer. To the bowl of the mustard mixture, add the egg, salt, cornstarch, lemon juice, and sugar; whisk to blend. Set the bowl over the simmering water and cook, whisking constantly, until the mustard just thickens, 4 to 6 minutes. (Can be made 2 weeks in advance. Cover and refrigerate.)

mustard 6

Sadly, I had to punt on the mozzarella I had originally hoped to make this month, because I haven’t figured out where I can get milk that isn’t ultrapasteurized.

smoked salmon mousse

salmon mousse 6

Having friends with kids when you don’t have kids is tricky. I appreciate being invited to their house for dinner, but I’m not sure how best to reciprocate, especially with people who don’t have family in the area to be built-in babysitters. One solution a friend and I came up with is to have dinner at her house, but split the cooking. That way, we all get to hang out, she doesn’t have to do all of the hostess work, I get to cook, and the kids can still go to bed at their normal time and place.

salmon mousse 2

The last time we did this, we decided to each make a few small dishes rather than one big meal. I had lots of ideas, but nearly all of them were based on carbs, like green chile fettuccine alfredo (which I did make), empanadas, crostini, and California rolls. I settled on cucumber slices to replace the bread in crostini, not to mention add some vegetables to the menu.

salmon mousse 3

Salty smoked salmon is perfect with watery cucumber. Piping stars on the slices is so pretty, and what’s more, the mousse is extremely easy to make – it’s nothing more than blending a few ingredients together in the food processor. With these little bites, I didn’t miss carbs one bit. In fact, the only people who didn’t like these were the kids.

salmon mousse 4

One year ago: Roasted Vegetable Bean Soup
Two years ago: Applesauce Snack Cake
Three years ago: Spinach Artichoke and Red Pepper Strata

Printer Friendly Recipe
Smoked Salmon Mousse (adapted from Annie’s Eats and allrecipes)

Makes about 25 appetizers

3 ounces smoked salmon
4 ounces cream cheese, softened
1 teaspoon lemon juice
1 teaspoon fresh minced dill
Black pepper

Place the smoked salmon in a blender or food processor; blend until smooth. Add the remaining ingredients and blend to desired consistency. To serve, pipe the mousse onto cucumbers slices or crackers, or serve as a dip.

salmon mousse 7

baked reuben dip

You don’t have to make this the way I made this. Making things more difficult than necessary is the way I do things, but I understand that I am a weirdo. Feel free to buy corned beef at the deli instead of brining and boiling your own brisket. I’m sure you can also pick up some perfectly respectable rye bread. I draw the line at using Thousand Island salad dressing instead of mixing up a few ingredients for the traditional Russian dressing (which is similar, but not identical, to Thousand Island).

I make mayonnaise-based baked dips exactly once a year, for the Super Bowl. Because I love them, but they are, after all, a bowl of fat that you spread on carbs.  This was our third-quarter snack, and even after a quarter of chips and dips and another of vegetables with dip, we scarfed down a considerable amount of this dip.

My biggest worry with this recipe was that it was not a sandwich, as reubens are one of Dave’s favorite foods. I was fully expecting Dave to consider this “good…but I’d rather just have a reuben.” He said nothing of the sort. Now that’s a good dip – fully worthy of being my one choice this year, and, it goes without saying, of the time I spent obsessively making most of the components from scratch.

One year ago: Honey Ginger Pork Tenderloin
Two years ago: Chicken Artichoke Pesto Calzones
Three years ago: Banana Walnut Pancakes

Printer Friendly Recipe
Baked Reuben Dip
(adapted liberally from allrecipes and epicurious)

Serves 4

See that thick layer of swiss cheese on top? Don’t do that. Let the mixture itself brown, not just the cheese. There’s no need to have a layer of cheese armor on top of the dip.

I used the food processor to shred the cheese, chop the meat, and mix everything. All that mixing probably accounts for the uniform grey-ness of my dip. Another factor is that my home corned beef is more of a muted purple color than storebought version because it doesn’t have the nitrates that keep the meat red.

I just actually read through that allrecipes recipe for the first time, and apparently it doesn’t call for mixing all of the ingredients together anyway, just layering them. That might make this more attractive too. Although sometimes taste trumps looks, and ugly food is okay.

¼ cup mayonnaise
2 ounces cream cheese, softened
1 tablespoon ketchup
1 tablespoon grated onion
1 tablespoon horseradish
1 teaspoon Worcestershire sauce
2 tablespoons minced parsley
8 ounces sauerkraut, rinsed and squeezed dry
4 ounces corned beef, shredded
6 ounces (1½ cups) shredded Swiss cheese

Preheat oven to 350 degrees. In a large bowl, mix the mayonnaise, cream cheese, ketchup, onion, horseradish, Worcestershire sauce, and parsley until evenly combined. Stir in the sauerkraut, beef, and cheese. Spread the mixture in a 1-quart casserole dish. Bake 20-25 minutes, until bubbling and golden. Serve with rye bread.

sun-dried tomato jam

Copy of IMG_0278

Crusty bread, cheese, cured sausage, fruit. It’s a seriously underestimated meal. Yes, a meal. Not a particularly healthy one, I admit, but it does cover all of the nutritional bases, as long as you make an extra effort to eat a lot of the fruit. It doesn’t hurt to use 100% whole wheat bread either.

Copy of IMG_0255

And if you add a bit of tomato jam, you’ve just given yourself one more healthy-ish vegetably option. (“Healthy-ish” and “vegetably” really is how I think about nutrition. It seems to sorta kinda work.) The jam is just sautéed and then stewed vegetables.

Copy of IMG_0266

The result is a perfect counterpart for creamy or sharp or tangy cheese (or one of each!), salty salami, and fresh berries or grapes. The jam is both sweet and savory, fantastic spread on a slice of baguette by itself or combined with cheese. Definitely a great addition to one of my favorite somewhat indulgent meals.  Or maybe you’re a normal person and would serve this as an appetizer?  I guess that would work too.

Copy of IMG_0288

Printer Friendly Recipe
Sun-dried Tomato Jam
(adapted from Everyday Italian via Confections of a Foodie Bride)

The original recipe is for crostini with goat cheese, but I thought the jam was a great addition to a cheese plate on its own.

If you can find pre-sliced dried tomatoes, your life will be much easier.  Chopping greasy, slippery tomatoes is the hardest part of this recipe.

Makes about 1½ cups

8oz jar sun-dried tomatoes packed in oil, drained and chopped, oil reserved
1 tablespoon olive oil
½ onion, thinly sliced
1 clove garlic, minced
2 tablespoon sugar
¼ cup red wine vinegar
1 cup water
½ cup chicken broth
1 teaspoon chopped fresh thyme leaves
½ teaspoon salt
½ teaspoon freshly ground black pepper

1. Place a medium saucepan over medium heat. Add the chopped sun-dried tomatoes, 1 tablespoon of the reserved sun-dried tomato oil, olive oil, onion, and garlic. Stir and cook until the onions are soft and beginning to brown at the edges, about 5 to 7 minutes.

2. Add the sugar, vinegar, water, chicken broth, thyme, salt, and pepper. Bring the liquid to a boil, reduce the heat, and simmer, covered, for 30 minutes. Remove the cover and continue simmering until most of the liquid is reduced and the mixture is the consistency of jam, about 5 to 10 more minutes. Remove from the heat, let cool slightly, and serve.

Copy of IMG_0280

goat cheese, pesto, and sun-dried tomato terrine

Copy of IMG_9428

Dave is, it should come as no surprise to me by now, quite a good match for me. I used to wish that he was as excited about food as I was. I’d ask him for meal ideas, I’d demand feedback after trying a new recipe, and I wished he’d cook with me. Invariably, his replies were, respectively, “salmon pesto pasta”, “good”, and “sure, someday.”

Which, actually – is fine by me. Do I really need someone picking apart each dish I make? Or adding even more ideas to an already overstuffed recipes-to-try folder? Or taking up valuable cooking opportunities?

Copy of IMG_9404

No, his uncritical, always-appreciative, open-minded attitude toward food is perfect. And when he does get excited by a dish, I know to take note, like when he came home from a work party raving about a goat cheese pesto spread someone had brought.

Copy of IMG_9406

What you do is line a bowl with plastic wrap, then spread some softened goat cheese in the bottom. You’re supposed to make the goat cheese spreadable by adding cream, but I used milk and it worked just fine. Over the first layer of goat cheese, you add some pesto, then more goat cheese, then minced sun-dried tomatoes and chopped toasted pine nuts, then more goat cheese. After chilling for a few hours, it inverts nicely, and you pull the plastic wrap off to reveal nice layers.

Copy of IMG_9411

Wow, what a great combination of ingredients. The sweetness of the sun-dried tomatoes balances the tart goat cheese, and pesto is always delicious.  I served it with a whole wheat baguette, and we ate, um, a lot of it. It was completely irresistible.

Copy of IMG_9433

One year ago: Lavash Crackers and Pesto Goat Cheese Spread (Hi! I like pesto! And goat cheese!)

Printer Friendly Recipe
Goat Cheese, Pesto, and Sun-Dried Tomato Terrine
(from Fine Cooking)

Dave did tell me, too late, that his coworker had advised that one of the tricks to making the terrine look neat was to not overfill the intervening layers. That would have been nice to know before I spooned in a bunch of extra pesto.

My personal preference would have been for one more tomato. Dave didn’t agree.

10 ounces goat cheese
¼ to ½ cup heavy cream
Kosher salt and freshly ground black pepper
3 tablespoons basil pesto (homemade or store-bought)
5 oil-packed sun-dried tomatoes, drained and finely chopped
¼ cup pine nuts, toasted and coarsely chopped
Extra-virgin olive oil for drizzling

1. Line the inside of a 2-cup sharply sloping bowl (about 4 inches across the top) with plastic; let the ends extend over the sides a few inches. In a mixing bowl, mash the goat cheese and ¼ cup of the cream with a fork and season with ¼ teaspoon salt and a few grinds of pepper; add more cream if the cheese hasn’t softened.

2. Spoon about one-third of the cheese into the lined bowl and pack it into an even layer. Spread the pesto almost completely to the sides of the first layer of cheese. Top with another third of the cheese, the sun-dried tomatoes, and all but ½ tablespoon of the pine nuts. Top with the remaining cheese. Pack down, fold the plastic over, and refrigerate for at least 30 minutes.

3. Half an hour before serving, take the bowl out of the refrigerator. Pull on the edges of the plastic to loosen the terrine from the bowl. Invert the terrine onto a plate, drizzle with a little olive oil, and let sit for ½ hour to warm up. Sprinkle with the remaining pine nuts, season liberally with pepper, and serve.

Copy of IMG_9427

honey yogurt dip

copy-of-img_1756

Dave and I, for better or worse, don’t have the types of jobs that we can just forget about when we leave work at the end of the day. As a result, we often have to work on weekends. One particularly stressful weekend, I decided that we should make weekend working an event, where we set aside a few hours to sit down at the table together and get our work done. And what I really mean when I say ‘event’ is that I want snacks.

copy-of-img_1653

Since we were being industrious and working, it made sense to keep the snacks on the healthy side. Plus they were replacing dinner, so they needed to be nutritionally well-rounded. This fruit dip was exactly what I was looking for – easy, healthy(ish), and finger-food friendly.

copy-of-img_1644

Calling this a recipe may be overstating things a bit – it’s really just yogurt sweetened with honey and enhanced with a pinch of cinnamon. The original recipe recommended vanilla yogurt, but a number of the reviewers indicated that the result was too sweet. Another common complaint was that the dip was too thin. I thought using Greek yogurt would solve both problems at once.

copy-of-img_1651

It was a good change apparently, because the dip was perfect – fresh and light, plus just a little spicy from the cinnamon. It enhanced our fruit without overpowering it. Unfortunately, the dip was a lot more successful than working was for me that weekend – I found myself all too easily distracted. But at least I was eating fruit, right?

copy-of-img_1750

One year ago: Green Chile Chicken Enchiladas

Yogurt Honey Dip (adapted from Bon Apetit July 1998, but really epicurious.com)

Makes about 1 cup, or 4 servings

I have to admit that I didn’t measure anything when I made this. It’s pretty much a to-taste thing anyway, just keep in mind that the flavor of the cinnamon didn’t really come through until the dip had been chilled for a few hours.

1 (7-ounce) container plain Greek yogurt
3-4 tablespoons honey
1/8-¼ teaspoon ground cinnamon

Mix the ingredients together. Cover and chill for at least 2 hours or up to 2 days. Serve with fresh fruit.

copy-of-img_1751

herbed lima bean hummus

copy-of-img_1461

I don’t blame Tuesdays with Dorie for my pants being too tight to button by the end of 2008.  I blame unemployment.   Instead of grabbing my standard healthy snacks and eating them at work because they were the only food available, I would pass over the bananas and carrots at home and fill up on cookie dough instead.

copy-of-img_1214

So one of my goals for 2009, since I’m still working at home a few days per week, is to make those healthy snacks more enticing. For bananas, it’s as simple as eating them with peanut butter or Nutella. The carrots, or whatever other raw vegetable I end up eating, cry out for some sort of dip. But anything based on mayonnaise and/or sour cream just defeats the purpose.

copy-of-img_1217

Fortunately, there’s plenty of bean dips out there to explore. This one, which isn’t like traditional hummus at all, is based on lima beans, a bean that I don’t have much experience with. The cooked lima beans are pureed along with aromatics, herbs and seasonings.

copy-of-img_1219

The original recipe called for the onion and garlic to be boiled along with the beans, but who wants boiled onion? Yuck. I took many of the recipe reviewers’ recommendations to sauté the onions and garlic instead. The recipe also calls for mint and dill, but I didn’t have any and didn’t miss it. Finally, I reduced the olive oil just a bit, since the whole point here is to make a healthy snack.

The resulting dip is a pretty green color with a very nice, sort of sweet, flavor. It made my daily carrot, which I guarantee wouldn’t have gotten eaten otherwise, much more enjoyable, but no less healthy.

copy-of-img_1463

One year ago:  Moo shu

Herbed Lima Bean Hummus (adapted substantially from Gourmet, via epicurious)

Makes about 2 cups

1-2 tablespoons extra-virgin olive oil, plus more for serving, if desired
½ large onion, chopped
3 garlic cloves, smashed with side of a large knife
½ teaspoon salt
1 (10-oz) packages frozen baby lima beans
2 tablespoons chopped fresh cilantro
2 tablespoons chopped fresh flat-leaf parsley
½ teaspoon ground cumin
⅛ teaspoon cayenne, or to taste
2 tablespoons fresh lemon juice

1. Over medium heat, heat 1 tablespoon oil in medium skillet. Add onions and cook, stirring occasionally, until they’re just starting to brown around the edges. Add the garlic and salt, stir, then remove from the heat.

2. Meanwhile, in a medium saucepan, bring lima beans and 1 cup water to a boil over high heat. Cover, lower heat, and simmer for 6-8 minutes, until tender. Drain.

3. Add onion mixture, beans, and all remaining ingredients to a food processor and process until smooth. Add more oil if the dip seems too thick.

4. Transfer dip to a serving bowl and drizzle with remaining tablespoon oil, if desired. Serve with crudité or toasted pita wedges. (Dip can be covered and stored in refrigerator for up to 3 days.)

asian peanut dip

copy-of-copy-of-img_80881

I keep my eye out for vegetables dips that aren’t ridiculously unhealthy. The thing is, when I serve some sort of meat that’s finger food, I don’t like to serve a vegetable that requires silverware. The perfect accompaniment is crudité (snobby way of saying vegetables eaten as a snack) with a dip, but most dips are nothing more than seasoned mayonnaise and sour cream. Not that I don’t love mayonnaise and sour cream, but I don’t always want to think of the dip as a treat.

copy-of-img_8078

I’ve found one vegetable dip that’s a little healthier, and now I have another one. When struggling to figure out what to serve with the shrimp tempura recipe I was testing for Cooks Illustrated, I remembered that my friend had recently made this great spicy peanut dip on a camping trip. She got the recipe from Backpacker magazine, but when I searched on the internet, I saw that there were many similar recipes, most just as easy as the one we had the on the trip. There were slight variations between each, and I decided to stick with the Backpacker magazine one because it uses rice vinegar instead of lime juice for its acidity, which I’d really enjoyed.

copy-of-img_8020

(Clearly at the time I didn’t realize I’d blog about this at some point, or I would have taken a more flattering/interesting photo.)

The recipe, designed as it is to be made outdoors on a single-burner backpacking stove, is simple. I’ve tweaked the instructions just slightly, to bring the most flavor out of the red pepper and to tame the bite of the garlic. I also increased the seasoning and decreased the amount of red pepper flakes. It seemed far spicier when I made it at home than it did on the trip, maybe because I heated the flakes in oil first. And of course we didn’t add the scallions when we were camping – who brings scallions on a multi-day canoeing trip?

copy-of-img_8080

Usually, we adapt our favorite meals to be appropriate outdoors. I think this is the first time I’ve adapted a backpacking recipe for home, but this is a great recipe to have. I know peanut butter isn’t exactly a low-fat ingredient, but it’s a heck of a lot healthier than mayonnaise or sour cream, and this dip is just as good as more decadent vegetable dips.

copy-of-img_8086

Asian Peanut Dip (adapted from Backpacker Magazine)

Serves 4

1 teaspoon canola or vegetable oil
1 garlic clove, minced
½ teaspoon red pepper flakes
½ cup water
½ cup peanut butter, creamy or chunky
4 tablespoons soy sauce
2 tablespoons rice vinegar
1 scallion, sliced
salt to taste

In a small saucepan over medium heat, heat oil, garlic, and red pepper flakes. Cook, stirring frequently, until garlic is fragrant, 1-2 minutes. Add water, increase heat to high, and bring to boil. When water boils, remove pan from heat and add peanut butter, stirring until smooth. Stir in remaining ingredients (saving some scallion slices for garnish, if desired). Return to heat and continue stirring for 2-4 minutes until mixture is thickened. Serve warm or cold with crackers or crudité.