sushi bowls

I’m so proud of this recipe. I actually came up with the idea on my own. Whoa. Not that sushi ingredients mixed up in a bowl is a groundbreaking idea, but that isn’t the point. The point is that I didn’t know there was already a recipe out there when I came up with it. I was creative! That never happens!

The inspiration behind my big idea was that Dave and I love sushi, but making it is a pain in the ass and going out to eat all the time isn’t feasible. So I figured, why bother making cute little sushi rolls – it’s the ingredients that we like, not their shape. I decided to mix up the ingredients in a bowl and call it a day.

And that makes this a pretty darn easy meal. Sushi rice takes only a little more effort than basic long-grain rice does, and that’s the only ingredient in this recipe that needs to be cooked.

I’ve made this a few times now, and once I used smoked salmon instead of raw tuna. I used smoked salmon twice when I made sushi rolls, and I thought it was good. It’s convenient, and I thought it might be a good option for people who aren’t comfortable eating raw fish. But when I used it in the sushi bowls, it was so salty that it kind of ruined the whole dish. I’m not sure if there’s a difference between brands or if all smoked salmon is so salty. I bought the cheapest brand, because that stuff always surprises me by how expensive it is.

But, every other time I’ve made this, it’s been just so good. And healthy! Look at all that green stuff. There’s no added fat in the recipe; the only fat involved is what’s naturally in avocado, sesame seeds, and the fish. That makes this a super tasty, easy, healthy, balanced meal on its own. It’s perfect.

Printer Friendly Recipe
Sushi Bowls

I’ve used raw tuna, smoked salmon, and imitation crab in this, all with very good results.  If you’re using salty smoked salmon, reduce the salt in the rice mixture slightly.

4 servings

1⅓ cups rice, rinsed well
1⅓ cups water
¼ cup soy sauce
wasabi to taste, probably at least 2 teaspoons
4 teaspoons rice vinegar
4 teaspoons sugar
½ teaspoon salt
2 (8 by 7-inch) sheets nori, cut into strips 1½ inches long and ⅛ inch wide
1 avocado, pitted, flesh scooped from skin and cut into chunks 1 inch long and ¼ inch wide
1 cucumber, peeled and cut into matchsticks 1½ inches long and ⅛ inch wide
2 green onions, halved lengthwise and cut into strips 1 inch long
8 ounces sushi-grade fish
¼ cup sesame seeds, toasted

1. Rinse the rice. Place the rice and water in a medium saucepan and bring to a boil over high heat, uncovered. Once it begins to boil, reduce the heat to the lowest setting and cover. Cook for 15 minutes. Remove from the heat and let stand, covered, for 10 minutes.

2. Meanwhile, combine the soy sauce and wasabi in a small bowl. Combine the rice vinegar, sugar and salt in a separate small bowl and heat in the microwave on high for 30 to 45 seconds, until the sugar dissolves. Transfer the rice into a large wooden or glass mixing bowl and add the vinegar mixture. Fold and cut thoroughly to combine and coat each grain of rice with the mixture. Fan until rice is near room temperature. (If you use an electric fan, this will only take about a minute.) Do not refrigerate.

3. Combine rice, wasabi mixture, and remaining ingredients. Serve.

gazpacho

While everyone else has been getting excited about fall, publishing recipes with pumpkin and apples and cranberries, I’ve been desperately holding on to summer. Not only do I just plain like being warm, but I didn’t get my fill of summer produce this year. I only ate corn on the cob one time – just one! I’m a disgrace. And I can never get enough of flavorful seasonal tomatoes.

Gazpacho, to me, is the quintessential summer dish, putting the spotlight on tomatoes, with cucumbers and peppers singing backup. I served this gazpacho to a friend of mine from Spain, and he said that it was as good as any gazpacho he’d had over there. This is good stuff.

I’ve always been a big fan of traditional hot tomato soup, and I didn’t understand the allure of gazpacho when I was young – cold tomato soup? Yuck. But gazpacho made correctly isn’t anything like a smooth tomato soup. I like gazpacho to have more in common with salad than soup. That means that the vegetables have to be chopped by hand instead of in the food processor. It takes more time, but it’s worth it to eat real gazpacho instead of the vegetable smoothie that you’d end up with if you used the food processor.

Another great aspect of gazpacho is that it lasts for several days in the fridge. And it’s absolutely healthy, so it makes a really good snack. I love to keep some around for when I get home from work and I’m starving and dinner won’t be ready for a while.

Right after I finished dicing the vegetables for this, I inhaled deeply – it was pure summer. I felt better about letting the season go and moving into fall once I had made a batch of gazpacho. But don’t expect to see pumpkin recipes here for a while!

Gazpacho (from Cooks Illustrated)

CI note: Welch’s and Fresh Samantha’s are our favorite brands of tomato juice for this recipe — not too thick, with a bright, lively flavor. This recipe makes a large quantity because the leftovers are so good, but it can be halved if you prefer. Traditionally, diners garnish their gazpacho with more of the same diced vegetables that are in the soup, so cut some extra vegetables when you prepare those called for in the recipe. Additional garnish possibilities include simple garlic croutons, chopped pitted black olives, chopped hard-cooked eggs, and finely diced avocados. For a finishing touch, serve in chilled bowls.

Bridget note: I’ve found that the brand of tomato juice is extremely important. I’m never been able to find Welch’s or Samantha’s tomato juice, but Campbell’s works fine. And I never use ice cubes, I just add 1 cup of cold water.

Makes about 3 quarts, serving 8 to 10

3 ripe medium beefsteak tomatoes (about 1½ pounds), cored and cut into ¼-inch cubes (about 4 cups)
2 medium red bell peppers (about 1 pound), cored, seeded, and cut into slices, then into ¼-inch cubes (about 2 cups)
2 small cucumbers (about 1 pound), one peeled and the other with skin on, both seeded and cut into ¼-inch cubes (about 2 cups)
½ small sweet onion (such as Vidalia, Maui, or Walla Walla) or 2 large shallots, peeled and minced (about ½ cup)
2 medium cloves garlic, minced or pressed through a garlic press (about 2 teaspoons)
2 teaspoons table salt
⅓ cup sherry vinegar
ground black pepper
5 cups tomato juice
1 teaspoon hot pepper sauce (optional)
8 ice cubes
extra-virgin olive oil for serving

1. Combine the tomatoes, bell peppers, cucumbers, onions, garlic, salt, vinegar, and pepper in a large (at least 4-quart) nonreactive bowl. Let stand until the vegetables just begin to release their juices, about 5 minutes. Stir in the tomato juice, hot pepper sauce, if using, and ice cubes. Cover tightly and refrigerate to blend flavors, at least 4 hours and up to 2 days.

2. Adjust the seasonings with salt and pepper and remove and discard any unmelted ice cubes. Serve cold, drizzling each portion with about 1 teaspoon extra-virgin olive oil and topping with the desired garnishes, (see top note).

tuscan-style couscous salad


Food generally tastes better outside. Even more so after you’ve hiked eight miles while carrying a 25-pound pack. Since Dave and I almost always eat this couscous salad while we’re backpacking, it’s no wonder we like it so much. But last time we went camping, we got driven home early by, um, we’ll just say fear of Lyme disease and spare you the creepy details. We ate this salad when we got home that night, and it tasted just as good while sitting on the couch watching a movie as it does when we’re eating it out of zip-top bags in the woods.

What’s so great about this salad is that it’s a perfectly balanced complete meal – a couscous base, both beans and nuts, and plenty of tomatoes, onions, and basil. There’s no real cooking involved and not much chopping.

I have tweaked the original recipe slightly – while it’s basically the same list of ingredients, I’ve doubled the amount of pine nuts, tomatoes, basil, and onion. I’ve also reduced to the olive oil in the dressing, which I do with most vinaigrettes recipes.

One final change I make to the original recipe is to toast the unpeeled garlic cloves before adding them to the dressing. Lately I’ve been unhappy with the sharpness of raw garlic, and toasting it mellows its flavor a bit. It’s still garlicky and good, but it won’t burn your tongue. And since the pine nuts are already being toasted, it’s no problem to add the garlic cloves to the skillet as well.

Between the vivid colors of this dish, its healthfulness, the ease with which it comes together, and of course, its flavorful mix of ingredients, this salad is well worth eating at home and in the woods.

Tuscan-Style Couscous Salad (adapted from Vegetarian Classics, by Jeanne Lemlin)

Serves 4 as a main course

1½ cups couscous
½ teaspoon turmeric
2 cups boiling water
½ cup pine nuts
1 (15-ounce) can small white beans such as navy or Great Northern, rinsed well and drained
1 pint cherry tomatoes, halved
¾ cup shredded fresh basil
1 small red onion, slivered

The dressing:
3 garlic cloves, unpeeled
⅓ cup lemon juice
½ teaspoon salt
Generous seasoning freshly ground pepper
3 tablespoon extra virgin olive oil

1. Place the couscous and turmeric in a large bowl and mix. Pour on the boiling water, stir, and immediately cover the bowl with a large plate. Let sit for 10 minutes. Remove the cover and fluff the couscous with a fork. Let cool.

2. Place the pine nuts and unpeeled garlic cloves in a small skillet and toast over medium heat, tossing often, until golden, about 5 minutes. Watch them carefully because they can easily burn. Let the pine nuts cool, then mix them into the couscous along with the beans, tomatoes, basil, and red onion.

3. Mince the garlic. Place the dressing ingredients in a jar with a tight-fitting lid and shake vigorously. Pour over the couscous mixture and toss well. Let marinate at least 30 minutes before serving. Cover and chill if longer than 30 minutes. Serve at room temperature.

soba salad with feta and peas

Apparently I can’t always predict when a dish is going to be good. The only reason I made this was to use up some soba noodles and scallions. Then I found two opened bags of peas in the freezer and half a lemon in the refrigerator, so the meal seemed worth making even if it ended up being no better than edible.

There are some unusual ingredient combinations in this recipe. Soba noodles and feta? Soy sauce and lemon juice? This is why I had my doubts.

I was really surprised when the meal wasn’t just edible, but I loved it. Between the lemon juice and the feta, I was expecting it to be too sour, but the tartness was nicely balanced by the soy sauce and sugar.

Not only was this delicious, it’s one of the easiest meals I’ve made recently. Only one ingredient needs to be chopped, which is a such a welcome change from the meals I normally cook. It’s nutritionally balanced on its own, requiring no side dishes to be a full meal. It can be served warm or cold. I had it ready as soon as Dave got home from work, but when he decided to work out and shower before eating, it was no problem to set the salad aside until we were ready.

Really, this might be the perfect dish – tasty, healthy and easy. I’m already looking for the next opportunity to make it.

Soba Salad with Feta and Peas (adapted from Gourmet July 2006)

Makes 4 servings

1 (10- to 12-ounce) package soba noodles*
1 (10-ounce) package frozen baby peas
3 tablespoons olive oil
2 tablespoons fresh lemon juice
2 teaspoons soy sauce
1 teaspoon sugar
¾ teaspoon salt
¾ teaspoon black pepper
6 oz feta, crumbled (¾ cup)
4 scallions, finely chopped

1. Cook noodles and peas together in a 6- to 8-quart pot of lightly salted boiling water until noodles are tender, 4 to 6 minutes.

2. While noodles cook, whisk together olive oil, lemon juice, soy sauce, sugar, salt, and pepper in a large bowl.

3. Drain noodles and peas well in a colander, then rinse under cold running water to stop cooking. Drain well again, then add to dressing along with feta and scallions. Grind more black pepper to taste over salad.

chicken with forty cloves of garlic

This chicken is the main dish of my favorite dinner party menu. But I’m not going to lie – there are good and bad aspects to making this dish for company. The advantage is that I’m pretty sure this is the best chicken I’ve ever eaten (although this comes close). It’s infused with the flavors of garlic and wine, it’s juicy, the skin is crispy, and it’s served up with a handful of roasted garlic cloves that are perfect for smearing on slices of baguette.

On the other hand, it’s fairly work-intensive. A lot of that work can be finished a few hours before dinner, but you can’t avoid some last minute cooking here. Years ago, I thought that if I had to do any cooking once my guests arrived, it meant I was being a bad host. These days, I don’t worry so much. My friends like to help, and they’re also perfectly happy to chat and drink their wine while I finish up the sauce for the chicken. I like to have a bit of a break between courses, so I’ll generally serve the salad, then finish the chicken.

But again, much of this dish can be prepared in advance. The chicken can be brined early in the day, then rinsed, dried, and refrigerated until needed. The recipe calls for a whole chicken to be cut in pieces, but I’ve used pre-cut pieces with no problem. The garlic and shallots can be roasted in advance and set aside. Of course all of the ingredients can be measured and set right where you need them. The most important thing is to relax – you fed your guests salad so they aren’t starving, they hopefully have good wine to drink, and this chicken is absolutely worth the wait.

I’m looking over the recipe right now, and I’m wondering if you could actually make everything ahead of time and just keep it in a slightly warm oven? (You’ll have to take it out to bake the goat cheese rounds if you’re making those, but that’s easy enough.) I think it would work. I’m going to try it tonight, and then I’ll update with the results.  (Update: I tried it and it was a huge failure.  Not saying it can’t be done correctly somehow, but what I did certainly didn’t work.)

Chicken with 40 Cloves of Garlic (from Cooks Illustrated)

Serves 3 to 4

CI note: Try not to purchase heads of garlic that contain enormous cloves; if unavoidable, increase the foil-covered baking time to 40 to 45 minutes so that the largest cloves soften fully. A large Dutch oven can be used in place of a skillet, if you prefer. Broiling the chicken for a few minutes at the end of cooking crisps the skin, but this step is optional. Serve the dish with slices of crusty baguette for dipping into the sauce and onto which the roasted garlic cloves can be spread.

Table salt
1 whole chicken (3½ to 4 pounds), cut into 8 pieces (4 breast pieces, 2 thighs, 2 drumsticks) and trimmed of excess fat.
Ground black pepper
3 large heads garlic (about 8 ounces), outer papery skins removed, cloves separated and unpeeled
2 medium shallots, peeled and quartered pole to pole
1 tablespoon olive oil
2 sprigs fresh thyme
1 sprig fresh rosemary
1 bay leaf
¾ cup dry vermouth or dry white wine
¾ cup low-sodium chicken broth
2 tablespoons unsalted butter

1. Adjust oven rack to middle position and heat oven to 400 degrees. Dissolve ¼-cup salt in 2 quarts cold tap water in large container or bowl; submerge chicken pieces in brine and refrigerate until fully seasoned, about 30 minutes. Rinse chicken pieces under running water and thoroughly pat dry with paper towels. Season both sides of chicken pieces with pepper.

2. Meanwhile, toss garlic and shallots with 2 teaspoons olive oil and salt and pepper to taste in 9-inch pie plate; cover tightly with foil and roast until softened and beginning to brown, about 30 minutes, shaking pan once to toss contents after 15 minutes (foil can be left on during tossing). Uncover, stir, and continue to roast, uncovered, until browned and fully tender, 10 minutes longer, stirring once or twice. Remove from oven and increase oven temperature to 450 degrees.

3. Using kitchen twine, tie together thyme, rosemary, and bay; set aside. Heat remaining 1-teaspoon oil in 12-inch heavy-bottomed ovenproof skillet over medium-high heat until beginning to smoke; swirl to coat pan with oil. Brown chicken pieces skin-side down until deep golden, about 5 minutes; using tongs, turn chicken pieces and brown until golden on second side, about 4 minutes longer. Transfer chicken to large plate and discard fat; off heat, add vermouth, chicken broth, and herbs, scraping bottom of skillet with wooden spoon to loosen browned bits. Set skillet over medium heat, add garlic/shallot mixture to pan, then return chicken, skin-side up, to pan, nestling pieces on top of and between garlic cloves.

4. Place skillet in oven and roast until instant-read thermometer inserted into thickest part of breast registers about 160 degrees, 10 to 12 minutes. If desired, increase heat to broil and broil to crisp skin, 3 to 5 minutes. Using potholders or oven mitts, remove skillet from oven and transfer chicken to serving dish. Remove 10 to 12 garlic cloves to mesh sieve and reserve; using slotted spoon, scatter remaining garlic cloves and shallots around chicken and discard herbs. With rubber spatula push reserved garlic cloves through sieve and into bowl; discard skins. Add garlic paste to skillet. Bring liquid to simmer over medium-high heat, whisking occasionally to incorporate garlic; adjust seasoning with salt and pepper to taste. Whisk in butter; pour sauce into sauceboat and serve.

Other recipes part of this recommended dinner party menu:
Salad with Herbed Baked Goat Cheese
Sauteed Shredded Zucchini
Pain a l’Ancienne (baguettes)

Just about any dessert works well with this meal.
Many wines work well with this meal, but I especially like full-flavored whites such as Chardonnay, and medium-bodied reds such as Pinot Noir.

salad with herbed baked goat cheese

I’m trying to cut down on the number of Cooks Illustrated recipes that I put in my blog. For one thing, I don’t want Chris Kimball to come over here and kick my ass. Plus, I feel like most Cooks Illustrated recipes are a no-brainer – they’re so dependable that it’s no surprise to hear another recommendation. On the other hand, I cooked almost exclusively from Cooks Illustrated for several years, so there are some recipes that I love so much that I can’t resist sharing.

In fact, I have entire dinner party menus of CI recipes to discuss. I’m going to spend the next few entries putting forth the recipes for one of my favorite meals. I’ve made this for a group of friends and for my parents, and it received great reviews both times. My parents had arrived at my house pretty pissed off after having their car broken into and getting stuck for hours trying to cross into the US from Canada, and after this meal (plus two bottles of wine and some beer), they were in much better spirits.

This salad is a great first course. It’s nice and light, but the goat cheese makes it interesting. The cheese rounds can be prepared up to a week in advance, which is always an advantage when you’re having company. I would also make the vinaigrette early in the day I plan to serve it and keep it in a jar with a tight-fitting lid. That way, when it’s time to serve the salad, I can just shake up the dressing and mix it with the greens. I almost always use bagged greens, because I hate to wash lettuce. With pre-cleaned lettuce, cheese rounds that can be formed days before you plan to serve them, and a simple vinaigrette that can be made in advance, this salad makes for the perfect opening course to an elegant dinner.

Salad with Herbed Baked Goat Cheese and Vinaigrette (from Cooks Illustrated)

Bridget note: I’ve used different herbs based on what I had available, and it was fine. I also usually forget to brush the rounds with olive oil before baking them, so if you’re stressed for time (like I always am when I have company), don’t worry too much about that step.

Serves 6

Herbed Baked Goat Cheese
3 ounces Melba toasts, white (about 2 cups)
1 teaspoon ground black pepper
3 large eggs
2 tablespoons Dijon mustard
1 tablespoon minced fresh thyme leaves
1 tablespoon chopped fresh chives
12 ounces goat cheese, firm
extra-virgin olive oil

Vinaigrette and Salad
2 tablespoons red wine vinegar
1 tablespoon Dijon mustard
1 teaspoon minced shallot
¼ teaspoon table salt
6 tablespoons extra-virgin olive oil
1 tablespoon fresh chives
Ground black pepper
14 cups hearty greens (mixed), washed and dried

1. For Goat Cheese: In food processor, process Melba toasts to fine even crumbs, about 1½ minutes; transfer crumbs to medium bowl and stir in pepper. Whisk eggs and mustard in medium bowl until combined. Combine thyme and chives in small bowl.

2. Using kitchen twine or dental floss, divide cheese into 12 evenly sized pieces. Roll each piece into a ball; roll each ball in herbs to coat lightly. Transfer 6 pieces to egg mixture, turn each piece to coat; transfer to Melba crumbs and turn each piece to coat, pressing crumbs into cheese. Flatten each ball into disk about 1½ inches wide and 1 inch thick and set on baking sheet. Repeat process with remaining 6 pieces cheese. Freeze cheese until firm, about 30 minutes. (Cheese may be wrapped tightly in plastic wrap and frozen up to 1 week.) Adjust oven rack to uppermost position; heat to 475 degrees.

3. Remove cheese from freezer and brush tops and sides evenly with olive oil. Bake until crumbs are golden brown and cheese is slightly soft, 7 to 9 minutes (or 9 to 12 minutes if cheese is completely frozen). Using thin metal spatula, transfer cheese to paper towel-lined plate and cool 3 minutes.

4. For Salad: While goat cheese is baking, combine vinegar, mustard, shallot, and salt in small bowl. Whisking constantly, drizzle in olive oil; season to taste with pepper.

5. Place greens in large bowl, drizzle vinaigrette over, and toss to coat. Divide greens among individual plates; place 2 rounds goat cheese on each salad. Serve immediately.

Other recipes part of this recommended dinner party menu:
Chicken with Forty Cloves of Garlic
Sauteed Shredded Zucchini
Pain a l’Ancienne (baguettes)

Just about any dessert works well with this meal.
Many wines work well with this meal, but I especially like full-flavored whites such as Chardonnay, and medium-bodied reds such as Pinot Noir.

hash browns with sauteed vegetables and poached eggs

I’ve become enamored with poached eggs lately. They’re such a great topping for so many breakfast ideas. Besides eggs benedict, I like to serve them on toast with a bit of cheddar cheese sprinkled over. Hash browns and a bed of sautéed vegetables is my favorite poached eggs base.

The trick to great hash browns is to use starchy potatoes like russets, but to rinse some of the outside starch off of the shreds, then thoroughly dry them before starting to cook. Because I consider this breakfast one of my healthier options, I use olive oil for cooking both the vegetables and the potatoes, although vegetable oil and butter are also good choices. How often you stir the potatoes depends on how you like your hash browns. If you want a crispy base and a tender interior within a bed of potatoes, pack the shreds into a medium-size pan and leave them alone until the bottom browns, 5-6 minutes. Then flip the whole mound over and brown the second side. I tend to put the potatoes in a large skillet and stir every few minutes. After 10-15 minutes, they’re pretty evenly split between crispy browned and tender.

The vegetables you use are completely adaptable. My favorite combination is red onion, red peppers, and mushrooms. This time I used spinach instead of the red peppers, and I loved it. I like the vegetables chopped so that I can get some of each in one bite, so pretty small. (I’m particular about how vegetables are chopped anyway.)

Mound some cooked potatoes on a plate, spread the sautéed vegetables over it, and top with a poached egg – it’s a perfect combination of flavors and nutrition. Once the egg is cut into, warm yolk drips down and blends with the potatoes, and your morning is off to a terrific start.

Hash Browns, Sautéed Vegetables, and Poached Eggs (Poached Egg recipe from Cooks Illustrated)

Serves 2

1½ tablespoons olive oil
6-8 cremini or button mushrooms, halved if large and sliced thin
salt
½ small red onion, halved and sliced thin
1½ ounces spinach, cleaned and chopped very coarse
ground black pepper
1 pound russet potatoes, peeled and washed
2-4 eggs, each cracked into a small handled cup
2 tablespoons white vinegar

1. Heat oven to 200 degrees, then turn it off. Place 2 large plates in warm oven.

2. Heat ½ tablespoon of olive oil in a large nonstick skillet over medium-high heat. When shimmering but not smoking, add mushrooms and a pinch of salt. Cook, stirring occasionally, until liquid released by mushrooms has evaporated. Add onion and cook until browned at edges. Add spinach and cook, stirring constantly, until just wilted. Season with salt and pepper to taste and transfer to a bowl. Put bowl in warmed oven.

3. While vegetables cook, shred potatoes in food processor with shredding blade or on large holes of box grater. Rinse thoroughly in a strainer, then move to a clean kitchen towel and squeeze and pat dry.

4. Heat 1 tablespoon olive oil in the same skillet (no need to wash) over medium heat until shimmering but not smoking. Add potatoes and ¼ teaspoon salt and mix thoroughly. Cook potatoes, stirring every 2-3 minutes, until slightly browned and cooked throughout, a total of 15-20 minutes.

5. While potatoes cook, fill an 8- to 10-inch nonstick skillet nearly to the rim with water, add 1 teaspoon salt and the vinegar, and bring the mixture to boil over high heat. Lower the lips of each cup just into water at once; tip eggs into boiling water, cover, and remove from heat. Poach until yolks are medium-firm, exactly 4 minutes. For firmer yolks (or for extra large or jumbo eggs), poach 4 ½ minutes; for looser yolks (or for medium eggs), poach 3 minutes.

6. While eggs are cooking, divide potatoes between warmed plates. Top with sautéed vegetables. With a slotted spoon, carefully lift and drain each egg over skillet, then lay each over vegetables. Season to taste with salt and pepper and serve immediately.

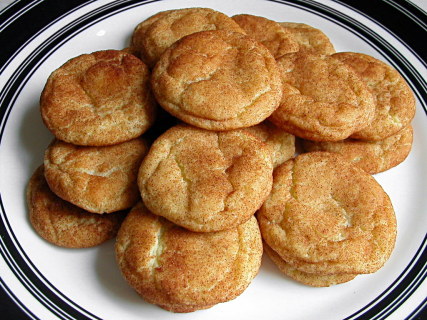
snickerdoodles

Snickerdoodles are so underrated. They’re Dave’s favorite cookie, and I think my dad’s as well. You probably won’t be surprised that Dave’s and my dad’s favorite ice cream flavors are strawberry and vanilla, respectively. Plain flavors, not too rich, but certainly still a delicious treat. As for me, I have to admit I usually make snickerdoodles when I’m out of chocolate chips.

But these are so good! We’re all missing out with our disdain of the humble snickerdoodle. Buttery, soft, coated in cinnamon sugar – these may not feel as rich as chocolate chip cookies, but they certainly have their place.

There are a lot of recipes for snickerdoodles, but they’re almost identical. I just take Betty Crocker’s basic recipe and tweak it to my liking. The most important change is replacing the shortening with more butter. Shortening in a cookie? Seriously? Blech. I also double the salt. The original recipe calls for a quarter of the salt most chocolate chip cookie recipes use. I find cookies with that little salt too bland. The next change I make is replacing one tablespoon of the granulated sugar with brown sugar. This is a trick I picked up from Cooks Illustrated’s sugar cookie recipe, which is designed to add a bit of complexity to the cookie with a hit of butterscotch flavor. The final tweak I make is to increase the cinnamon to sugar ratio in the coating. The original recipe has only 2 teaspoons cinnamon to a quarter cup sugar – a ratio of 1 part cinnamon to 6 parts sugar.  I like a ratio of 1 part cinnamon to 2 parts sugar. Sometimes, when I want to make Dave really happy, I also grate some nutmeg into the cinnamon sugar mixture.

Next time you’re in the mood to bake, don’t forget about snickerdoodles! And not just because they don’t require any ingredients besides staples, but because they’re delicious!

Snickerdoodles (adapted from Betty Crocker’s Big Red Cookbook)

Makes about 4 dozen 2-inch cookies

2¾ cups (13.75 ounces) unbleached flour
2 teaspoons cream of tartar
1 teaspoon baking soda
½ teaspoons salt
1½ cups granulated sugar minus 1 tablespoon (10.35 ounces total)
1 tablespoon light brown sugar
16 tablespoons (2 sticks) unsalted butter, softened
2 large eggs
¼ cup (1.75 ounces) granulated sugar (for rolling)
2 tablespoons cinnamon

1. Adjust oven rack to middle position and heat oven to 375 degrees. Whisk the flour, salt and baking soda in a medium bowl; set aside.

2. Beat butter and sugars (except the ¼ cup granulated sugar for rolling) until creamy; add eggs and beat until combined. Add flour mixture and mix until just combined.

3. Mix ¼ cup sugar and the cinnamon in a shallow bowl. Roll approximately a tablespoon of dough into a 1-inch ball; roll ball in cinnamon sugar mixture. Repeat with remaining dough, placing balls 2 inches apart on ungreased baking sheet.

4. Bake until cookies are just set and turning golden brown at edges, 8-9 minutes. Cool cookies on baking sheet for 2 minutes; then, using a wide metal spatula, transfer cookies to a wire rack and cool to room temperature.

rice and beans

I love beans. This is a recent revelation, as the only beans I remember eating as a kid were refried or mixed with hot dogs. (And just like that, pork and beans has been added to my “To Cook” list.) I’m not sure if it’s the beans that are so good, or the type of recipes that beans tend to be in – mishmashes of various flavors and textures blended together so each bite is just a little bit different from the last, but equally delicious.

Rice and beans is beans at their simplest. I have a Puerto Rican friend who makes fantastic rice and beans, and I’m kicking myself for not getting the recipe from him before I moved away. However, I’m finding that rice and beans is completely adaptable to personal tastes and availability of ingredients. The first time I made it, I used a recipe, but I don’t find myself following it very closely these days.

The original recipe uses sausage, onions, garlic, beans, chicken broth, and some seasoning. It’s a great recipe, but the beauty of rice and beans is that you can ignore the recipe and still get something fantastic. This time I used a bit of celery, a chipotle chile, and as many tomatoes as beans. Last time I used red pepper and less tomatoes. Any number of additions would be great – green pepper, squash, maybe even sweet potatoes. The only requirement is beans, although I admit that I wouldn’t make it without onions, and now I’m loving the tomatoes. I also love the sausage, even though I prefer not to use meat in my staple weeknight meals. If you can think of a great substitute, let me know!

I’ve linked to the original recipe above, and I’ll provide a recipe for what the pictures show, but keep in mind that this is a fun meal to adapt to your own preferences.

Rice and Beans

Serves 4

8 ounces cooked sausage, such as kielbasa (I used salami this time)
1 medium onion, diced small
1 stalk celery, minced (red pepper would be great too)
4 garlic cloves, minced
1 teaspoon cumin (I’ve also used Old Bay)
2 (15-ounce) cans red kidney beans, rinsed and drained
1 (15-ounce) can diced tomatoes (I used 2 cans, but it was admittedly very tomatoey)
1 cup chicken broth (I didn’t use this, but I should have)

6 cups cooked long-grain white rice (from 1 cup uncooked rice)

In a 3- or 4-quart saucepan over medium heat, cook the sausage until it begins to brown and fat begins to render. Add the onions and celery/pepper/whatever and cook, stirring occasionally, until softened and just beginning to brown. Add the garlic and spice(s) and cook, stirring constantly, until fragrant, about 30 seconds. Add the beans, tomatoes, and broth. Bring to a simmer over medium-high heat, then cover and reduce the heat to low. Simmer, stirring occasionally, until the mixture is thick and the flavors have blended, about 45 minutes (or as long as you want actually – I’m not sure I’ve ever cooked it for the full 45 minutes). Serve over rice.

sichuan green beans

I’m not very good at mise en place. I know that isn’t a sign of a particularly good cook, but I must be getting better lately because the kitchen isn’t so messy when I’m done cooking. I didn’t do a good job with this recipe though. I read “cook beans for 5-8 minutes” and I think Perfect! I’ll have just enough time to mince garlic, chop ginger, get the pork out of the fridge, measure out 3 liquids and 5 powders for the sauce, and slice the scallions! While stirring frequently. Dork.

Sichuan green beans was one of my favorite meals to make when I lived alone, and I still make it fairly often for me and Dave. It’s a quick, easy, balanced, healthy one pot meal. The recipe (according the Cooks Illustrated article) is based on a traditional Chinese meal involving deep-fried green beans. This recipe gets the same effect with just a couple tablespoons of oil over very high heat. The beans are cooked until they’re shriveled and blackened. It sounds like they’d be overcooked and soggy, but I swear they’re not. They’re crisp and sweet. It’s similar to what you get when you roast vegetables.

I did a quick scan on the internet of similar recipes, but I can see immediately that they’re not going to get the same sweet crunchiness out of the green beans. One steams the beans separately, one adds water to the pan to steam/boil them in the pan, one sautés them for a few minutes over medium heat. Bland (and extra work and dishes), boring, raw. No good. The high heat searing is necessary to get the most flavor out of the beans. I tried using Chinese long beans for this recipe once, but I actually didn’t like it as much. Besides costing far more than regular green beans, they weren’t as sweet.

The rest of the recipe is no problem. Cook some ground pork, add garlic and ginger, stir in some sauce ingredients, serve over white rice. You can leave the pork out and add shiitakes instead. This would make a nice side dish, but doesn’t have any protein source for a full meal. Either way, just make sure you do your chopping and measuring before you do your cooking. Otherwise you’ll be scrambling around like a dork, like I was.

Stir-Fried Sichuan Green Beans (from Cooks Illustrated January 2007)

Serves 4 as a side dish or 2 as a main course

CI note: To make this dish vegetarian, substitute 4 ounces of shiitake mushrooms, stemmed and minced, for the pork. If using mushrooms, you will need to add a teaspoon of oil to the pan in step 3 before adding the mushrooms. The cooking of this dish goes very quickly, so be sure to have all of the ingredients prepped before you start. Serve this dish with steamed white rice.

2 tablespoons soy sauce
1 tablespoon dry sherry
1 teaspoon sugar
½ teaspoon cornstarch
¼ teaspoon ground white pepper
¼ teaspoon red pepper flakes
¼ teaspoon dry mustard
2 tablespoons water
2 tablespoons vegetable oil
1 pound green beans, ends trimmed, cut into 2-inch pieces
¼ pound ground pork
3 medium cloves garlic, minced or pressed through a garlic press (about 1 tablespoon)
1 tablespoon minced fresh ginger
3 scallions, white and light green parts sliced thin
1 teaspoon toasted sesame oil

1. In small bowl, stir together soy sauce, sherry, sugar, cornstarch, white pepper, pepper flakes, mustard, and water until sugar dissolves; set aside.

2. Heat oil in 12-inch nonstick skillet over high heat until just smoking. Add beans and cook, stirring frequently, until crisp-tender and skins are shriveled and blackened in spots, 5 to 8 minutes (reduce heat to medium-high if beans darken too quickly). Transfer beans to large plate.

3. Reduce heat to medium-high and add pork to now-empty skillet. Cook, breaking pork into small pieces, until no pink remains, about 2 minutes. Add garlic and ginger; cook, stirring constantly, until fragrant, 15 to 20 seconds. Stir sauce to recombine and return beans to pan with sauce. Toss and cook until sauce is thickened, 5 to 10 seconds. Remove pan from heat and stir in scallions and sesame oil. Serve immediately.

Per Serving:
Cal 200; Fat 14 g; Sat fat 3 g; Chol 20 mg; Carb 12 g; Protein 8 g; Fiber 4 g; Sodium 680 mg