summer berry pie

summer berry pie 5

Dave enjoys and then forgets the vast majority of what I give him to eat. And how not to? I make so many different things that even I’m surprised sometimes when I scan through old unused pictures (two types of cucumber salad? orange-glazed tofu? raspberry muffins? The pictures prove I made these things, but I don’t remember any of it).

summer berry pie 3

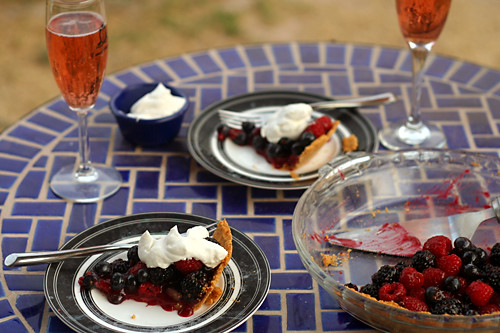
But once in a while, I make something that stands out to Dave enough to not only remember it, but request it again and again, even years later. I hadn’t made this pie in two years, but once berries start to come into season, Dave starts asking about it.

summer berry pie 4

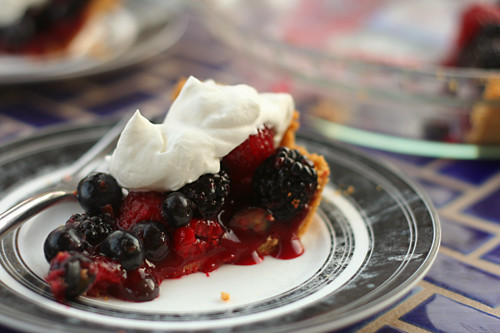
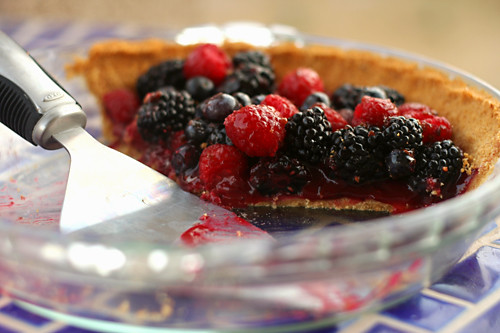
Often, fresh fruit pies are associated with the gel-shellacked versions you get in buffet lines. This pie replaces that gel with the barest coating of fruit jelly, which gives the fruit a beautiful shine without adding any flavorless goo. Instead, a layer of fruit puree holds the filling together while intensifying the bright berry flavor. With ripe sweet berries and a dollop of freshly whipped cream, it’s no wonder this dessert is so memorable.

summer berry pie 6

One year ago: Triple Chocolate Espresso Brownies
Two years ago: Strawberries and Cream Pie
Three years ago: Croque Madame

Printer Friendly Recipe
Summer Berry Pie (from Cooks Illustrated)

Serves 8 to 10

Currant jelly is smooth and bright red, so very attractive in this pie. However, I didn’t want to buy it because I don’t use it for anything else. I used raspberry jam, which I probably should have strained but didn’t.

Crust:
5 ounces graham crackers, broken into rough pieces (9-11 full crackers)
2 tablespoons granulated sugar
5 tablespoons unsalted butter, melted and warm

Filling:
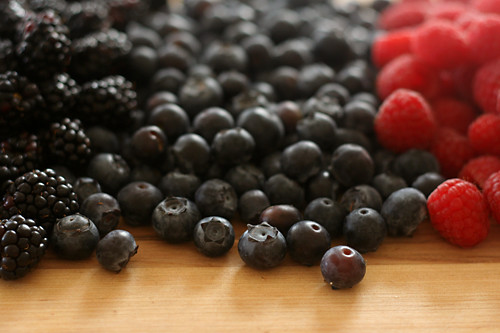
2 cups (about 9 ounces) fresh raspberries
2 cups (about 11 ounces) fresh blackberries
2 cups (about 10 ounces) fresh blueberries
½ cup (3½ ounces) granulated sugar
3 tablespoons cornstarch
⅛ teaspoon table salt
1 tablespoon lemon juice
2 tablespoons red currant jelly

Whipped cream:
1 cup heavy cream (cold)
1 tablespoon granulated sugar
1 teaspoon vanilla extract

1. FOR THE CRUST: Adjust an oven rack to the middle position and heat the oven to 325 degrees. In a food processor, process the graham crackers until evenly fine, about 30 seconds. You should have one cup of crumbs. Add the sugar; pulse to combine. Continue to pulse while adding the warm melted butter in a steady stream; pulse until the mixture resembles wet sand. Transfer to a 9-inch glass pie plate; use the bottom of a ramekin or measuring cup to press the crumbs evenly into the bottom and up the sides. Bake the crust until fragrant and beginning to brown, 15 to 18 minutes; transfer to wire rack and cool completely while making the filling.

2. FOR THE FILLING: Combine the berries in a large colander and gently rinse; spread the berries on towel-lined rimmed baking sheet and gently pat dry with additional towels.

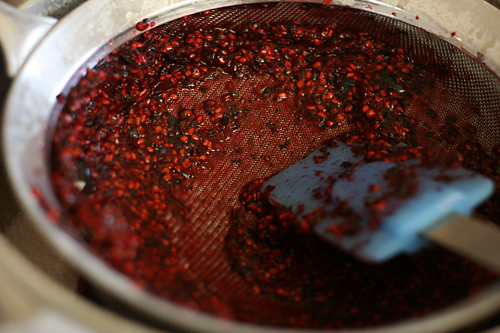
3. In a food processor, puree 2½ cups of the mixed berries until smooth and fully pureed, about 1 minute. Strain the puree through a mesh strainer into small nonreactive saucepan, scraping and pressing on seeds to extract as much puree as possible (you should have 1¼ to 1½ cups). Whisk the sugar, cornstarch, and salt in a small bowl to combine, then whisk the mixture into the puree. Bring the puree to a boil over medium heat, stirring constantly with a wooden spoon; when the mixture reaches a boil and is thickened to consistency of pudding, remove from heat, stir in the lemon juice, and set aside to cool slightly.

4. While the puree is cooling, place the remaining berries in a medium bowl. Heat the jelly in a second small saucepan over low heat until fully melted; drizzle the melted jelly over the berries and gently toss them together until the berries are glazed. Pour the slightly cooled puree into the cooled pie shell and smooth the top with a rubber spatula. Distribute the glazed berries evenly over the puree and gently press into the surface. Loosely cover pie with plastic wrap; refrigerate until chilled and the puree has set, about 3 hours (or up to 1 day).

5. FOR THE WHIPPED CREAM: Add the cream, sugar, and vanilla to the chilled bowl of an electric mixer. Beat at low speed until small bubbles form, about 30 seconds. Increase the speed to high and continue beating until the cream is smooth, thick, and nearly doubled in volume, about 20 seconds for soft peaks or about 30 seconds for stiff peaks. If necessary, finish beating by hand to adjust the consistency.

summer berry pie 7

date nut loaf

date nut loaf 2

When I was a kid, I didn’t have many independent food preferences; I just absorbed my family’s dislikes as my own. My mom didn’t like coconut, so I didn’t like coconut – never mind that I can’t remember ever trying it. I remember one particularly foolish phase in which my brother didn’t like tomatoes, so I didn’t like tomatoes. Tomatoes! One of the best foods ever!

It seems I’ve developed my own opinions, because my older sister and brother both love dates. They think they’re like candy. I think they’re sickly sweet unless stuffed with tangy goat cheese and wrapped in salty bacon.

date nut loaf 1

Maybe sweet candy-like dried fruit chopped up into cake would be good? After all, aren’t chocolate chips just chopped up candy? Dates, however, are not chocolate chips. Chocolate chips are delicious pockets of rich bitter and sweetness. Dates are tooth-achingly sweet, even in cake. On the other hand, at least there was cake to eat. Never in my life have I – or anyone in my family – disliked cake.

date nut loaf 4

Mary chose this “loaf” (pound cake? quick bread?) for Tuesdays with Dorie, and she has the recipe posted. I increased the salt slightly and substituted almonds for some of the walnuts.

One year ago: Rum-Drenched Vanilla Cake
Two years ago: Coconut Roasted Pineapple Dacquoise
Three years ago: Mixed Berry Cobbler

date nut loaf 3

grapefruit honey yogurt scones

grapefruit scones 5

Here’s what scones mean for me: Either I wake up on Saturday and immediately get out the butter, flour, and sugar so I can start mixing and making a big mess of the kitchen. Or, I wake up on Saturday and pilfer my time away on the internet, or, if I’m really smart, relaxing reading a book while scones go straight from the freezer to the oven. Either way, scones = Saturday = things that make me happy.

grapefruit scones 2

I wasn’t completely sure that cooked grapefruit would make me happy, but it turns out that grapefruit pieces in the middle of a scone create a nice pocket of juiciness. The honey flavor, which is often overpowered, was distinct. The yogurt keeps the scones tender, along with the butter and careful mixing of course.  I’m generally already happy on Saturday mornings, but good scones certainly don’t hurt.

grapefruit scones 6

One year ago: Eggs in Tomato Sauce
Two years ago: Anadama Bread
Three years ago: Baba Ghanoush, Falafel, and Hummus

Printer Friendly Recipe
Grapefruit, Honey, and Yogurt Scones (adapted from Joy the Baker)

Makes 6 scones

I used nonfat Greek yogurt, and it worked fine.

This was my first time segmenting citrus. It wasn’t as bad as I was expecting. Branny has detailed instructions in her blog.

As always, you can freeze scones after shaping, before baking. Bake directly from the freezer, adding 2-3 minutes to the baking time.

½ cup plain Greek yogurt
2 tablespoons honey
1 teaspoon vanilla
¼ cup (1.75 ounces) granulated sugar
1 grapefruit, zested, then segmented and coarsely chopped
1½ cups (7.2 ounces) all-purpose flour
1 teaspoon baking powder
½ teaspoon baking soda
¼ teaspoon salt
6 tablespoons unsalted butter, cold, cut into ¼-inch cubes

1. Place a rack in the center of the oven; heat to 425 degrees. Line a baking sheet with parchment paper or a silicone mat. In a measuring cup, combine the yogurt, honey, and vanilla. In a small bowl, rub the sugar and the grapefruit zest together until the sugar is moist and fragrant.

2. Place the flour, 2 tablespoons of the sugar mixture, baking powder, baking soda and salt in the bowl of a food processor. Pulse to combine. Add the butter; process in 1-second pulses until the mixture resembles coarse meal. Pour the yogurt mixture over the flour mixture; pulse until the dough is crumbly. Transfer the mixture to a large bowl and fold in the grapefruit pieces.

3. Turn the scone dough out onto a lightly floured surface. Form it into an 8 inch circle, about 1 inch thick. Use a knife or a bench scraper to cut the dough into six triangles. Place on the prepared baking sheet; top with the remaining grapefruit sugar.

4. Bake the scones for 15 to 17 minutes, until they’re golden brown. Allow to cool on the pan for 10 minutes before serving. These scones are best served the day they’re made.

grapefruit scones 4

brown sugar blueberry plain cake

Dave and I have fun during the winter teasing his family in Ohio about how while they’re bundling up and shoveling snow, we’re sitting outside drinking margaritas. They curse us, and then I try to temper this obnoxiousness by claiming that we’ll pay the price in the summer.

But I’m not sure we will. We have a good system for dealing with the heat. It involves a kiddie pool full of water to dip our feet in, frequent breaks to come inside and cool off (the perfect time to prep dinner), and, of course, margaritas.

I suspect that summer in the desert will be particularly awesome, and not just because of the heat that we love. There are also tomatoes, corn on the cob, and blueberries so cheap the stores are almost giving them away. Mostly I’ve been eating them straight, as the best snack you could ever ask for, but I’m never against adding my favorite fruits into dessert either. But as soon as the cake is baked, I’m heading back outside with my margarita.

Cindy chose this cake for Tuesdays with Dorie, and she has the recipe posted. I doubled the salt and used a 9×9-inch pan instead of 7×11-inch. I originally had some ideas of things I might tweak for next time, but to be honest, as good as this cake was, I’ve had other blueberry cakes that I like more.

One year ago: Raisin Swirl Bread
Two years ago: Parisian Strawberry Tartlets
Three years ago: La Palette’s Strawberry Tart

strawberry cream cake

Strawberries, cream cheese, and cake – is there any better combination? Strawberry shortcake is the iconic strawberries and cream dessert, and for good reason, but for me, this cake is a step above. Mostly because of the cream cheese, but I’m also partial to soft and tender cake over a craggy biscuit. And you can’t beat the wow factor of a beautiful layer cake with the innards exposed. Cake innards are my favorite.

Of course there’s a price to pay for alternating layers of sunny cake, swirled cream, and ruby strawberries, and that is in fussiness. And who doesn’t love fussiness? Not I.

Because this is a Cooks Illustrated recipe, there are a handful of tricks that make it work. The cream cheese stabilizes and thickens the whipped cream, not to mention it tastes so darn good. Half of the strawberries are halved for maximum visual impact, and the remainder is macerated to remove liquid. The extracted juice, full of strawberry flavor and not to be wasted, is cooked down to a syrup that won’t make your cake soggy.

Three parts that must be separately prepared and then alternately layered to make a tall, striped, impressive dessert.  A dessert which, when sliced, will collapse into a jumble of fruit, cream, and cake that shows a remarkable resemblance to strawberry shortcake.  But it was worth the trouble of all that layering, because fussing is fun, right?


One year ago: Cream Cheese Spritz
Two years ago: Strawberry Lemon Sorbet
Three years ago: Ricotta Spinach Tofu Ravioli

Printer Friendly Recipe
Strawberry Cream Cake (from Cook’s Illustrated)

12 servings

I hate splitting cakes. I baked my cake batter in three separate cake pans instead of one pan which would later need to be split.

I made a half recipe in 6-inch pans.  6-inch round pans are slightly smaller than half of a 9-inch pan, so my layers are taller than the original recipe will result in.

Cake:
1¼ cups (5 ounces) cake flour
1½ teaspoons baking powder
¼ teaspoon table salt
1 cup (7 ounces) sugar
5 large eggs (2 whole and 3 separated), room temperature
6 tablespoons unsalted butter, melted and cooled slightly
2 tablespoons water
2 teaspoons vanilla extract

Strawberry Filling:
2 pounds fresh strawberries (medium or large, about 2 quarts), washed, dried, and stemmed
4–6 tablespoons sugar
2 tablespoons Kirsch
Pinch table salt

Whipped Cream:
8 ounces cream cheese, room temperature
½ cup (3½ ounces) sugar
1 teaspoon vanilla extract
⅛ teaspoon table salt
2 cups heavy cream

1. FOR THE CAKE: Adjust an oven rack to the lower-middle position and heat the oven to 325 degrees. Grease and flour a round 9 by 2-inch cake pan or 9-inch springform pan and line with parchment paper. Whisk flour, baking powder, salt, and all but 3 tablespoons sugar in a mixing bowl. Whisk in 2 whole eggs and 3 yolks (reserving whites), butter, water, and vanilla; whisk until smooth.

2. In a clean bowl of a standing mixer fitted with the whisk attachment, beat the remaining 3 egg whites at medium-low speed until frothy, 1 to 2 minutes. With the machine running, gradually add the remaining 3 tablespoons sugar, increase the speed to medium-high, and beat until soft peaks form, 60 to 90 seconds. Stir one-third of the whites into the batter to lighten; add the remaining whites and gently fold into the batter until no white streaks remain. Pour the batter into a prepared pan and bake until a toothpick or wooden skewer inserted into the center of the cake comes out clean, 30 to 40 minutes. Cool in the pan 10 minutes, then invert the cake onto a greased wire rack; peel off and discard the parchment. Invert the cake again; cool completely, about 2 hours.

3. FOR THE STRAWBERRY FILLING: Halve 24 of the best-looking berries and reserve. Quarter the remaining berries; toss with 4 to 6 tablespoons sugar (depending on the sweetness of the berries) in a medium bowl and let sit 1 hour, stirring occasionally. Strain the juices from the berries and reserve (you should have about ½ cup). In the workbowl of a food processor fitted with the metal blade, give the macerated berries five 1-second pulses (you should have about 1½ cups). In a small saucepan over medium-high heat, simmer the reserved juices and Kirsch until the mixture is syrupy and reduced to about 3 tablespoons, 3 to 5 minutes. Pour the reduced syrup over the macerated berries, add a pinch of salt, and toss to combine. Set aside until the cake is cooled.

4. FOR THE WHIPPED CREAM: When the cake has cooled, place the cream cheese, sugar, vanilla, and salt in the bowl of a standing mixer fitted with the whisk attachment. Whisk at medium-high speed until light and fluffy, 1 to 2 minutes, scraping down the bowl with a rubber spatula as needed. Reduce the speed to low and add heavy cream in a slow, steady stream; when it’s almost fully combined, increase the speed to medium-high and beat until the mixture holds stiff peaks, 2 to 2½ minutes more, scraping the bowl as needed (you should have about 4½ cups).

5. TO ASSEMBLE THE CAKE: Using a large serrated knife, slice the cake into three even layers. Place the bottom layer on a cardboard round or cake plate and arrange a ring of 20 strawberry halves, cut sides down and stem ends facing out, around the perimeter of the cake layer. Pour one half of the pureed berry mixture (about ¾ cup) in the center, then spread to cover any exposed cake. Gently spread about one-third of the whipped cream (about 1½ cups) over the berry layer, leaving a ½-inch border from the edge. Place the middle cake layer on top and press down gently (the whipped cream layer should become flush with cake edge). Repeat with 20 additional strawberry halves, the remaining berry mixture, and half of the remaining whipped cream; gently press the last cake layer on top. Spread the remaining whipped cream over the top; decorate with the remaining cut strawberries. Serve, or chill for up to 4 hours.

lemon bar comparison

front to back: Cooks Illustrated, Lebovitz

I don’t make lemon bars often, despite how much I love them. They feel so light and refreshing that I can’t convince my brain that these are, in fact, full of butter. So I end up eating a lot of them.  But if I don’t get to make them often, when I do get a chance to, they need to be perfect. I need the best recipe. And how do I know which is best without a side-by-side comparison?

I started with Cooks Illustrated as a trustworthy source of straightforward results. I chose Tartine’s lemon bars on brown butter shortbread because it was one of the first recipes in the book that caught my eye and is typical of their talent for taking a classic recipe up a notch. I also made David Lebovitz’s lemon bar recipe, which uses the whole lemon, pith and all.

Cooks Illustrated: As promised, this is a typical lemon bar recipe with no tricks up its sleeve. The crust is a combination of flour, powdered sugar, cornstarch, salt, and butter, which is combined in the food processor, pressed into a pan, and chilled before baking. The topping is eggs, sugar, flour, milk, salt, and lemon zest and juice. The topping is poured onto the hot crust and baked until firm.

Tartine: The browned butter shortbread in this recipe’s title is a misnomer, as it turns out that the crust is mixed like any other lemon bar crust, with no browning of the butter beforehand. Instead, the crust just browned in the oven, making it more of a butter crust that is browned instead of a crust that includes browned butter.  The filling is similar to Cooks Illustrated’s, except it contains no milk.

Lebovitz: David Lebovitz’s crust uses granulated instead of powdered sugar and melted butter instead of solid. Like the other recipes, this topping is based on sugar, eggs, and lemon, but instead of a small amount of flour, it incorporates cornstarch, as well as melted butter, which is not present in the other recipes. And most importantly, this recipe includes the entire lemon, pith in addition to juice and zest.

Comparing the lemon bars made me realize how important the crust is. I’d always focused on the filling before, wanting it as lemony and sour as I could stand, and I thought the crust was nothing more than a vehicle to hold up the filling. Now the crust seems like an important contrast to the tart filling. In fact, in many ways, the crust was the deciding factor in choosing preferences. The fillings were similar, but the crusts varied widely.

Cooks Illustrated: The all-important crust factor was the downfall of this recipe. The crust was dry and didn’t brown. I’m blaming this on the cornstarch. It’s probably important for structure, but it didn’t do the flavor any favors. The filling, on the other hand, was creamy and tart and wonderful. The top photo spotlights the CI bars in front, and you can clearly see their pale crust and luscious filling.

Tartine: This crust was substantial enough to hold up the filling and had just a bit of snap to it. It did, indeed, brown well, which gave it a nice flavor. The filling was lemony and smooth, although it  cratered when it was removed from the oven, resulting in a sunken middle.  I surprised myself by wanting a higher ratio of crust to filling.

Lebovitz: The granulated sugar lent this crust a great flavor, but it was crumbly and sometimes broke under the weight of the filling. The filling itself contained far too many chunks of lemon, although this might be a result of using a food processor instead of a blender to puree the lemon.  The topping was pockmarked like the moon (scroll down to see a picture of the tops of the three recipes).

I enjoyed the lemon squares from all three recipes, but I believe the one perfect bar would be made from Tartine’s crust and Cooks Illustrated’s filling.


left to right: Lebovitz, Tartine, Cooks Illustrated

One year ago: Stuffed Butterflied Leg of Lamb
Two years ago: Fresh Strawberry Scones
Three years ago: Asparagus and Arugula Salad with Cannellini Beans and Balsamic Vinegar

Printer Friendly Recipe
Lemon Bars on Brown Butter Shortbread (from Tartine)

For the crust:
½ cup (2 ounces) confectioners’ sugar
1½ cups (7.5 ounces) all-purpose flour
12 tablespoons (1½ sticks) unsalted butter, at room temperature
½ cup (2 ounces) pine nuts (optional)

For the filling:
½ cup (2½ ounces) all-purpose flour
2¼ cups (16 ounces) sugar
1 cup plus 2 tablespoons lemon juice
lemon zest, grated from 1 small lemon
6 large whole eggs
1 large egg yolk
pinch salt
confectioners’ sugar for topping (optional)

1. Preheat the oven to 350 degrees and butter a 9-by-13-inch baking pan.

2. To make the crust: Sift the confectioners’ sugar into the bowl of a stand mixer fitted with the paddle attachment. Stir in the flour. Add the butter and pine nuts (if using) and beat on low speed just until a smooth dough forms.

3. Press the dough evenly into the pan and allow it to come up about a ½ inch up the sides of the pan. Line the crust with parchment paper and fill with pie weights. Bake the crust until it is a deep golden brown, about 25-35 minutes.

4. To make the filling: While the crust is baking, sift the flour into a mixing bowl and whisk in the sugar until blended. Add the lemon juice and zest and stir to dissolve the sugar. In a separate mixing bowl, whisk the whole eggs and egg yolk with the salt. Add the eggs to the lemon juice mixture and whisk until well mixed.

5. Once the crust is ready, pour the filling directly into the pan. Reduce the oven temperature to 300 degrees and bake just until the center of the custard is set, about 30 to 40 minutes.

6. Let cool completely on a wire rock, then cover and chill well before cutting. Cut into squares and dust the top with confectioners’ sugar, if desired. They will keep in an airtight container or well covered in the baking dish in the refrigerator for up to 4 days.

Printer Friendly Recipe
Perfect Lemon Bars (from Cooks Illustrated)

For the crust
1¾ cups (8.75 ounces) unbleached all-purpose flour
⅔ cup confectioners’ sugar, plus extra to decorate finished bars
¼ cup cornstarch
¾ teaspoon table salt
12 tablespoons unsalted butter (1 ½ sticks), at very cool room temperature, cut into 1-inch pieces

Lemon filling
4 large eggs, beaten lightly
1⅓ cups (9.33 ounces) granulated sugar
3 tablespoons unbleached all-purpose flour
2 teaspoons grated lemon zest from 2 large lemons
⅔ cup lemon juice from 3 to 4 large lemons, strained
⅓ cup whole milk
⅛ teaspoon table salt

1. For the crust: Adjust an oven rack to middle position and heat the oven to 350 degrees. Lightly oil a 13-by-9-inch baking dish and line with one sheet parchment or wax paper. Dot the paper with butter, then lay a second sheet crosswise over it.

2. Pulse the flour, confectioners’ sugar, cornstarch, and salt in the food processor workbowl fitted with the steel blade. Add the butter and process to blend, 8 to 10 seconds, then pulse until the mixture is pale yellow and resembles coarse meal, about three 1-second bursts. (To do this by hand, mix flour, confectioners’ sugar, cornstarch, and salt in medium bowl. Freeze the butter and grate it on the large holes of a box grater into the flour mixture. Toss the butter pieces to coat. Rub pieces between your fingers for a minute, until the flour turns pale yellow and coarse.) Sprinkle the mixture into the lined pan and press firmly with fingers into an even, ¼-inch layer over the entire pan bottom and about ½-inch up the sides. Refrigerate for 30 minutes, then bake until the crust is golden brown, about 20 minutes.

3. For the filling: Meanwhile, whisk the eggs, sugar, and flour in a medium bowl, then stir in the lemon zest, juice, milk, and salt to blend well.

4. To finish the bars: Reduce the oven temperature to 325 degrees. Stir the filling mixture to reblend; pour into the warm crust. Bake until the filling feels firm when touched lightly, about 20 minutes. Transfer the pan to a wire rack; cool to near room temperature, at least 30 minutes. Transfer to a cutting board, fold the paper down, and cut into serving-size bars, wiping knife or pizza cutter clean between cuts, as necessary. Sieve confectioners’ sugar over bars, if desired.

Printer Friendly Recipe
Whole Lemon Bars (reformatted slightly but not actually changed from David Lebovitz)

I needed 2 lemons to make 6 ounces of lemon. I trim off the knobby ends when making whole lemon desserts.

Crust:
1 cup (4.8 ounces) all-purpose flour
¼ cup (1.75 ounces) sugar
¼ teaspoon salt
8 tablespoons (1 stick) melted unsalted butter
½ teaspoon vanilla extract

Lemon topping:
1 lemon (about 6 ounces), organic or unsprayed
1 cup (7 ounces) sugar
3 tablespoons freshly squeezed lemon juice
3 large eggs, room temperature
4 teaspoons cornstarch
¼ teaspoon salt
3 tablespoons melted unsalted butter
Optional: powdered sugar, for serving

1. Preheat the oven to 350ºF (180ºC). Line an 8-inch square with foil.

2. For the crust: In a medium bowl, mix the flour, sugar, salt, melted butter, and vanilla, stirring just until smooth. Press the batter into the bottom of the pan, using your hands or a small offset spatula to get it as level as possible. Bake the crust for 25 minutes, or until it’s deep-golden brown.

3. For the topping: While the crust is cooking, cut the lemon in half, remove the seeds, and cut it into chunks. Put the chunks of lemon in a food processor or blender along with the sugar and lemon juice, and let it run until the lemon is completely broken up. Add the eggs, cornstarch, melted butter, and blend until almost smooth. (A few tiny bits of lemon pieces are normal and encouraged.)

4. When the crust comes out of the oven, reduce the oven temperature to 300ºF (150ºC). Pour the lemon filling over the hot crust and bake for 25 minutes or just until the filling stops jiggling and is barely set.

5. Remove from the oven and let cool completely. Once cool, carefully lift out the bars grasping the foil. Cut the bars into squares or rectangles. Sift powdered sugar over the top just before serving, if desired.

Storage: The bars will keep in an airtight container at room temperature up to three days. You can freeze the lemon bars as well for up to one month, letting them come to room temperature before serving.

left to right: Cooks Illustrated, Tartine, Lebovitz

strawberry cheesecake

When I want strawberry cheesecake, I want cheesecake that’s strawberry-flavored, not plain cheesecake topped with strawberries. And not a plain cheesecake with a swirl of strawberries. Although I’m certainly not against adding a strawberry topping and strawberry swirl to strawberry-flavored cheesecake.

I confess that the strawberry swirl wasn’t intentional. But when I had leftover strawberry puree, I didn’t know what else to do with it. I didn’t want to risk marring the cheesecake’s creamy texture by doubling the puree. So on my first try, I poured half of the cheesecake batter over the crust, then spooned on the puree, then finished with the rest of the cheesecake batter. I liked the hit of fresh strawberry flavor in each bite, but the leftover cheesecake’s crust got soft, almost soggy, after a day in the fridge, which I blamed on the watery strawberry puree.

So I thought I’d try putting the extra puree on top of the cheesecake instead of in the middle. Generally when you plan to swirl things together, you want them to be about the same viscosity, but that would require cornstarch and cooking to thicken the strawberry puree, and I didn’t want to mess with all that.

The swirl on top worked wonderfully, even without thickening the puree.  Of course I still topped the cheesecake with sliced strawberries, but with the bright flavor from the swirl, it was hardly necessary. Now this, with even pink strawberry flavor throughout, beautiful fresh puree, and if you can’t get enough strawberries, sliced fresh strawberries on top – this is worthy of being called strawberry cheesecake.

One year ago: Slaw Tartare
Two years ago: Comparison of 3 brownie recipe (and a box mix)
Three years ago: Red Beans and Rice

Printer Friendly Recipe
Strawberry Cheesecake (adapted from Dorie Greenspan’s Tall and Creamy Cheesecake from Baking: From my Home to Yours)

Makes 16 servings

For the crust:
1¾ cups graham crackers
3 tablespoons sugar
pinch of salt
½ stick (4 tablespoons) unsalted butter, melted

For the cheesecake:
4 (8-ounce) packages cream cheese, at room temperature
1⅓ cups (9.67 ounces) sugar
½ teaspoon salt
2 teaspoons pure vanilla extract
4 large eggs, at room temperature
2 tablespoons cream
1 cup (8 ounces – both in weight and liquid measurements) strawberry puree, divided

1. For the crust: Spray the bottom of a springform pan with nonstick spray. Either grind the graham crackers with a food processor or place them in a ziptop bag and crush with a rolling pin. Add the sugar, salt, and butter to the crumbs and stir until evenly mixed. Press the crumbs into an even layer covering the bottom of the prepared pan. Put the pan in the freezer for 30 minutes.

2. Meanwhile, heat the oven to 350 degrees. Bake the crust for 10 minutes, or until fragrant. Let cool on a wire rack, then wrap the bottom of the pan in foil. Reduce the oven temperature to 325 degrees. Bring a pot of water to a boil.

3. For the cheesecake: With a mixer fitted with the paddle attachment (or with a hand mixer), beat the cream cheese at medium-low speed until smooth. Add the sugar and salt; continue mixing for about 2 minutes, until the mixture is light and creamy. Add the vanilla, then the eggs one a time, mixing just until each one is incorporated. Mix in the cream and ½ cup of the strawberry puree.

4. Pour the batter onto the cooled crust. Spoon the remaining strawberry puree over the batter and use a butter knife to gently swirl it. Place the wrapped springform pan into roasting pan; pour the hot water into the roasting pan.

5. Bake the cheesecake for 1 hour and 30 minutes. Turn off the oven’s heat and prop the oven door open with a wooden spoon; let the cheesecake set in the water bath for another hour. Remove the cheesecake from the hot water and let it come to room temperature on a cooling rack. When the cake is cool, cover the top lightly and chill the cake for at least 4 hours.

I’m donating my Bourbon Pound Cake to Bloggers Bake for Hope.  This and over fifty other treats are available to be shipped directly to you. Bidding is open until midnight (EST) Friday, so hurry and bid to win this pound cake!  All proceeds go to Massachusetts Komen for the Cure.

fig-glazed burgers with onion jam

We’ve gotten into a loose routine with our weekend meals. Friday is usually some sort of pizza, unless we get takeout sushi; Saturday with its meat-carb-vegetable makeup is the only day of the week I bother with side dishes; and Sunday is something sandwich-like. I’m not going to say that sandwich night is my favorite, but there’s something undeniably happy-making (or maybe that’s the Sunday champagne habit) about carbs and their fillings, whether its tacos, gyros, burgers, or whatever else.

We’re pretty attached to our backyard these days, so Sunday sandwiches are usually cooked on the grill. Not that I’m bored of green chile cheeseburgers (or that I won’t put green chile on a fig-glazed burger), but there are so many great burger ideas out there, it would be a shame to stick to one favorite. This is just the first on a long list of great options.

It’s odd that I chose the sweet plus meat burger off of that list, since it isn’t a combination I often crave. Or it wasn’t. It might be now. It doesn’t hurt that it’s also mixed with vinegary onion jam and melty cheese. Our Sunday dinner sandwich habit might turn into a Sunday fig-glazed burgers habit.

One year ago: Pizza with Figs, Prosciutto, Gorgonzola, Balsamic, and Arugula (oddly similar flavors)
Two years ago: Pasta with Cauliflower, Walnuts, and Ricotta Salata
Three years ago: Creamy Buttermilk Coleslaw (This is no longer my favorite classic coleslaw. I’ll post the new recipe soon.)

Printer Friendly Recipe
Fig-Glazed Burgers with Red Onion Jam (adapted from Southern Living via Pink Parsley)

Makes 4 burgers

I like my burgers a little smaller, so I made six out of this amount of meat mixture instead of four.

Red onion jam:
1 teaspoon olive oil
1 large red onion, sliced thin
Pinch salt
2 tablespoons brown sugar
¼ cup balsamic vinegar
¾ teaspoon chopped fresh thyme

Cheeseburgers:
1½ pounds ground chuck
2 tablespoons chopped fresh oregano
1 teaspoon kosher salt
1 tablespoon Dijon mustard
¼ teaspoon garlic powder
½ teaspoon ground black pepper
3 tablespoons fig preserves
4 (½-oz) Muenster cheese slices
4 hamburger buns, split and toasted

1. In a large skillet, heat the oil over medium-high heat until it flows like water when you tilt the pan. Add the onions and salt; cook, stirring often, for 5 minutes, until the onions are just golden around the edges. Reduce the heat to medium-low; add the sugar, vinegar, and thyme; cover and cook 10 minutes, until the onion is tender and most of the liquid is absorbed.

2. Gently mix the beef, oregano, salt, mustard, garlic powder, and black pepper. Divide the mixture into four portions and shape each one into a ½-inch thick patty. Form a divot in the center of each patty.

3. Prepare a medium-hot grill. Using a paper towel, grease the grates with vegetable oil. Grill the patties for 5 minutes; flip, and continue grilling another 5 minutes. Brush each patty with fig preserves and top with a slice of cheese. Grill an additional 2 minutes, or until the beef is cooked and the cheese is melted. Serve on buns with onion jam.

lemon ricotta strawberry muffins

Sometimes it bothers me that I can’t buy any locally produced food. I get to thinking that if food can’t be grown here, maybe we shouldn’t live here. Clearly it’s an unenvironmental place to live if everything from greens to beef to beans has to be shipped here.

Then I remember that I’m here for an environmental reason. I work for a radioactive waste disposal site. And it’s here because there aren’t a lot of people here. Do you want radioactive waste stored anywhere near your city? Probably not. (Although the truth is that most of the locals here appreciate the repository’s presence, as it brings good jobs to the area and has had no environmental effect.) And there aren’t a lot of people here because stuff doesn’t grow here.

The upshot of this is that I have no qualms about buying California strawberries or Florida peaches. If I tried to follow a 100-mile diet in southern NM, we’d have to survive on pecans. Even the state’s prized green chiles are grown almost 200 miles away. I draw the line at Chilean berries, but anything from the US or Mexico is fair game.

If you try to eat local and you live farther north, you probably don’t have strawberries yet. When you do, here’s a great way to use them. These light, tender muffins are fragrant with lemon and studded with sweet berries. We enjoyed them while sitting outside in our sunbaked parched desert.

One year ago: Cauliflower Cheese Pie with Grated Potato Crust
Two years ago: Pan-Roasted Asparagus
Three years ago: Hazelnut Dried Cherry Biscotti

Printer Friendly Recipe
Lemon Ricotta Strawberry Muffins (adapted from Mollie Katzen via Apple a Day)

Makes 12 muffins

I substituted ½ cup whole wheat pastry flour for an equal amount of the all-purpose flour.

2 cups (9.6 ounces) all-purpose flour
1½ teaspoon baking powder
½ teaspoon salt
⅛ teaspoon baking soda
½ cup (3.5 ounces) granulated sugar
1 tablespoon lemon zest
1 cup ricotta cheese
2 large eggs
1 cup buttermilk
1 tablespoon vanilla extract
1 tablespoon lemon juice
4 tablespoons unsalted butter, melted and cooled
1½ cups strawberries, chopped

1. Heat the oven to 350ºF. Spray the bottoms only of a 12-cup muffin pan with nonstick spray or line with paper liners. In a large bowl, combine the flour, baking powder, salt, and baking soda.

2. In a medium bowl, rub the lemon zest into the sugar. Whisk in the eggs, ricotta, buttermilk, vanilla, lemon juice, and butter. Pour the ricotta mixture into the flour mixture and fold until the flour is evenly dispersed but not completely mixed in. Add the strawberries and fold until the flour is moistened (some lumps are okay) and the strawberries are evenly distributed.

3. Divide the batter evenly between the muffin cups. Bake until a toothpick inserted into a muffin comes out clean, 18-22 minutes. Set the pan on a rack to cool slightly, about 5 minutes, then use a thin-bladed knife to remove the muffins from the pan.

strawberry double crisp

There’s an inverse relationship between how doughy a dessert is and how often I’ll make it. That means that I will never make something for dessert that doesn’t contain anything resembling flour and butter, like poached pears. Pound cake, on the other hand, is my favorite thing to bake, because it’s nothing but dough. I hardly ever make crisps, and cobbler is only slightly more popular in my kitchen; at least cobbler biscuits are based on dough, even if there is all kinds of fruit mucking up the pureness of the butter and flour mixture.

But oh, this was good. I loved how the strawberries were simmered and crushed into a jam, I loved the combination of strawberries and cranberries (standing in for the unavailable rhubarb), and most of all, I loved how there was crisp topping lining the bottom of the pan as well as sprinkled on top. That bottom layer of topping (bottoming?), which contains both butter and flour and thus resembles dough, baked into something almost cookie-like.

The ratio of fruit to topping was perfect. The combination of berries and plain Greek yogurt was perfect. And most of all, the presence of baked dough was perfect.

Sarah chose this for Tuesdays with Dorie and has the recipe posted. I substituted cranberries for rhubarb, although I’m sure rhubarb would be delicious. I used almond slivers instead of walnuts, then added a dribble of almond extract for good measure. I didn’t have crystallized ginger, so minced up a cube of fresh ginger. I melted the brown sugar with the butter for the topping instead of adding it to the dry ingredients.

One year ago: Swedish Visiting Cake
Two years ago: Chocolate Amaretti Torte
Three years ago: Marshmallows