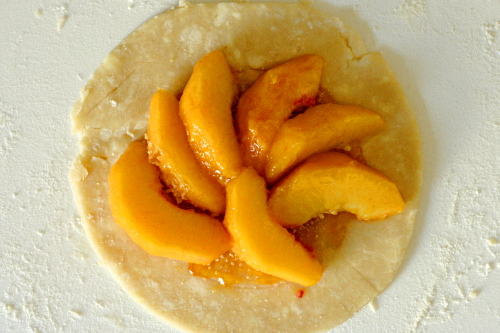
summer fruit galette (twd)

It’s safe to say that this Summer Fruit Galette, chosen for TWD by Michelle, wasn’t my best effort. My baking has gotten really out of control lately – my freezer is full of cupcakes, cookies, muffins, and breads. There’s cookie dough and half a cake in my refrigerator. (But I finally found someone to offload some of this excess onto, so I’m excited about that!) My capacity to bake has far outstripped our capacity to eat. I thought the galette would fit into this pattern perfectly because I could pare down the recipe, which would be tricky with a regular pie.

Last time I made Dorie’s pie crust, I was pretty happy with it, but was put off by the shortening. Mari suggested substituting lard for the shortening, and since the galette uses the same dough as the blueberry pie did, I had that opportunity. I didn’t notice any big differences between the crusts made with shortening and with lard – they seemed equally easy to work with and flavorful. But a few weeks ago, I had noticed two or three TWD members who had problems with the pie crust sort of melting in the oven, and I had a little of that problem this time. In short, I’m going to stick with my old favorite pie crust. They’re both good, but I’ve been using that one for years and I’ve always been happy with it. (I’ll put it on my blog at some point or another – probably the next pie recipe TWD makes.)

The rest of my problems with the galette were my fault. I only made a quarter of the recipe, and I’m afraid that that’s an impractically small fraction. The ratio between the area necessary to hold fillings and the area necessary to pleat the edges gets thrown off, and you end up with far more crust per filling than the recipe intended. And one of the parts of this recipe that I was very interested in was the custard topping that gets poured over the fruit, but again, with so little filling exposed, I was only able to dribble in the slightest amount of custard mix before it overflowed and made a mess.

Despite all of my foibles making this dessert, I still really enjoyed it. I can tell the potential for a really amazing dessert is there. This is another example of how Dorie takes just a few ingredients and shows them off to their best advantage.

The recipe can be found on Melissa’s website.

cherry rhubarb cobbler (twd)

Amanda chose possibly the healthiest recipe in the TWD cookbook. A portion of the flour in the biscuits is whole wheat and there’s <gasp> less than a tablespoon of butter per serving.

Combining rhubarb and cherries is a little unusual – Dorie does it because they have contrasting and complimentary flavors. Fair enough, but they also both have notoriously short seasons that only slightly overlap. I was lucky to find fresh rhubarb still available.

I love rhubarb in uses like this – it cooks down so soft as to be unnoticeable except for the sweet-tart flavor it lends. Sweet cherries, it turns out, I’m not so fond of in cooked fruit desserts. It sounds weird, but I’m annoyed at how well they hold their shape. I guess I want them to cook down and blend in with the other filling ingredients.

The biscuits were fine. Not as light and tender as the ones from Dorie’s other cobbler; these were more dense and bready. (I swear I didn’t overmix them.) They weren’t bad by any means, but maybe a little more wholesome than I prefer for dessert.

Dave, of course, loved the whole thing. He generally prefers healthier food than I do. When we eat out, I order steak and potatoes while he gets fish and vegetables. This cobbler was right up his alley.

Amanda will post the recipe on her blog.

blueberry pie (twd)

Blueberry season snuck up on me. When I first saw that Amy’s TWD pick this week was blueberry pie, I hadn’t yet seen seasonal blueberries at the store. But when I went just a few days later, blueberries had replaced strawberries in the produce place of honor. Phew. (Then we went camping in the supposed “blueberry capital of the world”, so…yeah, finding blueberries didn’t end up being a problem.)

Like most somewhat experienced bakers, I already have a favorite pie crust recipe. It’s tasty, flaky, easy to work with, and doesn’t require shortening. However, if I stubbornly cling to my old favorites and refuse to try new recipes, I’ll stagnate as a baker and a cook. I was certainly willing to give Dorie’s pie crust recipe a try.

I also have a favorite blueberry pie recipe, but again, with the trying new things…

Dorie’s pie crust knocked my socks off. It was delicious, flaky, tender, and even easier to work with than my other recipe. However, the shortening is actually a deal breaker with me. I’d rather be careful that my pie crust is chilled enough when I’m rolling it out than eat hydrogenated fats. Also, I think Dorie’s recipe needs to be scaled back a bit. It makes about 20% more crust than other recipes I’ve used, and as a result, the pie had a higher crust to fruit ratio than I like, even though I think I like pie crust more than most people. (Depending on the quality of the crust, of course.)

The filling, well, it reminded me that I love blueberry pie. I ate four (small, I swear!) pieces in one day. I reduced the sugar from 1 cup to ¾ cup, and I’m glad I did, I think I used just the right amount of sugar. I also didn’t have the lemon zest that I was supposed to use, so I fudged that with a bit of lemon extract. I still like my other recipe better – it uses cinnamon as a supporting flavor instead of Dorie’s lemon, and the cinnamon is surprisingly perfect with the blueberries.

The recipe calls for bread crumbs to be scattered on the bottom crust before the filling ingredients are added. I’m not putting breadcrumbs in blueberry pie; it’s just not happening. I considered using graham cracker crumbs, but ultimately got lazy and skipped this step entirely. I bake pies on a preheated baking sheet, which I think helps brown the bottom crust and keep it crispy. I had no problems with my crust getting soggy.

The recipe can be found on Amy’s blog.

apple cheddar scones (twd)

Apple and cheddar is a combination of flavors that I’ve heard about often but had never tried, so I was happy that Karina’s choice of Apple-Cheddar Scones for this week’s TWD recipe would give me that chance. Also, while I’m not sure if this is supposed to be a sweet or savory recipe, I served it with soup for dinner, which means I actually got to choose my own dessert to make last week! How exciting.

I made the full recipe, a rarity for me, and froze most of the shaped scones. The recipe came together with no hitches, although the dough was a bit stickier than I was expecting.

Although we ate these for dinner twice last week, situations beyond my control prevented me from enjoying one fresh from the oven. However, they were great even at room temperature. They were very light and tender.

That being said, I’ll tweak the recipe a bit for the next time I make it. Most importantly, I double the salt, because I kept hoping for just a bit more flavor from each bite, and this recipe calls for significantly less salt than most other biscuit recipes. I’d also cut the cheese into tiny squares instead of grating it, because I think the flavor almost gets lost when it’s evenly mixed in with the flour. I want little bursts of cheddar flavor. And I might increase the apples a bit, because I didn’t get as much apple flavor as I wanted either.

But they were still really good. I’m glad I have four more in the freezer. I’m also more interested in other apple-cheddar recipes now.

Karina has posted the recipe.

danish braids (daring bakers)

Wow, who knew making Danish dough would be so easy? I’d previously considered making some sort of laminated dough, Danish or croissants or the like, but the number of steps involved with those recipes made me think that it would be an intense project requiring the better part of a day.

Not so. While the dough needs some babysitting, each step of rolling the dough flat and folding it into thirds, repeated three times, takes only a minute or two.

And good thing, because I made two separate Danish doughs. After I quickly scanned the recipe near the beginning of the month, I started thinking about what I wanted to fill my Danishes with. I settled on a savory and a sweet version, and it wasn’t until a few days before the posting date, when I looked closer at the recipe, that I realized that the dough itself was sweet and might not be a good match for the red pepper, Italian sausage, and parmesan I’d planned to fill it with. So I made the dough twice, once as written (except leaving out the cardamom, orange zest, and vanilla bean due to laziness) to be filled with cherries and almonds, and another time, reducing the sugar, increasing the salt, replacing the orange juice with water, and eliminating the vanilla extract.

I was very happy with both the sweet and the savory breads. I thought the dough might be flakier than it was, but perhaps this was due to the heat in my kitchen when I was working with the dough. Maybe the butter melted into the dough instead of remaining as separate layers. Or maybe that’s just how this dough is. Regardless, it was very tender. I did think that it needed a bit more salt, and this is something I’ll take into account in the future.

Overall, this was a great learning experience. Now that I know what’s involved with making a laminated dough, I feel much more confident trying similar recipes, like croissants and puff pastry.

Danish Braids

This is the recipe as I made it. You can find the original recipe at this month’s hosts’ sites.

Sweet Danish Dough:
¾ teaspoon active dry yeast
2 tablespoons whole milk
1½ tablespoons sugar
½ teaspoon vanilla extract
½ large eggs, chilled
1 tablespoon fresh orange juice
4 ounces all-purpose flour
¼ teaspoon salt

Savory Danish Dough:
¾ teaspoon active dry yeast
2 tablespoons whole milk
1 teaspoon sugar
½ large eggs, chilled
1 tablespoon water
4 ounces all-purpose flour
1/3 teaspoon salt

For the butter block (Beurrage)
8 tablespoons (1 stick) cold unsalted butter
2 tablespoons all-purpose flour

For the dough: Combine yeast and milk in the bowl of a mixer fitted with the paddle attachment and mix on low speed. Slowly add sugar, vanilla extract, egg, and orange juice. Mix well. Change to the dough hook and add the salt with the flour, 1 cup at a time, increasing speed to medium as the flour is incorporated. Knead the dough for about 5 minutes, or until smooth. You may need to add a little more flour if it is sticky. Transfer dough to a lightly floured baking sheet and cover with plastic wrap. Refrigerate for 30 minutes.

For the butter block: Combine butter and flour in the bowl of a mixer fitted with a paddle attachment and beat on medium speed for 1 minute. Scrape down the sides of the bowl and the paddle and then beat for 1 minute more, or until smooth and lump free. Divide in two and set aside at room temperature.

2. After the dough has chilled 30 minutes, turn it out onto a lightly floured surface. Roll the dough into a rectangle approximately 9 x 6.5 inches and ¼ inch thick. The dough may be sticky, so keep dusting it lightly with flour. Spread the butter evenly over the center and right thirds of the dough. Fold the left edge of the dough to the right, covering half of the butter. Fold the right third of the rectangle over the center third. The first turn has now been completed. Mark the dough by poking it with your finger to keep track of your turns, or use a sticky and keep a tally. Place the dough on a baking sheet, wrap it in plastic wrap, and refrigerate for 30 minutes.

3. Place the dough lengthwise on a floured work surface. The open ends should be to your right and left. Roll the dough into another approximately 6.5 x 9 inch, ¼-inch-thick rectangle. Again, fold the left third of the rectangle over the center third and the right third over the center third. No additional butter will be added as it is already in the dough. The second turn has now been completed. Refrigerate the dough for 30 minutes.

4. Roll out, turn, and refrigerate the dough two more times, for a total of four single turns. Make sure you are keeping track of your turns. Refrigerate the dough after the final turn for at least 5 hours or overnight. The Danish dough is now ready to be used. If you will not be using the dough within 24 hours, freeze it. To do this, roll the dough out to about 1 inch in thickness, wrap tightly in plastic wrap, and freeze. Defrost the dough slowly in the refrigerator for easiest handling. Danish dough will keep in the freezer for up to 1 month.

Cherry filling:
1 can cherries, drained, ¼ cup juice reserved
1.5-2 tablespoons sugar
½ tablespoon cornstarch
pinch salt
drop almond extract
¾ teaspoon brandy
toasted almonds

Stir sugar, cornstarch, and salt together in saucepan. Whisk in reserved cherry juice and wine. Cook, whisking frequently, over medium-high heat, until mixture simmers and thickens. Stir in almond extract and cherries. Cover and refrigerate until ready to use. Add to braid along with toasted almonds.

Sausage filling:
¼ pound sausage
½ red pepper, diced

Put sausage and ¼ cup water in medium-large skillet. Cook over medium-high heat until water evaporates and sausage cooks through and browns, about 7 minutes, breaking up large pieces. Remove sausage with slotted spoon. Add enough oil so that amount in skillet equals about 1 tablespoon. Add peppers and sauté until softened slightly, about 5 minutes. Season to taste with salt and pepper. Remove and set aside. Add to braid along with grated pecorino and parmesan cheese.

DANISH BRAIDS:
2 sets of Danish Dough
½ cup of each filling

Beat 1 large egg for egg wash

1. Line a baking sheet with a silicone mat or parchment paper. On a lightly floured surface, roll the Danish Dough into a 10 x 15-inch rectangle, ¼ inch thick. If the dough seems elastic and shrinks back when rolled, let it rest for a few minutes, then roll again. Place the dough on the baking sheet.

2. Along one long side of the pastry make parallel, 4-inch-long cuts with a knife or rolling pastry wheel, each about ¾ inch apart. Repeat on the opposite side, making sure to line up the cuts with those you’ve already made.

3. Spoon the filling you’ve chosen to fill your braid down the center of the rectangle. Starting with the top and bottom “flaps”, fold the top flap down over the filling to cover. Next, fold the bottom “flap” up to cover filling. This helps keep the braid neat and helps to hold in the filling. Now begin folding the cut side strips of dough over the filling, alternating first left, then right, left, right, until finished. Trim any excess dough and tuck in the ends.

Egg Wash
Lightly coat the braid with the egg wash. Spray cooking oil onto a piece of plastic wrap, and place over the braid.

Repeat with remaining braid and filling.

Proofing and Baking
1. Proof at room temperature or, if possible, in a controlled 90 degree F environment for about 2 hours, or until doubled in volume and light to the touch.

2. Near the end of proofing, preheat oven to 400 degrees F. Position a rack in the center of the oven. Brush braids with egg wash again.

3. Bake for 10 minutes, then rotate the pan so that the side of the braid previously in the back of the oven is now in the front. Lower the oven temperature to 350 degrees F, and bake about 15-20 minutes more, or until golden brown. Cool and serve the braid either still warm from the oven or at room temperature. The cooled braid can be wrapped airtight and stored in the refrigerator for up to 2 days, or freeze for 1 month.

yeasted waffles with vanilla butter, sliced bananas and candied macadamia nuts

I try to resist having too many kitchen gadgets squeezed into my apartment’s small galley-style kitchen, but somehow I ended up with two waffles irons. One for flatter, traditional waffles and then one of those huge Belgian waffle makers that you see in hotel complementary breakfast line-ups.

Yikes. That’s a big waffle maker. But I figure the more I use it, the more justification I have for owning it. Danielle recently described a breakfast she had in a restaurant as a “dance in your seat meal” – sourdough waffles with candied walnuts and sliced bananas, served with vanilla butter. Hmm…yum.

I was pretty sure I could recreate it with just a few adjustments. I don’t have sourdough starter, but one of the recipes that came with my waffle iron uses yeast. It’s an easy recipe to put together, and in fact, most of it is done the night before, which I always like with breakfast recipes. The waffles ended up tasting fairly sourdoughy actually, plus they were wonderfully crisp on the outside and tender on the inside.

I didn’t have walnuts, but I sugared macadamia nuts using the same method used for the peanuts in the Snickery Squares recipe. For the vanilla butter, I mixed softened butter with my homemade vanilla extract and just a little powdered sugar. I considered using a real vanilla bean, but I got lazy.

Overall, it was great! I wasn’t crazy about the banana, either because it was too ripe, or because I eat bananas so much that I’m just not interested in them in a weekend breakfast. But the nuts were great, and it was nice not having to slather everything in maple syrup. The real find of this meal was the waffle recipe, which is the best I’ve ever made, and will certainly be my standard recipe in the future.

Good Night Waffles (adapted from the Waring Pro Belgian Waffle Maker instruction booklet)

I reduced the butter in this recipe from 8 tablespoons to 6 tablespoons since I knew I’d be topping the waffles with vanilla butter. Because the waffles seemed so good with the lower amount of butter, I figured I might as well stick with it.

½ cup water
1 tablespoon granulated sugar
2¼ teaspoons (one packet) instant dry yeast
2 cups whole milk
6 tablespoons unsalted butter, melted and cooled
1 teaspoon salt
2 cups all-purpose flour
2 large eggs, lightly beaten
2 teaspoons vanilla extract
¼ teaspoon baking soda

1. The night before, or at least 8 hours before baking, combine the warm water, granulated sugar, yeast, milk, melted butter, and salt. Beat in the flour until smooth (this may be done using a hand mixer on low speed). Wrap bowl tightly with plastic wrap and let stand overnight (or for 8 hours) on the countertop – do not refrigerate.

2. When ready to bake, preheat your waffle maker on your preferred setting. While the waffle maker is heating, stir the eggs, vanilla extract, and baking soda into the batter. Measure out enough batter for your waffle maker and pour into the preheated waffle maker. Use a heat-proof spatula to spread the batter evenly over the grids. Close lid and bake the Belgian waffle in the waffle maker until it indicates the waffle is done.

3. Remove waffle and repeat until the desired number of Belgian waffles has been made. Cover remaining batter and place in the refrigerator for up to 3 days. Waffles may be kept warm in an oven at low-heat (200°F). Place Belgian waffles on a cookie sheet on a rack in the warm oven.

This made 6 waffles for me. I served it with 3 sliced bananas, 1 cup sugared macadamia nuts, and 3 tablespoons vanilla sugar. Vanilla sugar was made by mixing 3 tablespoon butter with 1 teaspoon vanilla extract and 2 tablespoons powdered sugar.

mixed berry cobbler (twd)

The mixed berry cobbler that Beth chose for this week’s TWD recipe may be Dorie’s least popular recipe so far. The discussion thread for the recipe had one negative review after another, mostly revolving around a lack of flavor in the biscuit topping.

When I got a chance to look at the recipe closer, I was surprised by how poorly it had been received by other bakers. I compared the ingredients of Dorie’s cobbler topping to my favorite shortbread recipe, and they’re identical except for the shortbread calls for 50% more sugar. True, my favorite cobbler recipes call for even more sugar. Keeping that in mind, I added an extra tablespoon of sugar to the biscuit dough. I also reduced the sugar in the filling just slightly.

I knew immediately after making the biscuit dough that my cobblers were going to be delicious. In my experience, there’s a close correlation between how good the dough tastes and how good the baked good tastes, and this was some very tasty dough.

I was right. A few TWD members also commented that there was too much dough per fruit, but the dough was like a big delicious biscuity cookie, so for me, the more, the better. The biscuit had soaked up the fruit’s juices and was saturated with flavor. I generally shy away from serving my desserts with ice cream (do I really need two desserts in one sitting?), but this time, I couldn’t resist adding just a small scoop of vanilla ice cream to add a sweet balance to the tart berries. Absolutely wonderful.

Dorie’s recipe for Mixed Berry Cobbler can be found on the NPR website.

la palette’s strawberry tart

I joined TWD right at the beginning of strawberry season – when the first flavorless strawberries started showing up in stores, and I bought them just because I was excited about warmer weather and everything that goes along with it. I was eager to make one strawberry dessert after another during their short season, but the TWD recipe-choosers haven’t been on that same wavelength. (Of course, not all of TWD’s members are in the Northern Hemisphere anyway.) I still bought strawberries each week, and every week they’re more flavorful than the last. The strawberry tart that Marie chose for this week’s recipe was a perfect way to showcase delicious seasonal strawberries.

I make only a portion of most TWD recipes, since I’m only cooking for myself and Dave, and my capacity to bake outstrips our capacity to eat. But I didn’t want to take pictures of yet another mini-tart. I actually don’t have a fluted 9-inch tart pan, but I’ve successfully used my 9-inch springform pan for tarts in the past.

Dorie calls this dessert “rustic in the extreme”, so I decided to play that up. A rustic tart has no need for fluted, or even neat, edges, so I just quickly pressed the dough into the pan. A number of people had problems with the crust being too hard, so I was careful to only lightly press the dough. It did, however, end up ever so slightly more rustic than I had intended…

Although the recipe sounds extraordinarily simple – crust, jam, strawberries, whipped cream – it really does add up to more than its parts. I was surprised by how much the jam added to the flavor of the tart. My crust seemed more tender than most people described theirs, so maybe lightly pressing it into the pan worked? (Scratch that – I just cut the crust into slices, and it was a crumbly crackly mess.) I haven’t tried sprinkling the strawberries with Dorie’s suggested black pepper, but after reading a few positive reviews on that method, I’m going to try it with tonight’s serving. Although strawberry shortcake isn’t going anywhere as my favorite strawberry-showcasing dessert, I’m looking forward to finishing up this tart throughout the week.

Dorie has discussed this dessert and provided the recipe on Serious Eats. I made the recipe without any changes, but in the future, I’d like another 1/8 teaspoon salt in the crust.

french chocolate brownies (twd)

One of my favorite aspects of Dorie Greenspan’s Baking is that she gives twelve brownie recipes. There’s so much discussion about the best brownie recipe that it seems like sometimes the variety between brownies gets overlooked. Not only are there different add-ins – turtle brownies, espresso brownies, creme de menthe brownies – but there are different textures, and one isn’t necessarily better than another. Di’s TWD choice of French Chocolate Brownies was the first of Dorie’s brownies recipes that I tried.

Dorie tells a story of how these brownies were intended to be a rich chocolate cake, but her guests mistook them for brownies, and she didn’t correct them. I can see the confusion. The ingredient list is classic brownie, but the mixing method and resulting texture bridge the line between brownie and cake. Beating the eggs and sugar together until they’re thick creates a light, airy confection that is at the same time tender and moist and far less dense than most brownies.

Dorie calls for the unusual addition of flambéed raisins to the brownies, which most members of TWD weren’t excited about. I considered leaving that step out altogether, but didn’t want to miss out on the fun of flambéing. One of my favorite dessert combinations is raspberries and chocolate, so I used fresh raspberries. It was perfect. I think I’ll always add the raspberries to this recipe.

My only disappointment with these brownies was that they weren’t as chocolately as I would prefer, but I don’t blame Dorie for that. She says she prefers bittersweet chocolate over semisweet, but of course those words don’t have any official meaning in the US. I usually bake with Ghirardelli, whose bittersweet chocolate is 60% cacao, but this time I used Sharffenberger, whose semisweet is 60%, so I bought the semisweet. I probably should have used their bittersweet. On top of that, I read a Cooks Illustrated’s review of dark chocolates, and their comments for Sharffenberger included “lacked choco-oomph.” So perhaps it wasn’t the best choice of chocolate for this recipe.

But regardless, I’m nitpicking (again). I savored every single bite I took of these brownies, and I was sad when I finished each serving. I love that they’re chocolately and rich, but also unique for a brownie in their cakelike tenderness. And, an added bonus for a middle-brownie lover? There’s really no difference between the edges and middle. Every single serving is moist and light.

French Chocolate Brownies (from Dorie Greenspan’s Baking: From My Home to Yours)

16 brownies

Bridget note: I substituted about ½ cup fresh raspberries, halved, for the raisins. Instead of boiling them in water as in step 2, I gently heated them in a small skillet before adding the rum and continuing with step 2.

Update: I made these again, this time using a Pyrex dish instead of the metal pan I used for the original entry.  I don’t know if things bake faster in glass or what, but I must have overbaked them, because the brownies were too dry.   So check for doneness early!

½ cup all-purpose flour
⅛ teaspoon salt
⅛ teaspoon cinnamon (optional)
⅓ cup raisins, dark or golden
1½ tablespoons water
1½ tablespoons dark rum
6 ounces bittersweet chocolate, finely chopped
1½ sticks (12 tablespoons; 6 ounces) unsalted butter, at room temperature and cut into 12 pieces
3 large eggs, at room temperature
1 cup sugar

Getting ready: Center a rack in the oven and preheat the oven to 300°F. Line an 8-inch square baking pan with foil, butter the foil, place the pan on a baking sheet, and set aside.

1. Whisk together the flour, salt and cinnamon, if you’re using it.

2. Put the raisins in a small saucepan with the water, bring to a boil over medium heat and cook until the water almost evaporates. Add the rum, let it warm for about 30 seconds, turn off the heat, stand back and ignite the rum. Allow the flames to die down, and set the raisins aside until needed.

3. Put the chocolate in a heatproof bowl and set the bowl over a saucepan of simmering water. Slowly and gently melt the chocolate, stirring occasionally. Remove the bowl from the saucepan and add the butter, stirring so that it melts. It’s important that the chocolate and butter not get very hot. However, if the butter is not melting, you can put the bowl back over the still-hot water for a minute. If you’ve got a couple of little bits of unmelted butter, leave them-it’s better to have a few bits than to overheat the whole. Set the chocolate aside for the moment.

4. Working with a stand mixer with the whisk attachment, or with a hand mixer in a large bowl, beat the eggs and sugar until they are thick and pale, about 2 minutes. Lower the mixer speed and pour in the chocolate-butter, mixing only until it is incorporated-you’ll have a thick, creamy batter. Add the dry ingredients and mix at low speed for about 30 seconds-the dry ingredients won’t be completely incorporated and that’s fine. Finish folding in the dry ingredients by hand with a rubber spatula, then fold in the raisins along with any liquid remaining in the pan.

5. Scrape the batter into the pan and bake 50 to 60 minutes, or until the top is dry and crackled and a knife inserted into the center of the cake comes out clean. Transfer the pan to a rack and allow the brownies to cool to warm or room temperature.

6. Carefully lift the brownies out of the pan, using the foil edges as handles, and transfer to a cutting board. With a long-bladed knife, cut the brownies into 16 squares, each roughly 2 inches on a side, taking care not to cut through the foil.

Serving: The brownies are good just warm or at room temperature; they’re even fine cold. I like these with a little something on top or alongside-good go-alongs are whipped crème fraiche or whipped cream, ice cream or chocolate sauce or even all three!

Storing: Wrapped well, these can be kept at room temperature for up to 3 days or frozen for up to 2 months.

I’m out of town this week, building sand castles and burying nephews in the sand. I’ll be back next week to catch up on comments and other blogs!

florida pie (twd)

I’m guessing there are recipes in Dorie’s book that aren’t obscenely rich. In fact, there’s a whole section on muffins! But the TWD recipe choosers have thus far gravitated toward the decadent side of the book, at least since I joined. This week is no exception, as Dianne’s choice of Florida Pie has well over a cup of cream in addition to the can of sweetened condensed milk, the butter in the crust, and a fair amount of coconut.

Fortunately, it’s all worth it because I love citrus desserts, especially Key lime pie. I only recently realized that I liked coconut, so this was a fun way to incorporate it into a favorite dessert.

I didn’t follow the recipe quite as closely as I normally do. I did make the coconut cream the recommended way, by simply boiling heavy cream and sweetened shredded coconut together until they reduce and thicken. For the lime filling, however, I was surprised that Dorie didn’t call for zest, and since I like my citrus desserts on the puckery side, I added about 2 limes worth. Where I strayed from the recipe the most was in the freezing steps, of which Dorie has two – one after the filling is added, and one after the meringue is toasted. I’m not sure what the purpose of either of these freezing stages is – perhaps to keep the filling cold while the pie is broiled? I used a blow torch to brown the meringue, and I didn’t want my pie frozen, so I skipped both visits to the freezer.

Overall, the pie (or in my case, tartelettes) were good. I do love lime. I have to admit that I consider the coconut more of a distraction than an improvement, but I enjoyed the dessert regardless.

Florida Pie (from Dorie Greenspan’s Baking: From My Home to Yours)

1 9-inch graham cracker crust, fully baked and cooled, or a store-bought crust
1⅓ cups heavy cream
1½ cups shredded sweetened coconut
4 large eggs, separated
1 14-ounce can sweetened condensed milk
½ cup fresh Key (or regular) lime juice (from about 5 regular limes)
¼ cup of sugar

Getting Ready: Center a rack in the oven and preheat the oven to 350 degrees F. Put the pie plate on a baking sheet lined with parchment or a silicone mat.

Put the cream and 1 cup of the coconut in a small saucepan and bring it to a boil over medium-low heat, stirring almost constantly. Continue to cook and stir until the cream is reduced by half and the mixture is slightly thickened. Scrape the coconut cream into a bowl and set it aside while you prepare the lime filling.

Working with a stand mixer, preferably fitted with a paddle attachment, or with a hand mixer in a large bowl, beat the egg yolks at high speed until thick and pale. Reduce the mixer speed to low and beat in the condensed milk. Still on low, add half of the lime juice. When it is incorporated, add the remaining juice, again mixing until it is blended. Spread the coconut cream in the bottom of the graham cracker crust, and pour over the lime filling.

Bake the pie for 12 minutes. Transfer the pie to a cooling rack and cool for 15 minutes, then freeze the pie for at least 1 hour.

To Finish the Pie with Meringue: Put the 4 egg whites and the sugar in a medium heavy-bottomed saucepan and heat over medium-low heat, whisking all the while, until the whites are hot to the touch. Transfer the whites to a stand mixer, fitted with the whisk attachment, or use a hand mixer in a large bowl, and beat the whites at high speed until they reach room temperature and hold firm peaks. Using a rubber spatula, fold the remaining ½ cup coconut into the meringue.

Spread the meringue over the top of the pie, and run the pie under the broiler until the top of the meringue is golden brown. (Or, if you’ve got a blowtorch, you can use it to brown the meringue.) Return the pie to the freezer for another 30 minutes or for up to 3 hours before serving.