spice-rubbed picnic chicken

picnic chicken 7

Family vacations require a careful balance of time together and time apart. Originally, my family found that cruises worked well – everyone does their own thing during the day and we meet up for dinner. The last few years, we’ve started renting a house on the beach for a week. We still make sure to have dinner together every evening, but now we have to cook it ourselves.

picnic chicken 1

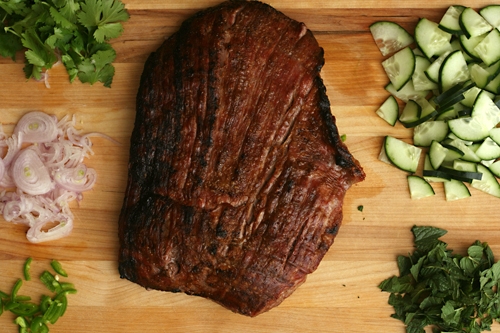
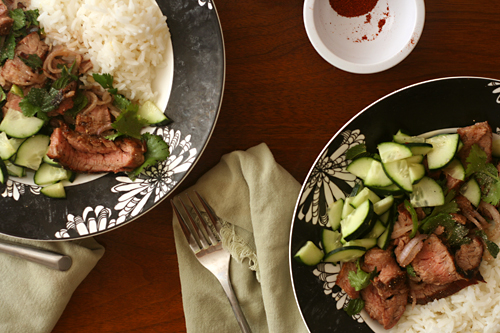
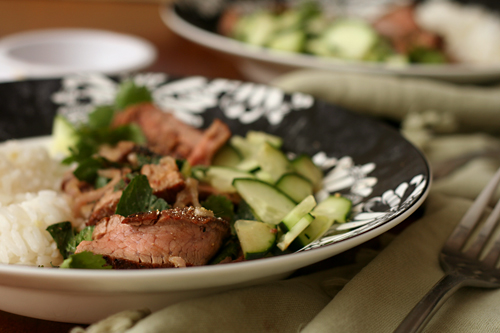
Despite my love for spending time in the kitchen, I have a greater love of sitting on the beach drinking margaritas. No one in my family is willing to cook dinner for the group every night. Instead, we take turns. On one trip, I made pasta with tomatoes and fresh mozzarella, salad, and crostini topped with white beans and with tuna. Last year, everyone built and then grilled their own pizza. Fajitas and chicken gyros are also crowd-pleasers.

picnic chicken 2

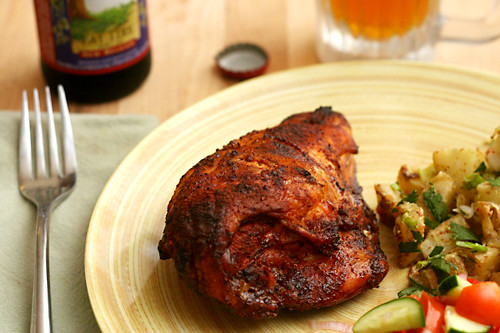
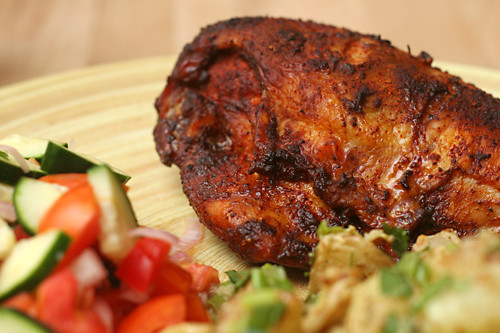
Between shredding cheese, preparing toppings, and stretching out ten rounds of dough, last year’s pizza extravaganza was ambitious. This year, I wanted something easier. This baked chicken is perfect because it’s actually meant to be cooked in advance, which means I can do it whenever I need a quick break from the sun.

picnic chicken 4

I mixed up the spices at home, so all I need to do on vacation is rub them on the raw chicken the day before it’s my turn to cook and store the meat in the refrigerator overnight. The chicken soaks up spice and salt, which also helps it retain moisture as it bakes. It ends up tasting like barbecued chicken that’s been smoking all day on the grill, but it’s completely undemanding. Undemanding is what vacation is all about.

picnic chicken 5

One year ago: Green Goddess Salad
Two years ago: Lemon Meringue Cake
Three years ago: Tuscan-Style Couscous Salad

Printer Friendly Recipe
Spice-Rubbed Picnic Chicken (from Cooks Illustrated)

Serves 8

If you have space to store 5 pounds of chicken pieces in your refrigerator all lined up on a baking sheet, you are lucky to be so rich in fridge space. I just pile the spiced chicken in a bowl with a cover.

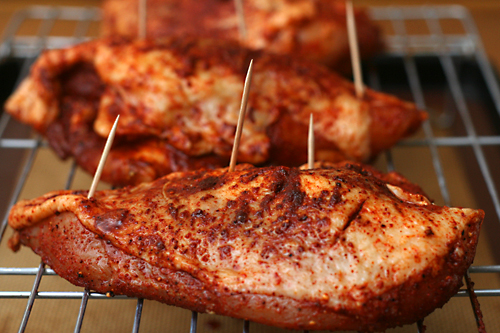
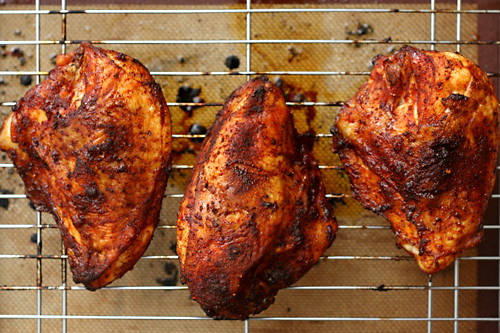
As you can see from the pictures, I did not cut the breasts into smaller pieces. Obviously it took longer to cook, but it worked fine.

5 pounds bone-in, skin-on chicken pieces (breasts, thighs, drumsticks, or a mix with breasts cut into 3 pieces or halved if small), trimmed of excess fat and skin
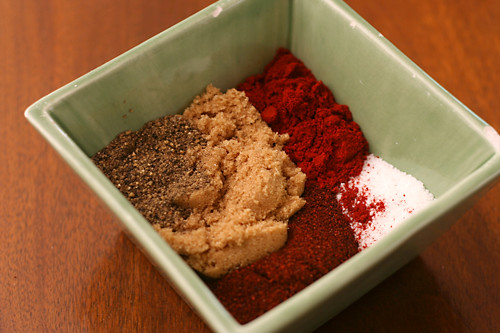
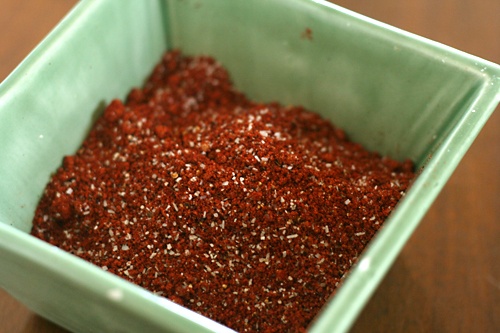
2 tablespoons kosher salt
3 tablespoons brown sugar
2 tablespoons chili powder
2 tablespoons sweet paprika
2 teaspoons ground black pepper
¼-½ teaspoon cayenne pepper

1. Use a sharp knife to make 2 or 3 short slashes in the skin of each piece of chicken, taking care not to cut into meat. Combine the salt, sugar, and spices in a small bowl and mix thoroughly. Coat the chicken pieces with the spices, gently lifting the skin to distribute the spice rub underneath but leaving it attached to chicken. Transfer the chicken skin side up to wire rack set over rimmed foil-lined baking sheet, lightly tent with foil, and refrigerate 6 to 24 hours.

2. Secure the skin of each breast piece with 2 or 3 toothpicks placed near the edges of the skin.

3. Adjust an oven rack to the middle position; heat the oven to 425 degrees. Roast the chicken until the thickest part of smallest piece registers 140 degrees on an instant-read thermometer, 15 to 20 minutes. Increase the oven temperature to 500 degrees and continue roasting until the chicken is browned and crisp and the thickest parts of the breast pieces register 160 degrees, 5 to 8 minutes longer, removing pieces from the oven and transferring to a clean wire rack as they finish cooking. Continue to roast the thighs and/or drumsticks, if using, until the thickest part of the meat registers 170 to 175 degrees, about 5 minutes longer. Remove from the oven; transfer the chicken to a rack and let it cool completely before refrigerating or serving.

picnic chicken 6

cocoa almond meringues

almond cocoa meringues 3

Sometimes I ignore the rules of baking, and other times I over-follow them. For example, when I see DO NOT OVERMIX in big bold capital letters, I will overcompensate, undermix, and bake clumps of raw flour into my genoise cake. On the other hand, if it’s raining and I decide I want to make meringues, I will make meringues, despite knowing that you’re not supposed to make meringues when it’s humid.

almond cocoa meringues 1

That first meringue cookies I made, years ago, while it was raining, were sticky and heavy and not good at all. Now I live in the desert in the middle of a drought. Humidity isn’t so much an issue.

almond cocoa meringues 2

Because this was only my second attempt at meringue cookies and the first was a bust, I’m not sure how they’re supposed to be. The outside of the cookies is crisp and light and shatters into tiny pieces when you bite into it. The inside was chewy. Is this because I didn’t follow the rules and opened the oven halfway through baking? Or did I, heaven forbid, OVERMIX? Or is this how they’re supposed to be?

almond cocoa meringues 5

Either way, it turns out that I like meringue cookies, especially meringue cookies that have cocoa and chocolate chips in them. And other than cracking open the oven door to sneak in the crème brulee I made with the egg yolk leftover after making meringues, I made the exact recipe – which can be found on Mike’s blog, as he chose this for Tuesdays with Dorie.

One year ago: Gingered Carrot Cookies
Two years ago: Banana Bundt Cake
Three years ago: Black and White Banana Loaf

almond cocoa meringues 4

chocolate sorbet

chocolate sorbet 3

My feelings toward cookie dough are well documented. In short, I like it a lot. It isn’t just cookie dough either; it’s anything made in the mixer and not in its final form, which means that also includes frosting and all manner of batters.

chocolate sorbet 1

But somehow, on Saturday, I made muffins, snickerdoodle dough, frosting, and chocolate sorbet without overeating even a little. I was some kind of self-control expert!  So I was extra surprised on Sunday when I ate enough chocolate sorbet to put me over that edge of too much. Chocolate sorbet? Who knew?

It snuck up on me, I think, because chocolate sorbet seems like it should be so rich and indulgent, but it’s also refreshing and light. It’s easy to justify one more little scoop, because there’s no butter or cream. It’s just sugar and milk, and heck, chocolate – everyone knows chocolate is good for you. There’s no need for self-control!  Except for all the sugar, of course, not to mention the fat in the chocolate.  Healthwise, though, it could be a lot worse – it could be cookie dough.

chocolate sorbet 5

Steph chose this for Tuesdays with Dorie; she has the recipe posted. Other than adding a pinch of salt and a dribble of vanilla, I followed it as written, but my sorbet is definitely grainy. Maybe I should have whisked more or even given it a whirr in the blender.

One year ago: Chewy Chunky Brownies
Two years ago: Vanilla Ice Cream
Three years ago: Summer Fruit Galette

chocolate sorbet 4

tapioca pudding comparison

tapioca pudding 11

Everyone knows there’s science in cooking – reactions occur when heat is applied to ingredients or even just mixed together, like the bubbles that form when baking powder is stirred into batter. But rarely when I cook do I feel like a scientist. I understand some of what’s happening on a molecular level, but following the steps in a recipe, or even hashing out my own path on the stovetop, does not feel like doing science.

tapioca pudding 2

Recipe comparisons are when I get to be an experimentalist and a cook/baker all at once, and that’s why I love them, despite all the work they entail. I thought a tapioca pudding comparison would be easier, and so I wouldn’t mind sharing it with Jen as part of her Friday Favorites series. And besides, Jen’s an engineer – that’s just a scientist with a purpose. It wasn’t until later that I found out that Jen doesn’t like pudding.

tapioca pudding 9

I would have loved for my first shared comparison to be one of those rarities in which there’s a clear favorite, but there wasn’t even one recipe that we loved. Cooks Illustrated’s had a weird gritty texture, Kraft’s was lacking flavor, and I completely messed up Mark Bittman’s recipe – although that one ended up being Dave’s favorite. Clearly more experimentation is in order, and that is absolutely fine with me. Check out Jen’s blog to get the full analysis, more photos, and the recipes – the very first pudding recipes in her blog, and perhaps the only ones she’ll ever post!

One year ago: Tacos al Pastor
Two years ago: Crockpot Chicken Broth
Three years ago: Chicken with Forty Cloves of Garlic

tapioca pudding 10

thai grilled-beef salad

thai steak salad 4

My habit is that on weekdays, I eat vegetarian and am healthy, and on weekends, I eat meat and am not healthy. I save alcohol and lately even dessert for weekends. It all evens out in the end so that I’m relatively fit and trim, but I’m starting to wonder – would it be so bad to eat meat and be healthy, all at the same time?

thai steak salad 1

Steak doesn’t have to mean huge T-bones and potatoes. It can mean slivers of beef mixed with herbs and served with cucumbers. This flank steak is seasoned with salt and (white) pepper, grilled and sliced, then dressed with a mixture of lime juice and fish sauce. Toasted white rice powder deepens the flavors while fresh herbs lighten them.

thai steak salad 3

I wonder how many other great meat-topped salads are out there that I’ve been overlooking. Although even if there aren’t any others worth trying, I’d be perfectly happy making this one over and over again. Eating healthy on weekends doesn’t feel like a sacrifice when it tastes so good – and besides, I still get to have a glass of wine on the side.

thai steak salad 5

One year ago: Garlic Mustard Glazed Skewers
Two years ago: Seafood Lasagna
Three years ago: Vanilla Ice Cream

Printer Friendly Recipe
Thai Grilled-Beef Salad (from Cooks Illustrated)

Serves 4 to 6

1 teaspoon sweet paprika
1 teaspoon cayenne pepper
1 tablespoon white rice
3 tablespoons lime juice (from 2 limes)
2 tablespoons fish sauce
2 tablespoons water
½ teaspoon sugar
1½ pound flank steak, trimmed
Salt and white pepper, coarsely ground
4 shallots, sliced thin
1½ cups fresh mint leaves, torn
1½ cups fresh cilantro leaves
1 Thai chile, stemmed and sliced thin into rounds
1 seedless English cucumber, sliced ¼ inch thick on bias

1. Heat the paprika and cayenne in an 8-inch skillet over medium heat; cook, shaking the pan, until fragrant, about 1 minute. Transfer to a small bowl. Return the now-empty skillet to medium-high heat, add the rice, and toast, stirring frequently, until deep golden brown, about 5 minutes. Transfer to a second small bowl and cool for 5 minutes. Grind the rice with a spice grinder, mini food processor, or mortar and pestle until it resembles fine meal, 10 to 30 seconds (you should have about 1 tablespoon rice powder).

2. Whisk the lime juice, fish sauce, water, sugar, and ¼ teaspoon toasted paprika mixture in a large bowl and set aside.

3. For a Charcoal Grill: Open the bottom vent completely. Light a large chimney starter filled with charcoal briquettes (6 quarts). When the top coals are partially covered with ash, pour the coals evenly over half of the grill. Set the cooking grate in place, cover, and open the lid vent completely. Heat the grill until hot, about 5 minutes.

For a Gas Grill: Turn all burners to high, cover, and heat the grill until hot, about 15 minutes. Leave the primary burner on high and turn off the other burner(s).

4. Clean and oil the cooking grate. Season the steak with salt and white pepper. Place the steak over the hot part of the grill and cook until it’s beginning to char and beads of moisture appear on the outer edges of the meat, 5 to 6 minutes. Flip the steak and continue to cook on the second side until charred and the center registers 125 degrees, about 5 minutes longer. Transfer to a plate, tent loosely with aluminum foil, and let rest for 5 to 10 minutes (or allow to cool to room temperature, about 1 hour).

5. Slice the meat, against the grain and on the bias, into ¼-inch-thick slices. Transfer the sliced steak to the bowl with the fish sauce mixture. Add the shallots, mint, cilantro, chile, and half of the rice powder; toss to combine. Transfer to a platter lined with cucumber slices. Serve, passing the remaining rice powder and toasted paprika mixture separately.

thai steak salad 6

baked eggs in mushrooms with zucchini ragout

zucchini ragout 5

When Cara asked me to guest post and offered the suggestion of focusing on a vacation that I’m excited about, I jumped at the chance to chatter to a new audience about my upcoming trip to Italy. Italy! Venice! The Cinque Terre! Tuscany! Rome! And then there’s the stuff that I’m really excited about – wine and espresso and cheese and pesto and bread and seafood. Also wine. Check out Cara’s blog to read about the Baked Eggs in Mushrooms with Zucchini Ragout I made, which involves no wine or espresso or pesto or bread or seafood. At least there’s cheese.

carrot avocado salad

carrot avocado salad 3

The problem with just about every recipe that contains avocado is that there isn’t enough avocado. The only exception I can think of is guacamole, because it’s almost entirely avocado. My favorite way to eat avocado is on toast with a sprinkling of kosher salt.

carrot avocado salad 2

My usual way of eating it, however, is as an accent in which there’s just enough avocado so that most bites have a tiny portion. And all the bites without avocado are just sad.  And all the bites that do have avocado need more of it.

carrot avocado salad 1

And that is what I love about this salad – avocado is the main event, or at least it shares equal billing with the sweet caramelized carrots. It might sound like an unusual combination, but it works. The radishes add a nice touch as well, crisp and spicy. I’m pretty sure the only way I could like this salad more would be if I left out the carrots, pepper, cumin, olive oil, and radishes. And maybe added in some toast.

carrot avocado salad 4

One year ago: Spinach Artichoke Pizza
Two years ago: Tofu Mu Shu
Three years ago: Crockpot Pulled Pork

Printer Friendly Recipe
Roasted Carrot and Avocado Salad (adapted from Smitten Kitchen)

4 servings

I prefer to use a regular olive oil to roast the carrots and extra virgin olive oil in the dressing.

1 pound carrots, scrubbed or peeled and cut into two-inch segments
Coarse salt and freshly ground black pepper
½ teaspoon ground cumin
3 tablespoons olive oil, divided
3 tablespoons lemon juice
4 radishes, chopped small
1 avocado, pitted and sliced

1. Adjust a rack to the middle position and heat the oven to 400 degrees. On a large baking sheet, toss the carrots with ¼ teaspoon salt, ⅛ teaspoon pepper, cumin, and 2 tablespoons olive oil. Roast for about 20 to 30 minutes, until the carrots are tender and browned.

2. In a small bowl, whisk together the lemon juice and the remaining tablespoon olive oil. In a medium serving bowl, combine the carrots, avocado and radishes. Drizzle the vegetables with the dressing, adding more salt and pepper to taste. Serve immediately.

carrot avocado salad 5

caramel pots de creme

caramel pots de creme 4

Despite a few bumps in the road, caramel and I have always been on good terms. I’ve had a good, safe method that I’m comfortable with: add sugar and water to a pot, be careful not to get any crystals on the sides of the pot, stir in some corn syrup for safety, bring to a simmer, be careful to brush down any crystals on the sides of the pot, watch carefully while it darkens, be careful to swirl the pan instead of stir with anything that might have sugar crystals on it. It worked…as long as I was careful.

caramel pots de creme 1

I knew there was this no-water method, in which sugar is melted directly, instead of dissolved in water first. But it seemed so much safer to add water and dissolve the sugar first, despite all the being careful that that method entailed. I assumed I’d try the other method eventually, but, for years, I was nervous.

I finally took the plunge this weekend, and, friends? Dive right in, because the water is just fine.

caramel pots de creme 2

Directly melting the sugar is so much easier! Why does anyone bother with that troublesome water method? It takes twice as long, and there’s all this being careful to be careful about. Just put the sugar in a pot, turn the heat on, stir when it starts to melt and keep stirring as it darkens, which takes just a few minutes. And then if you want a real treat, mix in some heavy cream and eggs for a smooth, creamy, thick custard that has a hint of burnt sugar – a hint you hardly had to work for.

Peggy chose this recipe for Tuesdays with Dorie, and she has the recipe posted. I added a hefty pinch of salt to balance all that sugar.

One year ago: White Chocolate Brownies
Two years ago: Cappuccino Muffins
Three years ago: French Chocolate Brownies

caramel pots de creme 3

basic coleslaw

Once upon a time, I thought I didn’t like coleslaw. A Cooks Illustrated recipe turned me around, but over time, I found aspects of it that I didn’t love. One is that is really does take about 4 hours of salting the cabbage for it to draw out enough water to avoid a watery dressing. Then you have to rinse the salt off so your slaw isn’t too salty, and then you have to dry the cabbage, because wasn’t the whole point of salting to remove water?

The dressing of that recipe is based on buttermilk, which is a great lowfat option, but is too thin to coat the cabbage strands well. Many slaw dressings are nothing more than flavored mayonnaise, and while I do love mayonnaise, I don’t like to spend so much of my calorie budget on salad. The dressing for my old favorite recipe also requires sour cream, which I never have.

The answer, like I’m finding it is to so many things, is Greek yogurt. It’s everything you want in a slaw dressing – thick, creamy and tangy. Oh, and full of protein instead of just fat. I like to use the same flavorings used in the Cooks Illustrated recipe – cider vinegar, parsley, minced onion, a wee bit of sugar. I also like to mix a spoonful of mayonnaise into the yogurt. It’s amazing how even a small proportion of mayonnaise can make the whole mixture taste like it’s full of the fattening stuff.

With a thicker dressing, it isn’t as necessary to draw water out of the cabbage. If I have time, I still often sprinkle the shredded cabbage with salt and set it aside, but I use only as much salt as I need to include in the salad anyway – so no tedious rinsing and drying is required. Without needing to plan four hours in advance, I can mix up a quick coleslaw while Dave heats the grill for brats. I’m not going to say that I like the coleslaw more than the sausage – but it’s close, and it’s a heck of a lot healthier too.

One year ago: Grilled Artichokes
Two years ago: Basic Lentil Soup
Three years ago: Snickery Squares

Printer Friendly Recipe
Basic Coleslaw (adapted from Cooks Illustrated)

You can see that I now take a very laid back approach to preparing slaw. This is what happens when I start making things for lunch on Saturday; I can’t be bothered with details when it’s 85 degrees and sunny out. Sometimes I combine the first few ingredients earlier in the morning and set them aside until later to lightly pickle to cabbage and onion, but sometimes I make the slaw start to finish right before serving. Either way works great.

Feel free to use any fat level of Greek yogurt.

½ cabbage, sliced thin
¼ cup minced red onion
¼ teaspoon table salt
1 teaspoon cider vinegar
½ teaspoon sugar
½ teaspoon Dijon mustard
1/8 teaspoon ground black pepper
1 carrot, shredded
2 tablespoons minced fresh parsley leaves
1 (7-ounce container) plain Greek yogurt
2 tablespoons mayonnaise

In a large bowl, stir together the cabbage, onion, salt, vinegar, and sugar. Set aside while you prepare the remaining ingredients. Add the rest of the ingredients and stir to combine.

barbecued pulled pork

The best part of barbecuing a whole pork shoulder on the grill is that you are forced to spend all day outside tending the grill. I can’t think of many better ways to spend a Saturday. We started the grill before breakfast, then spent the rest of the day in the backyard.  First we drank coffee, then some water because you have to to survive, even on weekends, and then it was time for afternoon margaritas, and then we capped it off with beer, because what else are you going to drink with pulled pork?

The truth is that while you do need to keep a constant-ish eye on the grill, you don’t need to spend much time actually doing anything with it. Once the pork is cooking, it takes just a couple of seconds every hour or so to add a handful of fresh coals. A thermometer is key to monitor the temperature, although a cheap oven thermometer – which is what I used – will work just fine.  And if you do find the temperature varying widely, it won’t ruin your pork; just let it slowly come down to the right temperature range or add more coals to bring it up and continue cooking. Cooking a whole pork shoulder on the grill is a simple and forgiving process, even if it does take a long time.

I know the question everyone is asking: Is it really better than crockpot pulled pork? Well, of course it is. Crockpot pulled pork, especially using the same spice rub, is incredible – flavorful, tender, and easy easy easy. Barbecued pulled pork isn’t as moist and as a result, its flavor seems more concentrated. It’s still easy to pull, but it has more chew than crockpot pulled pork, which can get mushy if you’re not careful. The biggest difference were the outside bits of the roast, which were deeply browned and crisp. (This is not the same thing as the blackened top in the photo below, which is a thick layer of fat that I discarded.) Dave and I filled up on those while I was still shredding the roast. But the best part of making pulled pork on the grill as opposed to in the crockpot is that while one method frees you up to do chores and run errands all day, the other keeps you in the backyard with a book and a beer.

One year ago: Home Corned Beef and Corned Beef Hash
Two years ago: Orange Oatmeal Currant Cookies
Three years ago: Hash Browns with Sauteed Vegetables and Poached Eggs

Printer Friendly Recipe
Barbecued Pulled Pork (spice rub from Cooks Illustrated)

Serves a lot

The least messy way I’ve found to add the spices to the meat is to line a rimmed baking sheet with a large piece of plastic wrap. Set the pork on the plastic wrap; add the spice rub, rotating the meat to rub all sides. Wrap the plastic wrap around the meat, then wrap another layer of plastic around in the opposite direction.

I use all of the spice rub on one roast, but if you think it’ll be too much, save half for another use. It’ll keep in the pantry for months.

Spice Rub:
1 tablespoon ground black pepper
1-2 teaspoons cayenne pepper
2 tablespoons chili powder
2 tablespoons ground cumin
2 tablespoons dark brown sugar
1 tablespoon dried oregano
4 tablespoons paprika
2 tablespoons table salt
1 tablespoon granulated sugar
1 tablespoon ground white pepper

1 (6-8 pound) bone-in pork shoulder

1. Combine all of the ingredients in the spice rub. At least one day, and up to three days, before cooking the pork, rub the spice rub onto all sides of the pork (see note). Wrap the pork in a double layer of plastic wrap. Refrigerate overnight or up to three days.

2. About 10 hours before you plan to serve the pork, remove it from the refrigerator; let it set at room temperature for 1 hour. Meanwhile, soak 4 wood chunks (or 4 cups of wood chips) in water for an hour.

3. About 20 minutes before you’re ready to grill, light about 30 charcoal briquettes (half a chimney starter). Once the coals are covered with a layer of ash, dump them into a pile on one side of the grill, then top with ¼ of the wood chunks or chips. Open the bottom vents completely. Place the meat, fat side up, on a double layer of aluminum foil with the edges folded up or in a 9×13-inch disposable aluminum baking pan. Place the meat on the side of the grill opposite the coals. Put the lid on the grill with the vents opposite the coals; adjust vents to be ¾ open.

4. Use a grill or oven thermometer to monitor the temperature of the grill, which should remain between 200 and 250 degrees. Add fresh coals, about 8 every hour, when the temperature drops. Add more wood chips an hour after you start cooking, then again at the 2- and 3-hour mark. (Don’t worry if the top of the meat blackens; you’ll discard that layer of fat anyway.)

5. After about 5 hours, when the internal temperature of the pork reaches 165 degrees, wrap it completely in foil. Continue cooking until the internal temperature of the pork is 195 degrees, another 2-3 hours.

6. Remove the pork from the grill and let it set at room temperature, covered, for one hour.

7. Place the pork on a large rimmed baking sheet. Remove and discard the thick layer of fat. Use your fingers or forks to shred the remaining meat. Serve.