poached eggs with arugula and polenta fingers

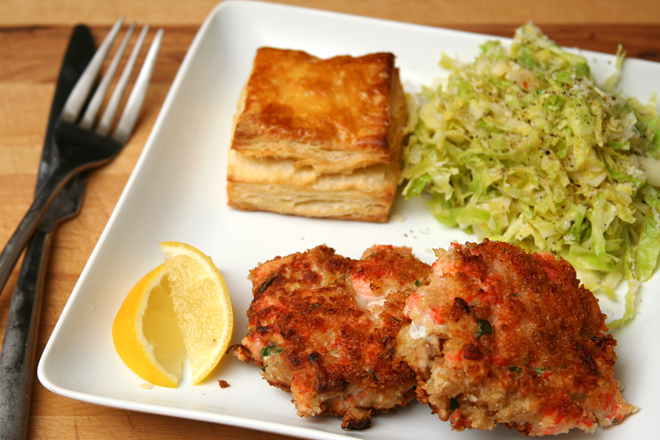
This is the weirdest thing I’ve made in a long time. I think I saw the recipe in Bon Appetit and caught that I liked each component – arugula salad, poached eggs, polenta – but didn’t stop to consider that those items might not belong on the same plate.

I’m not really that close-minded. Someone obviously enjoyed this, so there must be something good about it. I just needed to focus on that good.

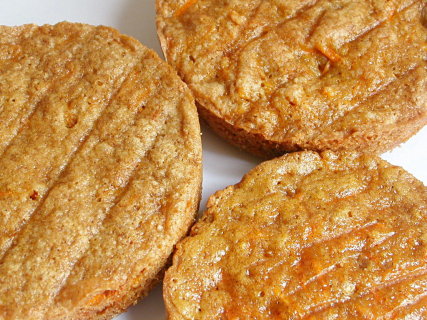
There were moments of doubt. The coconut milk in the polenta is unusual, not to mention fattening, but then tasted surprisingly good. The original recipe recommends frying the polenta fingers on high in extra virgin olive oil, which is silly. I used a mixture of olive oil (not virgin) and canola oil, and it still smoked on medium-high heat. I did find that the heat must be turned up pretty high to brown the polenta.

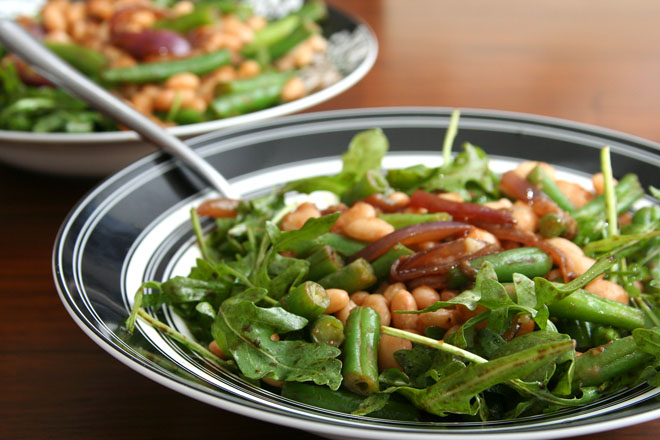
I doubled the amount of dressing and greatly increased (quadrupled maybe) the amount of arugula. It was all going fine until I was actually putting the egg on the salad, and then I realized that egg on salad actually might not be my thing.

But, never mind, I guess it is my thing, and maybe Dave’s too. The egg was quite a nice topping for the salad, and the polenta fingers were a great accompaniment, especially when they were used to sop up extra vinaigrette. So if poached egg on salad is your thing, or if you’re willing to try something new, this recipe is worth your effort.

Poached Eggs with Arugula and Polenta Fingers (adapted from Bon Appetit May 2008 )

Makes 4 servings

Bridget note: I’ve made the recipe a bit more detailed than it is in the magazine, as well as changing the polenta and poached egg method to those of Cooks Illustrated.

For the polenta:
1 13.5- to 14-ounce can unsweetened coconut milk
water
½ cup polenta or coarse cornmeal
¼ teaspoon salt
2 tablespoons parmesan cheese
1 tablespoon olive oil
1 tablespoon canola oil

For the salad:
8 cups arugula
2 teaspoons balsamic vinegar
2 tablespoons olive oil
pinch salt
pinch black pepper

For the poached eggs:
4 eggs, each cracked into a small handled cup
2 tablespoons white vinegar
1 teaspoon salt

1. For the polenta: Pour coconut milk into 2-cup measuring cup and add enough water to make 2 cups liquid. Bring liquid to boil in medium heavy-bottomed saucepan over medium-high heat. Reduce the heat to the lowest possible setting, add salt, and pour the cornmeal into the water in a very slow stream from a measuring cup, all the while whisking in a circular motion to prevent lumps.

2. Cover and cook, vigorously stirring the polenta with a wooden spoon for about 10 seconds once every 5 minutes and making sure to scrape clean the bottom and corners of the pot, until the polenta has lost its raw cornmeal taste and becomes soft and smooth, about 30 minutes. Stir in the parmesan and season with salt and pepper to taste.

3. Spray 8-inch square baking pan with nonstick cooking spray. Pour polenta into pan and spread to corners. Press plastic wrap directly on surface of polenta and chill until firm, about 1 hour. (Can be made 1 day ahead and refrigerated.)

4. Turn polenta out onto cutting board. Cut into 4×1-inch rectangles. Heat oils in 12-inch nonstick skillet over medium-high heat. Working in two batches, add polenta fingers; cook until golden, about 3 minutes per side.

5. For the salad: While first batch of polenta cooks, whisk oil, vinegar, salt, and pepper in small bowl until combined. In large bowl, toss arugula with dressing and divide among salad plates.

6. For the poached eggs: While last batch of polenta cooks, fill an 8- to 10-inch nonstick skillet nearly to the rim with water, add the salt and vinegar, and bring the mixture to boil over high heat. Lower the lips of each cup just into water at once; tip eggs into boiling water, cover, and remove from heat. Poach until yolks are medium-firm, exactly 4 minutes. For firmer yolks (or for extra large or jumbo eggs), poach 4 ½ minutes; for looser yolks (or for medium eggs), poach 3 minutes.

7. Top each salad with a poached egg. Break yolks with tip of knife. Sprinkle with black pepper. Serve with polenta.

ricotta spinach (and tofu) ravioli

A while ago, I wrote a comment on someone else’s blog about how tofu’s bad reputation comes from people trying to substitute tofu for tastier but fattier ingredients, like cheese and meat. And it’s true – I love tofu in recipes where it belongs – hot and sour soup, moo shu, peanut sesame noodles, stir fry. But, it turns out that I’m a hypocrite, because just a few days before I wrote that comment, I had made ravioli filling with ricotta, spinach, parmesan, and, yes, tofu.

This filling is a holdover from my brief stint as a brown rice-eating, refined sugar-avoiding health nut. The lifestyle wasn’t a keeper, but this recipe is. The trick is to process the tofu in a food processor before adding the other ingredients to ensure that the tofu is absolutely smooth. I also like the spinach processed, or at least very finely chopped, because the texture of cooked spinach is potentially stringy unless chopped finely.

This is my most successful attempt at making homemade ravioli. (And it was all done between 9pm and midnight on a Friday, because I’m a nut.) I made the dough by hand instead of using the food processor, since I’ve been more successful with hand-kneaded dough in the past. The picture is all out of whack – I was supposed to use 3 eggs and 2 cups of flour, this is 3 cups of flour and 2 eggs. I figured out the screw-up just in time.

In the past, I’ve always rolled out pasta dough for ravioli to the thinnest setting, but then they’re impossibly delicate. I kept the pasta just a bit thicker this time. I was also careful to form wider sheets of pasta, which meant I could form square raviolis instead of rectangles. It’s a small issue, but I was excited about the squares. For nice square ravioli, make sure you start rolling the dough by feeding the widest edge through first. Not only does this make for prettier ravioli, but the pasta sheets don’t become as long and difficult to handle.

The thicker dough made far better ravioli than I’ve made before! This is the first time I’ve been able to boil ravioli without it immediately tasting watery. The dough remained firm, and the ravioli, both the filling and the pasta, were delicious. The tofu doesn’t detract from the filling at all, and while I can’t say that it’s adding any flavor of its own, it sure is a healthy filler ingredient.

Spinach Ricotta Tofu Ravioli (dough ingredients and ravioli forming instructions from Cooks Illustrated; dough mixing and rolling method from Marcella Hazan; filling recipe is my own creation)

The instructions look long, but that’s only because I copied and pasted Marcella Hazan’s very detailed pasta instructions from her lasagna recipe. It’s not nearly as complicated as it looks.

I’m not providing you with a sauce recipe. I’ve been using a simple tomato sauce with these.

Ravioli take well to freezing. I didn’t eat any of these the day I formed them. I immediately flash froze them, and they’ve made for some handy easy meals in the weeks since.

For the dough:
2 cups (10 ounces) unbleached flour
3 large eggs

For the filling:
10 ounces fresh spinach
12 ounces firm tofu
15 ounces ricotta cheese
¾ cup (1.5 ounces) grated parmesan cheese
1 teaspoon salt
ground black pepper

For the pasta:

Pour the flour onto a work surface, shape it into a mound, and scoop out a deep hollow in its center. Break the eggs into the hollow.

Beat the eggs lightly with a fork for about 2 minutes as though you were making an omelet. Draw some of the flour over the eggs, mixing it in with the fork a little at a time, until the eggs are no longer runny. Draw the sides of the mound together with your hands, but push some of the flour to one side, keeping it out of the way until you find you absolutely need it. Work the eggs and flour together, using your fingers and the palms of your hands, until you have a smoothly integrated mixture. If it is still moist, work in more flour.

When the mass feels good to you and you think it does not require any more flour, wash your hands, dry them, and run a simple test: Press you thumb deep into center of the mass; if it comes out clean, without any sticky matter on it, no more flour is needed. Put the egg and flour mass to one side, scrape the work surface absolutely clear of any loose or caked bits of flour and of any crumbs, and get ready to knead.

Return to the mass of flour and eggs. Push forward against it using the heel of your palm, keeping your fingers bent. Fold the mass in half, give it a half turn, press hard against it with the heel of your palm again, and repeat the operation. Make sure that you keep turning the ball of dough always in the same direction, either clockwise or counterclockwise, as you prefer. When you have kneaded it thus for 8 full minutes and the dough is as smooth as baby skin, it is ready for the machine.

Cut the ball of dough into 6 equal parts.

Spread clean, dry, cloth dish towels over a work counter near where you’ll be using the machine.

Set the pair of smooth cylinders, the thinning rollers, at the widest opening. Flatten one of the pieces of dough by pummeling it with your palm, and run it through the machine. Fold the dough twice into a third of its length, and feed it by its narrow end through the machine once again. Repeat the operation 2 or 3 times, then lay the flattened strip of pasta over a towel on the counter. Since you are going to have a lot of strips, start at one end of the counter, leaving room for the others.

Take another piece of dough, flatten it with your hand, and turn it through the machine exactly as described above. Lay the strip next to the previously thinned one on the towel, but do not allow them to touch or overlap, because they are still moist enough to stick to each other. Proceed to flatten all the remaining pieces in the same manner.

Close down the opening between the machine’s rollers by one notch. Take the first pasta strip you had flattened and run it once through the rollers, feeding it by its wider end. Do not fold it, but spread it flat on the cloth towel, and move on to the next pasta strip in the sequence.

When all the pasta strips have gone through the narrower opening once, bring the rollers closer together by another notch, and run the strips of pasta through them once again, following the procedure described above. You will find the strips becoming longer, as they get thinner, and if there is not enough room to spread them out on the counter, you can let them hand over the edge. Continue thinning the strips in sequence, progressively closing down the opening between the rollers one notch at a time. This step-by-step thinning procedure, which commercial makers of fresh pasta greatly abbreviate or skip altogether, is responsible, along with proper kneading, for giving good pasta its body and structure. Continue thinning the pasta until the second-to-last setting.

For the filling:

Place cleaned spinach leaves and any water that clings to them in a nonreactive soup kettle. (If you’re using pre-washed bagged spinach, add 2 tablespoons water to the pot). Cover and cook over medium heat until spinach wilts, about 5 minutes. Cool spinach slightly and squeeze out the excess liquid; set aside.

Process the tofu in a food processor until smooth. Add the spinach and pulse to combine and finely chop. Add the remaining filling ingredients and pulse to combine.

To form ravioli:

Your sheets should be approximately 4 inches across. Place small balls of filling (about one rounded teaspoon each) in a line one inch from the bottom of the pasta sheet. Leave one and one-quarter inches between each ball of filling. Fold over the top of the pasta and line it up with the bottom edge. Seal bottom and the two open sides with your finger. Use fluted pastry wheel to cut along the two sides and bottom of the sealed pasta sheet. Run pastry wheel between balls of filling to cut out the ravioli.

To cook ravioli:

Bring 4 quarts water to boil in a large stockpot. Add salt and half the pasta. Cook until doubled edges are al dente, 4-5 minutes. With a slotted spoon, transfer ravioli to warmed bowls or plates; add sauce of choice. Meanwhile, put remaining ravioli in boiling water and repeat cooking process. (Or bring two pots of water to boil and cook both batches simultaneously.) Serve immediately. (Alternatively, after draining the boiled ravioli, layer them in a baking dish with sauce and put them in a warmed oven until ready to serve.)

asparagus and arugula salad with cannellini beans and balsamic vinegar

The combination of my upcoming beach trip and Tuesdays With Dorie has prompted a series of main dish salads for dinner. I’m surprising myself by how much I’m enjoying it. I was especially surprised by this salad, which I expected to be edible but not special. I’m so glad I chose the recipe even though I wasn’t excited about it, because it was so good that now I’m waiting for an opportunity to make it again.

arugula green beans white beansupdated photo 1/12/2015, with green beans substituted for asparagus

The salad is composed of two rather distinct parts. The base is a bed of arugula, dressed with a very simple balsamic vinaigrette. This is topped with a mixture of red onions that have been browned, asparagus that is sautéed just until tender, and cannellini beans, all of which is dressed with the same vinaigrette. It’s an unusual but delicious combination.

I did drastically reduce the arugula. The recipe calls for 14 ounces (although I’m unsure if this is before or after it’s stemmed), but even one whole 5-ounce bag of pre-washed arugula seemed like a lot. Five ounces ended up being the perfect amount. That’s the only change I made, and I even used a cheapo balsamic vinegar, with no noticeable adverse affects on the salad.

Last time I made salad, I flaked out on the meal-planning and made bread to go with it, even though croutons are a primary feature of Caesar salads. This time, I didn’t serve anything else with the salad and realized half-way through eating it that there was no carbs involved anywhere. Next time I swear I’ll get it right.

Asparagus and Arugula Salad with Cannellini Beans and Balsamic Vinegar (from Cooks Illustrated May 2003)

Serves 4 to 6 as a first course or 2 to 3 as a main dish

5 tablespoons extra-virgin olive oil
½ medium red onion, sliced 1/8 inch thick (about 1 cup)
1 pound asparagus, trimmed of tough ends and cut on diagonal into 1-inch pieces)
Table salt and ground black pepper
1 can (15 ounces) cannellini beans, rinsed and drained (about 1½ cups)
2 tablespoons balsamic vinegar, plus 2 teaspoons
14 ounces arugula (1 large bunch), washed, dried, and stemmed (about 6 cups lightly packed)

1. Heat 2 tablespoons oil in 12-inch nonstick skillet over high heat until beginning to smoke; stir in onion and cook until beginning to brown, about 1 minute. Add asparagus, ¼ teaspoon salt, and ¼ teaspoon pepper; cook until asparagus is browned and tender-crisp, about 4 minutes, stirring once every minute. Off heat, stir in beans; transfer to large plate and cool 5 minutes.

2. Meanwhile, whisk remaining 3 tablespoons oil, vinegar, ¼ teaspoon salt, and 1/8 teaspoon pepper in medium bowl until combined. In large bowl, toss arugula with 2 tablespoons dressing and divide among salad plates. Toss asparagus mixture with remaining dressing, place a portion over arugula, and serve.

hash browns with sauteed vegetables and poached eggs

I’ve become enamored with poached eggs lately. They’re such a great topping for so many breakfast ideas. Besides eggs benedict, I like to serve them on toast with a bit of cheddar cheese sprinkled over. Hash browns and a bed of sautéed vegetables is my favorite poached eggs base.

The trick to great hash browns is to use starchy potatoes like russets, but to rinse some of the outside starch off of the shreds, then thoroughly dry them before starting to cook. Because I consider this breakfast one of my healthier options, I use olive oil for cooking both the vegetables and the potatoes, although vegetable oil and butter are also good choices. How often you stir the potatoes depends on how you like your hash browns. If you want a crispy base and a tender interior within a bed of potatoes, pack the shreds into a medium-size pan and leave them alone until the bottom browns, 5-6 minutes. Then flip the whole mound over and brown the second side. I tend to put the potatoes in a large skillet and stir every few minutes. After 10-15 minutes, they’re pretty evenly split between crispy browned and tender.

The vegetables you use are completely adaptable. My favorite combination is red onion, red peppers, and mushrooms. This time I used spinach instead of the red peppers, and I loved it. I like the vegetables chopped so that I can get some of each in one bite, so pretty small. (I’m particular about how vegetables are chopped anyway.)

Mound some cooked potatoes on a plate, spread the sautéed vegetables over it, and top with a poached egg – it’s a perfect combination of flavors and nutrition. Once the egg is cut into, warm yolk drips down and blends with the potatoes, and your morning is off to a terrific start.

Hash Browns, Sautéed Vegetables, and Poached Eggs (Poached Egg recipe from Cooks Illustrated)

Serves 2

1½ tablespoons olive oil
6-8 cremini or button mushrooms, halved if large and sliced thin
salt
½ small red onion, halved and sliced thin
1½ ounces spinach, cleaned and chopped very coarse
ground black pepper
1 pound russet potatoes, peeled and washed
2-4 eggs, each cracked into a small handled cup
2 tablespoons white vinegar

1. Heat oven to 200 degrees, then turn it off. Place 2 large plates in warm oven.

2. Heat ½ tablespoon of olive oil in a large nonstick skillet over medium-high heat. When shimmering but not smoking, add mushrooms and a pinch of salt. Cook, stirring occasionally, until liquid released by mushrooms has evaporated. Add onion and cook until browned at edges. Add spinach and cook, stirring constantly, until just wilted. Season with salt and pepper to taste and transfer to a bowl. Put bowl in warmed oven.

3. While vegetables cook, shred potatoes in food processor with shredding blade or on large holes of box grater. Rinse thoroughly in a strainer, then move to a clean kitchen towel and squeeze and pat dry.

4. Heat 1 tablespoon olive oil in the same skillet (no need to wash) over medium heat until shimmering but not smoking. Add potatoes and ¼ teaspoon salt and mix thoroughly. Cook potatoes, stirring every 2-3 minutes, until slightly browned and cooked throughout, a total of 15-20 minutes.

5. While potatoes cook, fill an 8- to 10-inch nonstick skillet nearly to the rim with water, add 1 teaspoon salt and the vinegar, and bring the mixture to boil over high heat. Lower the lips of each cup just into water at once; tip eggs into boiling water, cover, and remove from heat. Poach until yolks are medium-firm, exactly 4 minutes. For firmer yolks (or for extra large or jumbo eggs), poach 4 ½ minutes; for looser yolks (or for medium eggs), poach 3 minutes.

6. While eggs are cooking, divide potatoes between warmed plates. Top with sautéed vegetables. With a slotted spoon, carefully lift and drain each egg over skillet, then lay each over vegetables. Season to taste with salt and pepper and serve immediately.

caesar salad

I almost never make salads. Not because I don’t like them, but because I don’t like them as a side dish. To me, salad doesn’t coordinate well with other dinner items. I do like when it’s served before a meal, or as a meal.

I went the route of serving Caesar salad as a meal the day that I made the peanut butter torte. I figured that if I was going to eat peanut butter and cream cheese and oreos and chocolate and whipped cream for dessert, something was going to have to give.

In one of Alton Brown’s first Good Eats episodes (um, before the show was very good), he discussed the original Caesar salad recipe, which was built tableside at a restaurant by chef Cesar Cardini. The recipe starts with a thin coating of oil on the lettuce, then salt, pepper, more oil, lemon juice, and a coddled egg. I’m not all about this method. I like to at least attempt to emulsify my salad dressing ingredients, and I also think that putting oil directly on the leaves keeps the other ingredients from flavoring the lettuce. Instead, I whisked the dressing ingredients thoroughly, then dressed the leaves with the mixture.

The only ingredient in this recipe that struck me as unusual was the coddled egg. Coddled eggs are cooked in boiling water for about one minute, so, yeah, they’re still mostly raw. I didn’t tell Dave about the raw-ish egg in the salad, and I tried not to think about it myself. I’m not worried about salmonella, I’m just grossed out by eating raw egg white. But I really don’t think the salad would have been as good without it. The egg gives the dressing not only smoothness and body, but a pleasant rich, but not overwhelmingly eggy, flavor.

Alton’s croutons are really exceptional. I had my doubts that grinding the garlic into the oil and then straining the oil to toast the bread in would add enough garlic flavor, but they were extremely garlicky and delicious.

Because I’m a flake, and I forgot while planning this meal that one of the key parts of Caesar salad is the croutons, I made Deb’s pizza bianca to go with the salad. I used my pizza dough recipe instead of the one she gives (although they’re very similar) and followed the directions in the recipe for forming the dough. (Keep in mind that Deb rolled her dough out much thinner.) Also, because Peter Reinhart’s constant reminders that a slow rise is better for artisan breads has stuck with me, I made the dough the day before (with less yeast) and let it rise in the refrigerator overnight. The next day I took it out and let it come to room temperature, then shaped it and put it back in the fridge until I wanted to bake it. It was very good. The only thing I’ll change next time is to use less olive oil on the top, because “Oh my god, there’s a fire in the oven!” aren’t words Dave likes to hear from me when I’m cooking.

Hail Caesar Salad (from Alton Brown’s Good Eats)

Bridget note: I made a few changes to the recipe. I dried the bread as slices instead of cut up into bite-size pieces, because they were easier to cut once they were dried. I didn’t use kosher salt. I found 2 cups of water to be far too little to be able to cover the eggs. I probably used a bit more Worcestershire sauce and Parmesan cheese.

1 loaf day old Italian bread
3 garlic cloves, mashed
9 tablespoons extra virgin olive oil
¼ teaspoon plus 1 pinch kosher salt
2 eggs
2 heads romaine lettuce, inner leaves only
7 grinds black pepper
1 lemon, juiced
6 drops Worcestershire sauce
¼ cup grated Parmesan cheese

Heat oven to 350 degrees.

Cut ½ to ¾-inch croutons from the loaf of bread and place on a baking sheet and put into the oven until dry but not browned.

Use a mortar and pestle to mash the garlic with 4 tablespoons of oil and 1/4 teaspoon kosher salt. Strain the oil into a skillet over medium heat. Add the dried croutons and fry, tossing constantly until all of the oil is absorbed and the croutons turn gold. Set aside.

Bring 2 cups water to a boil in a small saucepan. Add the eggs and cook for 1 minute. Chill in ice water to halt cooking. Set aside.

In a very large bowl, tear lettuce and toss with 3 tablespoons of olive oil. Sprinkle with the remaining kosher salt and the black pepper. Add the remaining olive oil. Toss well. Add the lemon juice and Worcestershire sauce. Break in the eggs. Toss until a creamy dressing forms. Toss in Parmesan cheese and serve with croutons.

carrot cake (twd)

I don’t really get carrot cake. I don’t hate it. But what’s the appeal? Vegetables in cake – it just ain’t right. Wouldn’t you rather have a more logical flavoring for cake – chocolate or vanilla or strawberries or butter? If it’s the spices you love, pair them with apples. If it’s the cream cheese frosting, spread it on chocolate cake. But don’t put vegetables in my dessert. It just ain’t right.

So I can’t say I was ecstatic to see Amanda’s choice for this week’s TWD recipe. Plus, while I usually enjoy the creativity that comes from having someone else choose a recipe for me, it’s a problem when I already have a similar recipe picked out to try. I’ve had my eye on Cooks Illustrated’s carrot cake recipe for years, I guess with the idea that if anyone could make me love carrot cake, it would be CI.

I thought I could kill two birds with one stone – I’d make Dorie’s recipe and CI’s, and that way I could compare them. My mom has a recipe she loves, so I threw that into the mix as well. They each call for four eggs, so it would be easy to quarter each recipe. Then I decided that that would still be too much carrot cake, so I got all OCD and decided to use one egg total, but still make all three recipes, so I made one twelfth of each recipe. It was a pain in the ass even with good math skills and a digital scale. I skipped all of the chunky ingredients (coconut, raisins, nuts) in Dorie’s recipe so that the recipes would be more equivalent and comparable.

The three recipes weren’t drastically different in their ingredient lists, although the mixing method varied. After baking, Dorie’s and CI’s carrot cakes look very similar, but my mom’s recipe, which was the only one that didn’t call for baking powder, didn’t rise nearly as much. (CI’s is the bottom layer, then my mom’s recipe, then Dorie’s.)

Unfortunately, I can’t give a good comparison of the three cakes. I’ve only had one slice, and the cream cheese frosting pleasantly dominated the taste of the cake. I’ll try harder next time, scraping off the frosting and eating the cake plain. And then finishing dessert off with a spoonful of pure, unadulterated sugary cream cheese frosting.

Update/Comparison: I really didn’t eat much of this cake, so I can’t give a very good comparison.  That being said, I think Dorie’s recipe was my favorite.  My mom’s needs baking powder so it will rise higher.  Cooks Illustrated uses both brown and granulated sugar, and I think using all granulated sugar gave the cake more flavor.  I do like CI’s mixing method though.  Because most of the ingredients are similar, in the future, I’ll probably use CI’s recipe with all granulated sugar.

Bill’s Big Carrot Cake (from Dorie Greenspan’s Baking: From My Home to Yours)

10 servings

For the cake:
2 cups all purpose flour
2 teaspoons baking powder
2 teaspoons baking soda
2 teaspoons ground cinnamon
¾ teaspoon salt
3 cups grated carrots (about 9 carrots, you can grate them in food processor fitted w/ a shredding a blade or use a box grater)
1 cup coarsely chopped walnuts or pecans
1 cup shredded coconut (sweetened or unsweetened)
½ cup moist, plump raisins (dark or golden) or dried cranberries
2 cups sugar
1 cup canola oil
4 large eggs

For the frosting:
8 ounces cream cheese, room temperature
8 tablespoons (1 stick) unsalted butter, at room temperature
1 pound (16 ounces) confectioners’ sugar
1 tablespoon fresh lemon juice or ½ teaspoon pure lemon extract
½ cup shredded coconut (optional)

Finely chopped toasted nuts and/or toasted shredded coconut (optional)

Getting ready: Position the racks to divide the oven into thirds and preheat the oven to 325 degrees Fahrenheit. Butter three 9- by 2-inch round cake pans, flour the insides, and tap out the excess. Put the two pans on one baking sheet and one on another.

To make the cake:
Whisk the flour, baking powder, baking soda, cinnamon and salt. In another bowl, stir together the carrots, chopped nuts, coconut, and raisins.

Working with a stand mixer, preferably fitted with a paddle attachment, or with a hand mixer in a large bowl, beat the sugar and oil together on a medium speed until smooth. Add the eggs one by one and continue to beat until the batter is even smoother. Reduce the speed to low and add the flour mixture, mixing only until the dry ingredients disappear. Gently mix the chunky ingredients. Divide the batter among the baking pans.

Bake for 40-50 minutes, rotating the pans from top to bottom and front to back at the midway point, until a thin knife inserted into the centers comes out clean. The cakes will have just started to come away from the sides of the pans. Transfer the cakes to cooling racks and cool for about 5 minutes, then run a knife around the sides of the cakes and unmold them. Invert and cool to room temperature right side up.

The cakes can be wrapped airtight and kept at room temperature overnight or frozen for up to 2 months.

To make the frosting:
Working with a stand mixer, preferably fitted with a paddle attachment or with a hand mixer in a large bowl, beat the cream cheese and butter together until smooth and creamy. Gradually add the sugar and continue to beat until the frosting is velvety smooth. Beat in the lemon juice or extract.

If you’d like coconut in the filling, scoop about half of the frosting and stir the coconut into this position.

To assemble the cake:
Put one layer top side up on a cardboard cake round or a cake plate protected by strips of wax or parchment paper. If you added the coconut to the frosting, use half of the coconut frosting to generously cover the first layer (or generously cover with plain frosting). Use an offset spatula or a spoon to smooth the frosting all the way to the edges of the layer. Top with the second layer, this time placing the cake stop side down, and frost with the remainder of the coconut frosting or plain frosting. Top with the last layer, right side up, and frost the top- and the sides- of the cake. Finish the top with swirls of frosting. If you want to top the cake with toasted nuts or coconut, sprinkle them on now while the frosting is soft.

Refrigerate the cake for 30 minutes, just to set the frosting before serving.

Serving: This cake can be served as soon as the frosting is set. It can also wait, at room temperature and covered with a cake keeper overnight. The cake is best served in thick slices at room temperature and while it’s good plain, it’s even better with vanilla ice cream or some lemon curd.

Storing: The cake will keep at room temperature for 2 to 3 days. It can also be frozen. Freeze it uncovered, then when it’s firm, wrap airtight and freeze for up to 2 months. Defrost, still wrapped, overnight in the refrigerator.

Simple Carrot Cake with Cream Cheese Frosting (from Cooks Illustrated’s The New Best Recipe)

2½ cups unbleached all-purpose flour
1¼ teaspoons baking powder
1 teaspoon baking soda
1¼ teaspoons ground cinnamon
½ teaspoon ground nutmeg
1/8 teaspoon gound cloves
½ teaspoon salt
1 pound (6-7 medium) carrots, peeled
1½ cups granulated sugar
½ cup packed light brown sugar
4 large eggs
1½ cups safflower, canola or vegetable oil

Cream cheese frosting

8 ounces cream cheese, softened but still cool
5 tablespoons unsalted butter, softened but still cool
1 tablespoon sour cream
½ teaspoon vanilla extract
1¼ cups confectioners’ sugar

For the cake:

1. Adjust an oven rack to the middle position and heat the oven to 350 degrees. Spray a 13 by 9-inch baking pan with nonstick cooking spray. Line the bottom of the pan with parchment and spray the parchment.

2. Whisk together the flour, baking powder, baking soda, cinnamon, nutmeg, cloves and salt in a large bowl; set aside.

3. In a food processor fitted with a large shredding disk, shred the carrots (you should have about 3 cups); transfer the carrots to a bowl and set aside. Wipe out the food processor workbowl and fit with the metal blade. Process the granulated and brown sugars and eggs until frothy and thoroughly combined, about 20 seconds. With the machine running, add the oil through the feed tube in a steady stream. Process until the mixture is light in color and well emulsified, about 20 seconds longer. Scrape the mixture into a medium bowl. Stir in the carrots and the dry ingredients until incorporated and no streaks of flour remain. If you like nuts in your cake, stir 1½ cups toasted chopped pecans or walnuts into the batter along with the carrots. Raisins are also a good addition; 1 cup can be added along with the carrots. If you add both nuts and raisins, the cake will need and additional 10 to 12 minutes in the oven. Pour into the prepared pan and bake until a toothpick or skewer inserted into the center of the cake comes out clean, 35 to 40 minutes, rotating the pan halfway through the baking time. cool the cake to room temperature in the pan on a wire rack, about 2 hours.

For the frosting
1. When the cake is cool, process the cream cheese, butter, sour cream, and vanilla in a clean food processor workbowl until combined, about 5 seconds, scraping down the bowl with a rubber spatula as needed. Add the confectioners’ sugar and process until smooth, about 10 seconds.

2. Run a paring knife around the edge of the cake to loosen from the pan. Invert the cake onto a wire rack, peel off the parchment, then invert again onto a serving platter. Using an icing spatula, spread the frosting evenly over the surface of the cake. Cut into squares and serve.

Carrot Cake (from my mom, and I don’t know where she got the recipe)

1½ (10.5 ounces) cup sugar
2 cups (10 ounces) flour
2 teaspoons baking soda
1 teaspoon salt (scant)
2 teaspoons cinnamon
1 cup cooking oil
3 cups (16 ounces) finely grated carrots (raw)
4 whole eggs

Sift dry ingredients into a large mixing bowl making sure they are thoroughly mixed. Add cooking oil and blend. Add eggs ONE at a time and mix (by hand). Stir in carrots. Bake in two deep cake pans sprayed with Pam. Bake at 350 for 30 to 40 minutes until cakes spring back in center or toothpick comes clean. Cool 10-15 minutes. Remove from pans and frost while warm.

Cream cheese frosting:
1 8 ounce package cream cheese (regular, not low or non-fat)
8 tablespoons (1 stick) butter
4½ cups (16 ounces) powdered sugar
1 teaspoons vanilla
1 cup chopped pecans (optional)

Let cheese and butter sit at room temperature for half an hour, then mix thoroughly. Add powdered sugar slowly, alternating with vanilla. Stir in nuts last. Frost and enjoy.

creamy buttermilk coleslaw

It seems that creamy coleslaw has fallen out of favor. I think that if you only like vinegar-based coleslaw, then you’re eating the wrong creamy coleslaws. I didn’t like it before this recipe either. It was always too sweet or too watery or too heavy or too mushy. This recipe is none of that.

One key technique in this recipe is salting the cabbage and letting it set for an hour or so before mixing it with the dressing ingredients. The salt sucks water out of the cabbage so there’s less water to leach into the dressing. The cabbage has to be rinsed after being salted, which seems counterintuitive, but it’s easy to dry off the moisture outside of the cabbage shreds – there’s still less water in the cabbage, which is what will keep you from making a watery slaw.

Large shreds of cabbage keep this looking and feeling like a salad while eliminating any worries of mushiness. For those who think that creamy coleslaws tend to be too heavy, look at the ingredient list below – two thirds of the dressing base is low-fat buttermilk, with just a bit of mayonnaise and sour cream added for body and complexity of flavor.

I never liked creamy coleslaw growing up, and I still don’t usually like it at restaurants. But this recipe, with its creamy but not rich dressing, slight sweetness from the carrots and just half teaspoon of sugar, slight bite from the shallot, and overall balance of flavors is worth trying.

Especially if it’s an opportunity to use a fancy schmany monkey vegetable peeler. How cute is this guy? A friend got it for me, because, one could say, I have a bit of a thing for monkeys. (Or at least one.) And even better – it’s sharp. I love it.

Creamy Buttermilk Coleslaw (from Cooks Illustrated July 2002)

Serves 4

CI note: If you are planning to serve the coleslaw immediately, rinse the salted cabbage in a large bowl of ice water, drain it in a colander, pick out any ice cubes, then pat the cabbage dry before dressing.

Bridget note: The recipe says to salt the cabbage for 1-4 hours, but I’ve had better results when I err on the long side of that range.

1 pound cabbage (about ½ medium head), red or green, shredded fine (6 cups)
table salt
1 medium carrot, shredded on box grater
½ cup buttermilk
2 tablespoons mayonnaise
2 tablespoons sour cream
1 small shallot, minced (about 2 tablespoons)
2 tablespoons minced fresh parsley leaves
½ teaspoon cider vinegar
½ teaspoon granulated sugar
¼ teaspoon Dijon mustard
1/8 teaspoon ground black pepper
1. Toss shredded cabbage and 1 teaspoon salt in colander or large mesh strainer set over medium bowl. Let stand until cabbage wilts, at least 1 hour or up to 4 hours. Rinse cabbage under cold running water. Press, but do not squeeze, to drain; pat dry with paper towels. Place wilted cabbage and carrot in large bowl.

2. Stir buttermilk, mayonnaise, sour cream, shallot, parsley, vinegar, sugar, mustard, ¼ teaspoon salt, and pepper together in small bowl. Pour dressing over cabbage and toss to combine; refrigerate until chilled, about 30 minutes. (Coleslaw can be refrigerated for up to 3 days.)

sichuan green beans

I’m not very good at mise en place. I know that isn’t a sign of a particularly good cook, but I must be getting better lately because the kitchen isn’t so messy when I’m done cooking. I didn’t do a good job with this recipe though. I read “cook beans for 5-8 minutes” and I think Perfect! I’ll have just enough time to mince garlic, chop ginger, get the pork out of the fridge, measure out 3 liquids and 5 powders for the sauce, and slice the scallions! While stirring frequently. Dork.

Sichuan green beans was one of my favorite meals to make when I lived alone, and I still make it fairly often for me and Dave. It’s a quick, easy, balanced, healthy one pot meal. The recipe (according the Cooks Illustrated article) is based on a traditional Chinese meal involving deep-fried green beans. This recipe gets the same effect with just a couple tablespoons of oil over very high heat. The beans are cooked until they’re shriveled and blackened. It sounds like they’d be overcooked and soggy, but I swear they’re not. They’re crisp and sweet. It’s similar to what you get when you roast vegetables.

I did a quick scan on the internet of similar recipes, but I can see immediately that they’re not going to get the same sweet crunchiness out of the green beans. One steams the beans separately, one adds water to the pan to steam/boil them in the pan, one sautés them for a few minutes over medium heat. Bland (and extra work and dishes), boring, raw. No good. The high heat searing is necessary to get the most flavor out of the beans. I tried using Chinese long beans for this recipe once, but I actually didn’t like it as much. Besides costing far more than regular green beans, they weren’t as sweet.

The rest of the recipe is no problem. Cook some ground pork, add garlic and ginger, stir in some sauce ingredients, serve over white rice. You can leave the pork out and add shiitakes instead. This would make a nice side dish, but doesn’t have any protein source for a full meal. Either way, just make sure you do your chopping and measuring before you do your cooking. Otherwise you’ll be scrambling around like a dork, like I was.

Stir-Fried Sichuan Green Beans (from Cooks Illustrated January 2007)

Serves 4 as a side dish or 2 as a main course

CI note: To make this dish vegetarian, substitute 4 ounces of shiitake mushrooms, stemmed and minced, for the pork. If using mushrooms, you will need to add a teaspoon of oil to the pan in step 3 before adding the mushrooms. The cooking of this dish goes very quickly, so be sure to have all of the ingredients prepped before you start. Serve this dish with steamed white rice.

2 tablespoons soy sauce
1 tablespoon dry sherry
1 teaspoon sugar
½ teaspoon cornstarch
¼ teaspoon ground white pepper
¼ teaspoon red pepper flakes
¼ teaspoon dry mustard
2 tablespoons water
2 tablespoons vegetable oil
1 pound green beans, ends trimmed, cut into 2-inch pieces
¼ pound ground pork
3 medium cloves garlic, minced or pressed through a garlic press (about 1 tablespoon)
1 tablespoon minced fresh ginger
3 scallions, white and light green parts sliced thin
1 teaspoon toasted sesame oil

1. In small bowl, stir together soy sauce, sherry, sugar, cornstarch, white pepper, pepper flakes, mustard, and water until sugar dissolves; set aside.

2. Heat oil in 12-inch nonstick skillet over high heat until just smoking. Add beans and cook, stirring frequently, until crisp-tender and skins are shriveled and blackened in spots, 5 to 8 minutes (reduce heat to medium-high if beans darken too quickly). Transfer beans to large plate.

3. Reduce heat to medium-high and add pork to now-empty skillet. Cook, breaking pork into small pieces, until no pink remains, about 2 minutes. Add garlic and ginger; cook, stirring constantly, until fragrant, 15 to 20 seconds. Stir sauce to recombine and return beans to pan with sauce. Toss and cook until sauce is thickened, 5 to 10 seconds. Remove pan from heat and stir in scallions and sesame oil. Serve immediately.

Per Serving:
Cal 200; Fat 14 g; Sat fat 3 g; Chol 20 mg; Carb 12 g; Protein 8 g; Fiber 4 g; Sodium 680 mg

spinach feta pine nut tart

copy-of-dscn4941.jpg

Dave is not so interested in food. Before we moved in together, his dinners varied between frozen pizza, microwave popcorn, and whatever leftovers I forced on him. I can’t get it through my head that he just doesn’t care, so I keep asking him for ideas when I plan our meals. When he can think of anything at all to suggest, it’s salmon pesto pasta. But this week he requested an ingredient instead of a dish, which is perfect, because he gets food he’ll enjoy, and I get to be creative with our meal planning.

The ingredient he suggested was pine nuts. (If he can’t have salmon pesto pasta, he’ll just request the ingredients in salmon pesto pasta.) I found a recipe for a Spinach Feta Pine Nut Tart on epicurious that sounded really interesting.

Wow, it was better than interesting. It was fantastic. The flavors melded together perfectly, with none bullying the others to be the star. The phyllo was flaky, the pine nuts were crunchy, and the eggs and spinach were creamy.

copy-of-dscn4950.jpg

Although I only slightly strayed from the original recipe’s ingredients, I adjusted the cooking method substantially. It called for one onion to be sautéed in 1/3 cup of olive oil. I couldn’t see any reason for that much oil, so I used about a tablespoon. I cooked my own fresh spinach, because frozen spinach is always so stemmy. And I made the whole thing on a baking sheet instead of the rectangular tart pan that the original recipe called for.

Making the tart was far easier than I was expecting. The filling was relatively simple to prepare, even with cooking my own spinach. This was my first time working with phyllo, and I found it a bit of a hassle, with the dampened towels and the brushing melted butter, but not exceptionally so.

Overall, I was very pleased with this meal. The only problem I had with it is that I wanted more.  Don’t let the original recipe fool you into thinking this is six servings – four is a more reasonable estimation.

copy-of-dscn4966.jpg

Spinach Feta Pine Nut Tart (adapted from epicurious)

Serves 4 as a main course

Filling may be made 1 day ahead and chilled, covered. Bring filling to room temperature before proceeding.

½ cup pine nuts (about 3 ounces)
1 medium onion, finely chopped
1 tablespoon olive oil
2 10-ounce packages frozen chopped spinach, thawed
2 large eggs
½ teaspoon salt
½ cup crumbled feta (about 3 ounces)
seven 17- by 12-inch phyllo sheets
5 tablespoons unsalted butter
6 tablespoons plus ¼ cup (1¼ ounce) freshly grated Parmesan

Preheat oven to 375°F.

Wet spinach leaves and place in a 12-inch nonstick skillet over medium-high heat. Cover and cook until spinach wilts, 2-3 minutes. Wring dry and roughly chop.

Toast pine nuts in small skillet over medium heat.

In the same 12-inch skillet used for the spinach, heat 1 tablespoon olive oil over medium-low heat. Add onion and cook, stirring occasionally, until softened.

In a large bowl, whisk eggs until combined and stir in spinach, onions, pine nuts, salt and feta until combined well.

Stack phyllo sheets and cover with 2 overlapping sheets plastic wrap and then a dampened kitchen towel. In a small saucepan melt butter and cool slightly. Spray a baking sheet with nonstick spray.

On a work surface lightly brush 1 phyllo sheet with butter. Sprinkle 1 tablespoon Parmesan evenly over buttered phyllo and repeat layering with 5 more phyllo sheets, butter, and 5 tablespoons Parmesan. Arrange last phyllo sheet on stack and lightly brush with butter. Spoon filling onto phyllo, spreading evenly and leaving outer 1½ inches free of filling. Fold edges of pastry over filling, leaving center uncovered, and lightly brush top of phyllo with butter. Sprinkle remaining ¼ cup Parmesan over exposed filling and bake tart in middle of oven until golden, 25 to 30 minutes. Serve tart warm or at room temperature.

copy-of-dscn4960.jpg

salmon cakes, flaky biscuits, hashed brussels sprouts

salmon cakes new
(Photo updated 12/30/12)

I made the best meal for dinner one Saturday a few weeks ago. It was one of those “I really want to cook something great tonight. Don’t worry, it won’t take too long” kind of meals. Famous last words. But it was worth it.

15.jpg

My favorite part of the meal was these biscuits. Look at those layers! They’re not quite the pain in the ass I remember them being from the last time I made them. They involve all of the steps required for regular biscuits, plus some extra rolling and folding. Not simple, but not a huge deal either.

25.jpg

The hashed Brussels sprout recipe comes from Orangette’s blog. I love Brussels sprouts, and my favorite way of cooking them is braised in heavy cream. I know, yikes on the health-factor of that, but it’s so good. Too heavy to go with this meal though, so I thought I’d try this recipe, in which they’re sliced, then braised in wine. I used sesame seeds instead of poppy seeds, because it’s what I had. It was good and light. It went with the rest of the meal wonderfully.

34.jpg

43.jpg

These were accompanying salmon cakes, and really, how can you go wrong? Chopped fresh salmon, mayonnaise, a few flavorings, all breaded and pan-fried. As I was breading the cakes, they seemed like they were falling apart, but once I got them into the frying pan, they become more structurally sound. I served them with a lemon-herb dipping sauce, but I think it was overkill – they would have been fine with just a wedge of lemon.

Altogether, one of the best meals I’ve eaten in a while.

Oh…there was one casualty.

51.jpg

Pan-Fried Fresh Salmon Cakes (from Cooks Illustrated January 2000)

CI note: A big wedge of lemon is the simplest accompaniment to salmon cakes, but if you decide to go with dipping sauce, make it before preparing the cakes so the sauce flavors have time to meld. If possible, use panko (Japanese bread crumbs).

Makes eight 2½- by ¾-inch cakes

1¼ pounds salmon fillet
1 slice white sandwich bread, such as Pepperidge Farm, crusts removed and white part chopped very fine (about 5 tablespoons)
2 tablespoons mayonnaise
¼ cup grated onion
2 tablespoons chopped fresh parsley leaves
¾ teaspoon table salt
1½ tablespoons lemon juice from 1 lemon
½ cup unbleached all-purpose flour
2 large eggs, lightly beaten
½ cup vegetable oil, plus 1 1/2 teaspoons vegetable oil
¾ cup fine, unflavored dried bread crumbs, preferably panko

1. Locate and remove any pin bones from salmon flesh. Using sharp knife, cut flesh off skin, then discard skin. Chop salmon flesh into ¼- to 1/3-inch pieces and mix with chopped bread, mayonnaise, onion, parsley, salt, and lemon juice in medium bowl. Scoop a generous ¼-cup portion salmon mixture from bowl and use hands to form into a patty measuring roughly 2½-inches in diameter and ¾-inch thick; place on parchment-lined baking sheet and repeat with remaining salmon mixture until you have 8 patties. Place patties in freezer until surface moisture has evaporated, about 15 minutes.

2. Meanwhile, spread flour in pie plate or shallow baking dish. Beat eggs with 1½ teaspoons vegetable oil and 1½ teaspoons water in second pie plate or shallow baking dish, and spread bread crumbs in a third. Dip chilled salmon patties in flour to cover; shake off excess. Transfer to beaten egg and, using slotted spatula, turn to coat; let excess drip off. Transfer to bread crumbs; shake pan to coat patties completely. Return now-breaded patties to baking sheet.

3. Heat remaining ½ cup vegetable oil in large, heavy-bottomed skillet over medium-high heat until shimmering but not smoking, about 3 minutes; add salmon patties and cook until medium golden brown, about 2 minutes. Flip cakes over and continue cooking until medium golden brown on second side, about 2 minutes longer. Transfer cakes to plate lined with paper towels to absorb excess oil on surface, if desired, about 30 seconds, and then serve immediately, with one of the sauces that follow, if you like.

Creamy Lemon Herb Dipping Sauce (from Cooks Illustrated January 2000)

Makes generous ½ cup

½ cup mayonnaise, preferably homemade
2½ tablespoons lemon juice from 1 lemon
1 tablespoon minced fresh parsley leaves
1 tablespoon minced fresh thyme leaves
1 large scallion, white and green part minced
½ teaspoon table salt
Ground black pepper

Mix all ingredients in small bowl; season to taste with ground black pepper. Cover with plastic wrap and chill until flavors blend, at least 30 minutes.

Flaky Buttermilk Biscuits (from Cooks Illustrated January 2006)

CI note: The dough is a bit sticky when it comes together and during the first set of turns. Set aside about 1 cup of extra flour for dusting the work surface, dough, and rolling pin to prevent sticking. Be careful not to incorporate large pockets of flour into the dough when folding it over. When cutting the biscuits, press down with firm, even pressure; do not twist the cutter. The recipe may be prepared through step 2, transferred to a zipper-lock freezer bag, and frozen for several weeks. Let the mixture sit at room temperature for 15 minutes before proceeding.

Makes 12 biscuits

2½ cups unbleached all-purpose flour (12½ ounces), plus additional flour for work surface
1 tablespoon baking powder
½ teaspoon baking soda
1 teaspoon table salt
2 tablespoons vegetable shortening, cut into ½-inch chunks
8 tablespoons unsalted butter (1 stick), cold, lightly floured and cut into 1/8-inch slices
2 tablespoons unsalted butter, melted
1¼ cups low-fat buttermilk, cold

1. Adjust oven rack to lower-middle position; heat oven to 450 degrees. Whisk flour, baking powder, baking soda, and salt in large bowl.

2. Add shortening to flour mixture; break up chunks with fingertips until only small, pea-sized pieces remain. Working in batches, drop butter slices into flour mixture and toss to coat; pick up each slice of butter and press between floured fingertips into flat, nickel-sized pieces. Repeat until all butter is incorporated; toss to combine. Freeze mixture (in bowl) until chilled, about 15 minutes.

3. Spray 24-inch-square area of work surface with nonstick cooking spray; spread spray evenly across surface with kitchen towel or paper towel. Sprinkle 1/3 cup of extra flour across sprayed area; gently spread flour across work surface with palm to form thin, even coating. Add all but 2 tablespoons of buttermilk to flour mixture; stir briskly with fork until ball forms and no dry bits of flour are visible, adding remaining buttermilk as needed (dough will be sticky and shaggy but should clear sides of bowl). With rubber spatula, transfer dough onto center of prepared work surface, dust surface lightly with flour, and, with floured hands, bring dough together into cohesive ball.

4. Pat dough into approximate 10-inch square; roll into 18 by 14-inch rectangle about ¼ inch thick, dusting dough and rolling pin with flour as needed. Following illustrations below, using bench scraper or thin metal spatula, fold dough into thirds, brushing any excess flour from surface; lift short end of dough and fold in thirds again to form approximate 6 by 4-inch rectangle. Rotate dough 90 degrees, dusting work surface underneath with flour; roll and fold dough again, dusting with flour as needed.

5. Roll dough into 10-inch square about ½ inch thick; flip dough and cut nine 3-inch rounds with floured biscuit cutter, dipping cutter back into flour after each cut. Carefully invert and transfer rounds to ungreased baking sheet, spaced 1 inch apart. Gather dough scraps into ball; roll and fold once or twice until scraps form smooth dough. Roll dough into ½-inch-thick round; cut three more 3-inch rounds and transfer to baking sheet. Discard excess dough.

6. Brush biscuit tops with melted butter. Bake, without opening oven door, until tops are golden brown and crisp, 15 to 17 minutes. Let cool on baking sheet 5 to 10 minutes before serving.

Hashed Brussels Sprouts with Poppyseed and Lemon (from Orangette)

Makes 4-6 servings

1¼ pounds Brussels sprouts
1½ tablespoon lemon juice
2 tablespoon olive oil
1 garlic clove, minced
1 tablespoon poppy seeds
¼ cup white wine
¼ teaspoon salt

Cut the stems from the Brussels sprouts and remove any blemished leaves. When all the sprouts are trimmed, you should be left with about 1 pound total. Halve each sprout lengthwise, and slice each half into thin slices, about 1/8 inch thick; or, alternatively, hash them in a food processor fitted with the slicing disc attachment.

In a large bowl, toss the hashed Brussels sprouts with the lemon juice.

In a large skillet or sauté pan, warm the olive oil over high heat, almost to the smoking point. Stir in the hashed sprouts, garlic, and poppy seeds. Add the wine, and cook for about 3-4 minutes, stirring constantly, until the sprouts are bright green and lightly softened but still barely crunchy. Reduce the heat to low, season with salt, and cook for 1 minute more. Remove the pan from the heat, and serve.